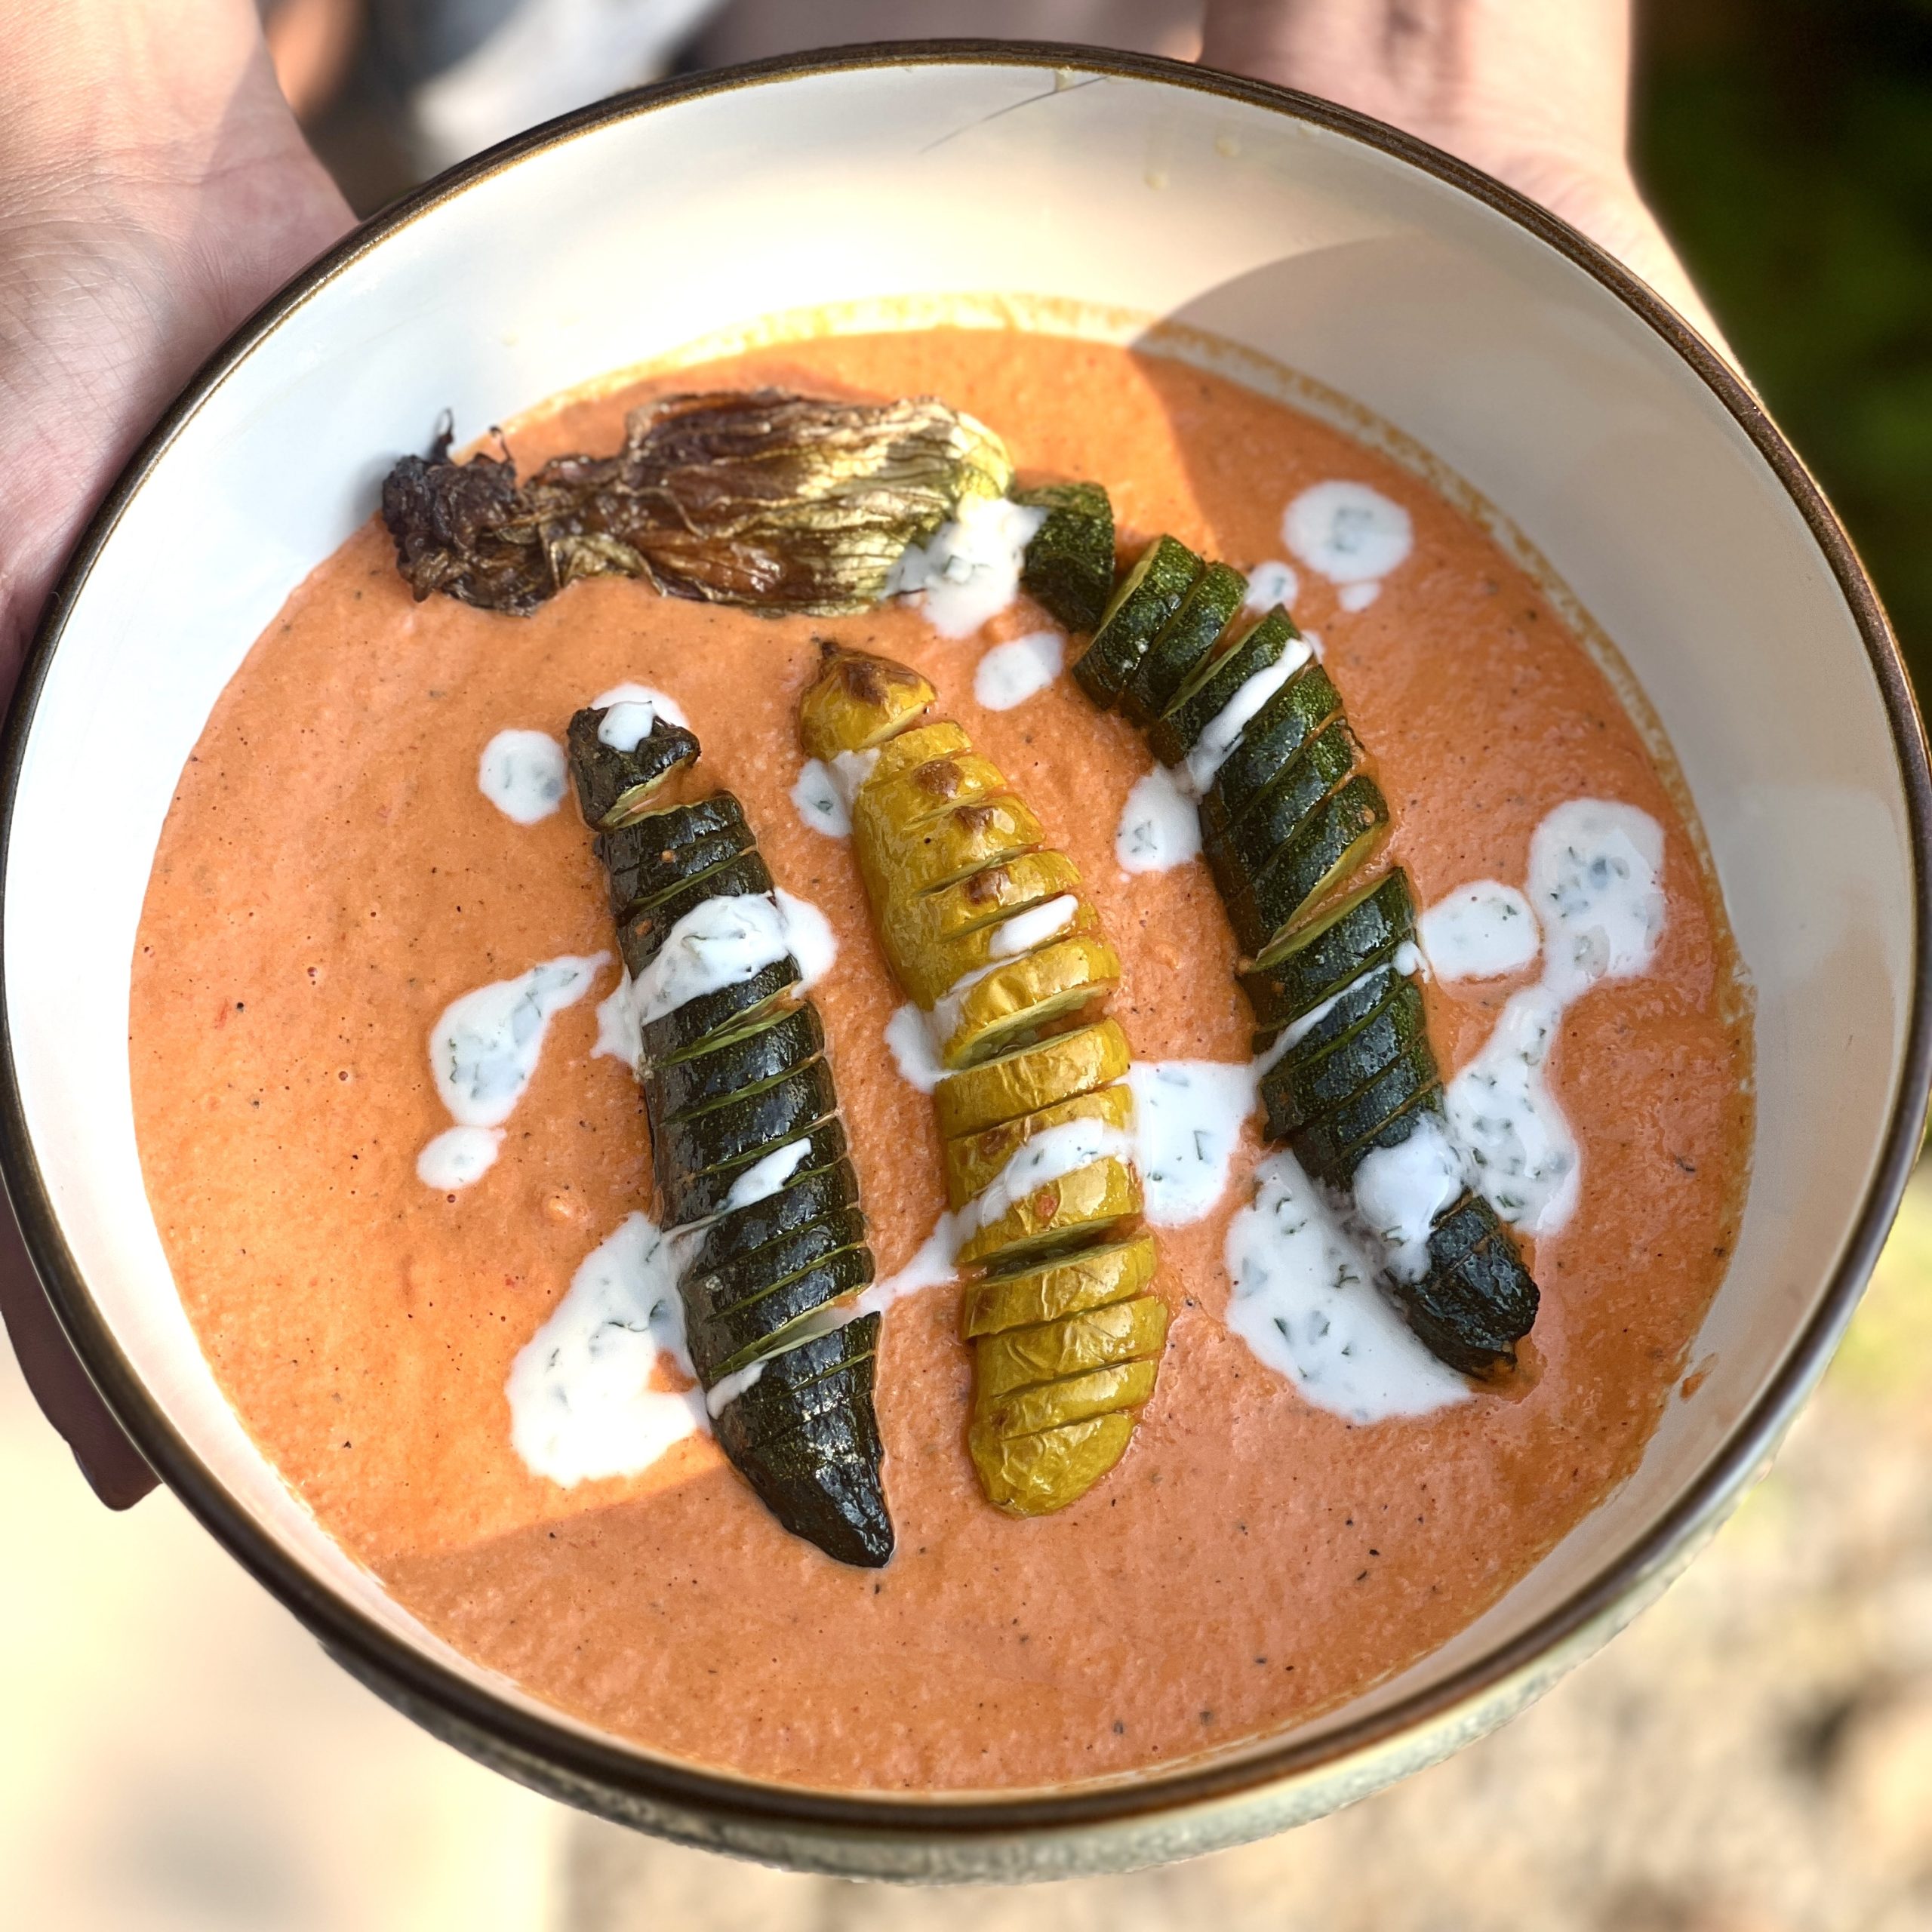
Courgette Hasselback With Romesco Sauce And Mint Yogurt
Takes 35 minutes
Serves 2
Ingredients
- 2 medium courgettes
Romesco Sauce
- 1 x 220g jarroast red pepper
- 1 clove garlic
- 100 g blanched almonds
- 8 tbsp olive oil
- 1 tbsp vinegar
- 2 tsp salt
- Pinch of ground black pepper
Yoghurt Sauce
- 250 g coconut yoghurt
- 10 g fresh mint
- 2 tbsp tahini
- Juice of 1/2 lemon
- Pinch of salt
Instructions
- Preheat the Oven:Preheat the oven to 200°C.
- Prepare the Courgettes:Slice each courgette 3/4 of the way through, spacing the slices approximately 1/2 cm apart to create a Hasselback effect. Place the courgettes on a baking tray, brush with 2 tablespoons of olive oil, and sprinkle with a generous pinch of salt. Ensure some oil gets between the slices. Bake for 20 minutes.
- Make the Romesco Sauce:While the courgettes are baking, peel the garlic cloves and add them to a food processor along with the roasted red peppers, blanched almonds, olive oil, vinegar, salt, and black pepper. Blend until smooth. Taste and adjust the seasoning if needed.
- Prepare the Yoghurt Sauce:Remove the mint leaves from the stalks and finely chop them. In a bowl, combine the mint, coconut yoghurt, tahini, lemon juice, and a pinch of salt. Mix well and adjust the seasoning to taste.
- Check the Courgettes:After 20 minutes, check on the courgettes. Open up some of the slices and add a little more oil if necessary to help them turn golden inside. Bake for a further 5 minutes, or until the courgettes are soft, slightly charred, but still holding their shape.
- Serve:In two bowls, spread a generous layer of Romesco sauce at the base. Place a courgette on top of each, then drizzle with the yoghurt sauce for a lovely finish. Enjoy!

Carrot Flapjacks
Takes 45 minutes
Serves 12
Ingredients
- 200 g jumbo oats
- 100 g carrot (grated)
- 75 g flour
- 150 ml vegetable oil
- 50 ml maple syrup
- 125 g brown sugar
- 200 g pistachios
Instructions
- Preheat the oven to 160°C.
- Finely grate the carrot into a bowl, add a tiny pinch of salt, and mix. Transfer the grated carrot to a sieve and squeeze out any excess juice.
- Remove the shells from the pistachios and roughly chop them.
- In a bowl, mix together the dry ingredients: oats, flour, brown sugar, and pistachios. Make a well in the centre.
- In another bowl, mix together the wet ingredients: vegetable oil, maple syrup, and the grated carrot.
- Add the wet ingredients to the dry ingredients and mix well.
- Line a 28 x 18 cm brownie tray with parchment paper. Add the flapjack mixture, pressing it into the corners and flattening it with the back of a spoon. Ensure it is well compacted but not overly pressed.
- Bake for 30 minutes at 160°C (for a crispier flapjack, bake at 180°C for 30 minutes).
- Remove from the oven and allow to cool for 10 minutes. While still in the tray, portion the flapjack into 16 squares (or your preferred size) using a knife. Allow it to cool fully before removing from the tray. It is very important to let the flapjacks cool completely to ensure they hold their shape.
- Store in an airtight container and enjoy! We don’t actually know how long they last beyond 7 days at room temperature, as they are always eaten before then.
The Happy Pear Podcast
This week we welcome a very special guest, the remarkable Ed Winters, also known as Earthling Ed. Ed is a prominent figure in the animal rights and veganism movement, whose passion and dedication have touched the lives of many.

Episode 123
In this episode, we dive deep into his inspiring journey, explore his impactful advocacy work, and uncover the strategies he employs to spread compassion and create a kinder world for animals.
Ed’s impressive credentials include speaking engagements at conferences and universities, captivating TEDx talks, and appearances in mainstream media. His extensive experience and knowledge have made him a respected voice within the movement.
We delve into Ed’s personal experiences and pivotal moments that led him on a path of advocating for animals. Through his deep empathy and unwavering commitment, he has shaped a mission to raise awareness and drive positive change. Ed shares his journey, revealing the transformative power of compassion and how it propels his work forward.
One of the strategies that sets Ed apart is his approach to advocacy work. He believes in the power of storytelling and empathy to connect with people on an emotional level. By highlighting the inherent value of all sentient beings, he encourages individuals to reconsider their food choices and embrace a compassionate lifestyle. Ed shares insights into the strategies he finds most effective in inspiring change and empowering others to make a difference.
Throughout the episode, we hear about the impact of Ed’s speeches, presentations, and online content. His ability to captivate audiences and foster genuine connections has left a lasting impression on many. We explore success stories and memorable moments that showcase the profound influence Ed has had on individuals, as well as the broader movement.
Ed’s vision for the future revolves around creating a kinder world for animals and the planet. He believes that compassion can revolutionise our relationship with animals, promote health, sustainability, and ethical choices. By embracing a plant-based lifestyle, we can contribute to a brighter future for all.
Join us as we explore the power of compassion and discover how each of us can play a role in creating a brighter, kinder world for all.
Enjoy!
Lots of love,
Dave & Steve
This episode is sponsored by Vivobarefoot Footwear. Vivobarefoot Footwear have given our listeners an exclusive 15% discount when you enter the code HAPPYPEAR15
Genuinely these are the only shoes you will see Dave & Steve wearing!
Produced by Sean Cahill & Sara Fawsitt
Available now from all good podcast providers:


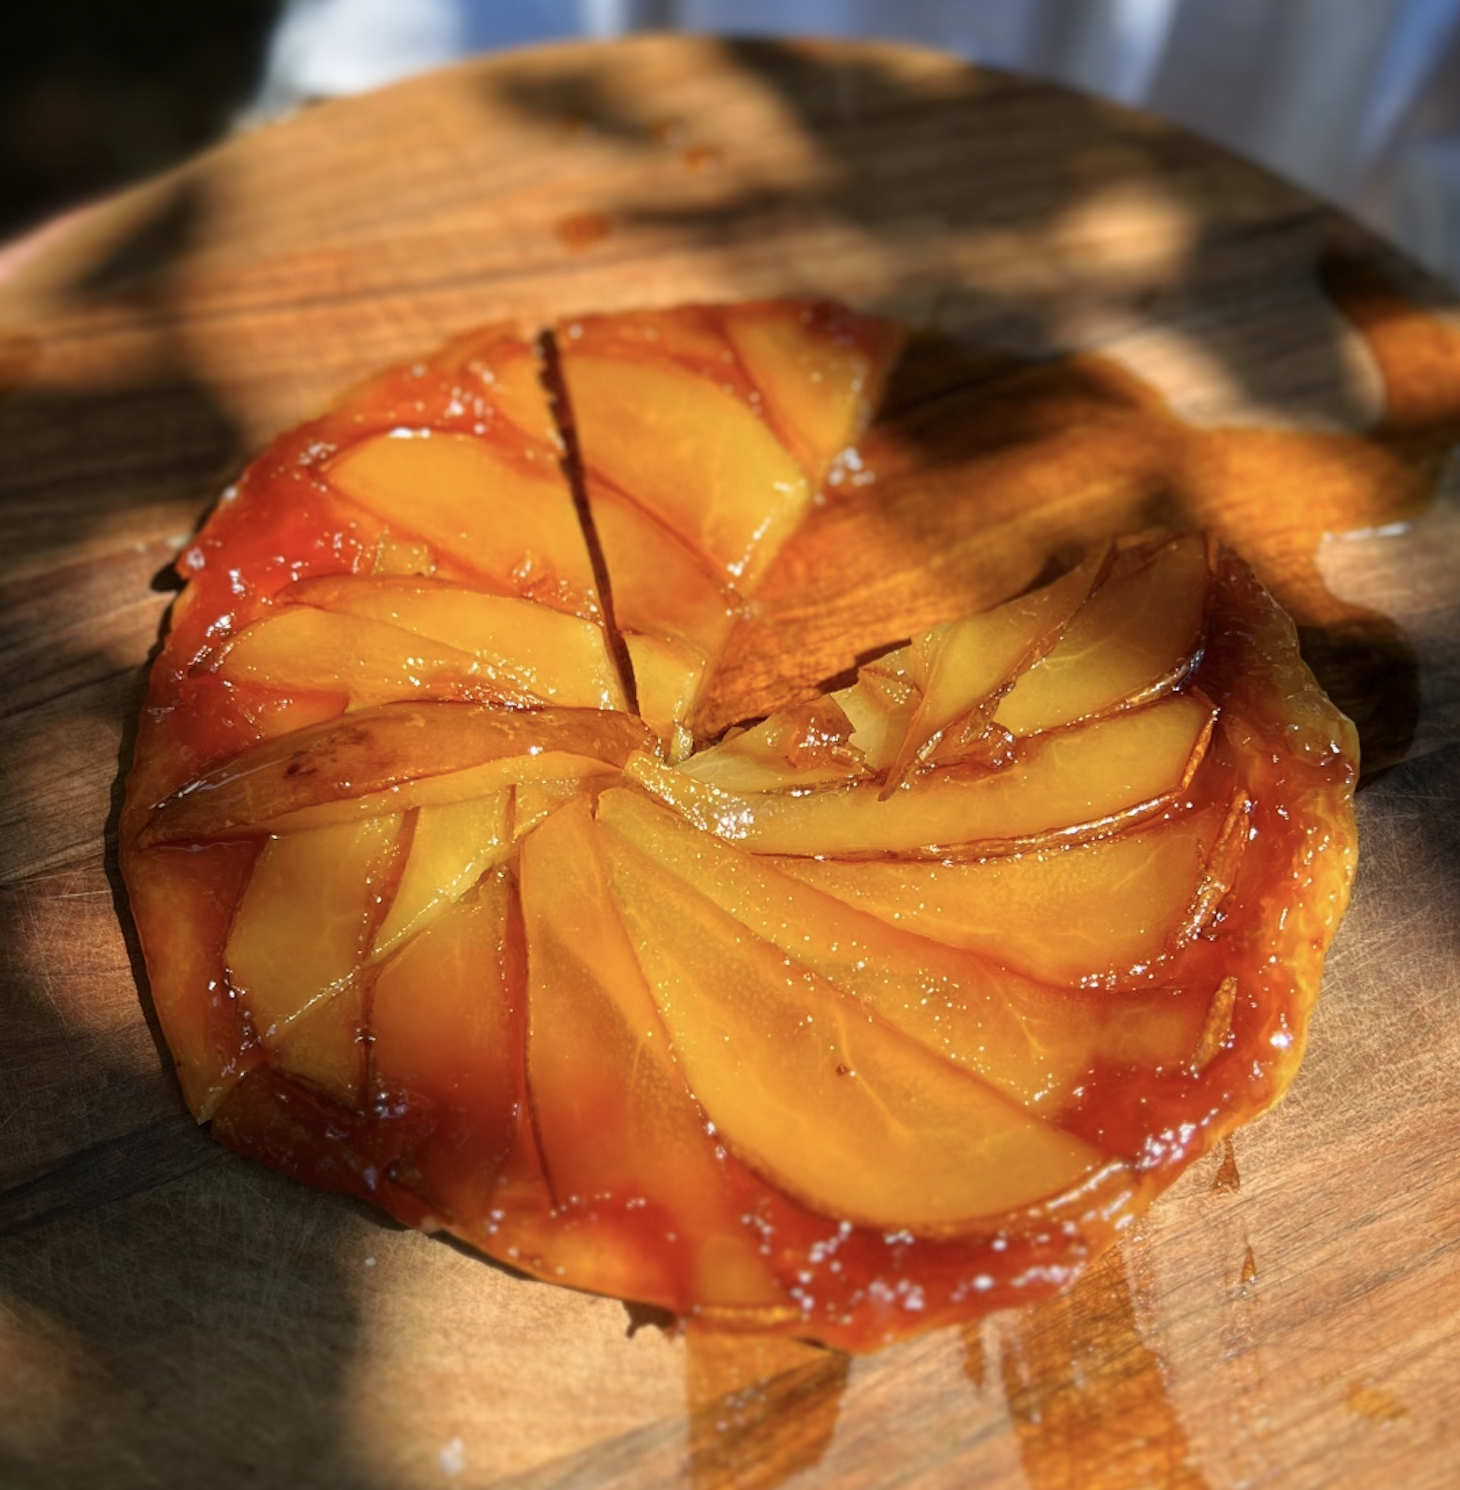
Easy Pear Tart Tatin
Takes 30 minutes
Serves 6
Ingredients
- 2 pears (ripe)
- 75 g brown sugar (or white sugar)
- 1 sheet puff pastry
Instructions
- Preheat the oven: Preheat your oven to 200°C.
- Prepare the caramel: Use an ovenproof frying pan and add 2 tablespoons of water along with the sugar. Mix until smooth, with no clumps. Place the pan on high heat and do not stir. Bring the mixture to a boil, then reduce the heat to medium and leave it to cook without stirring until the sugar turns a light shade of gold. Remove the pan from the heat.
- Prepare the pears: Slice the pears into long strips. Carefully arrange a single layer of pear slices on top of the caramel (be cautious of the hot pan and caramel). Try to shape the pears into a neat pattern, as this will be the top of your tart.
- Roll out the pastry: Roll out the puff pastry and cut it slightly larger than the pan. Carefully place the pastry on top of the pears, tucking it in around the edges.
- Bake the tart: Put the pan in the oven and bake for 20 minutes, or until the pastry turns golden.
- Flip and serve: Remove the pan from the oven. While the pan is still hot, place a board on top of the pan and flip it over confidently. The tart tatin will now be upright, with the pears and caramel on top and the pastry forming the base. Cut and enjoy!
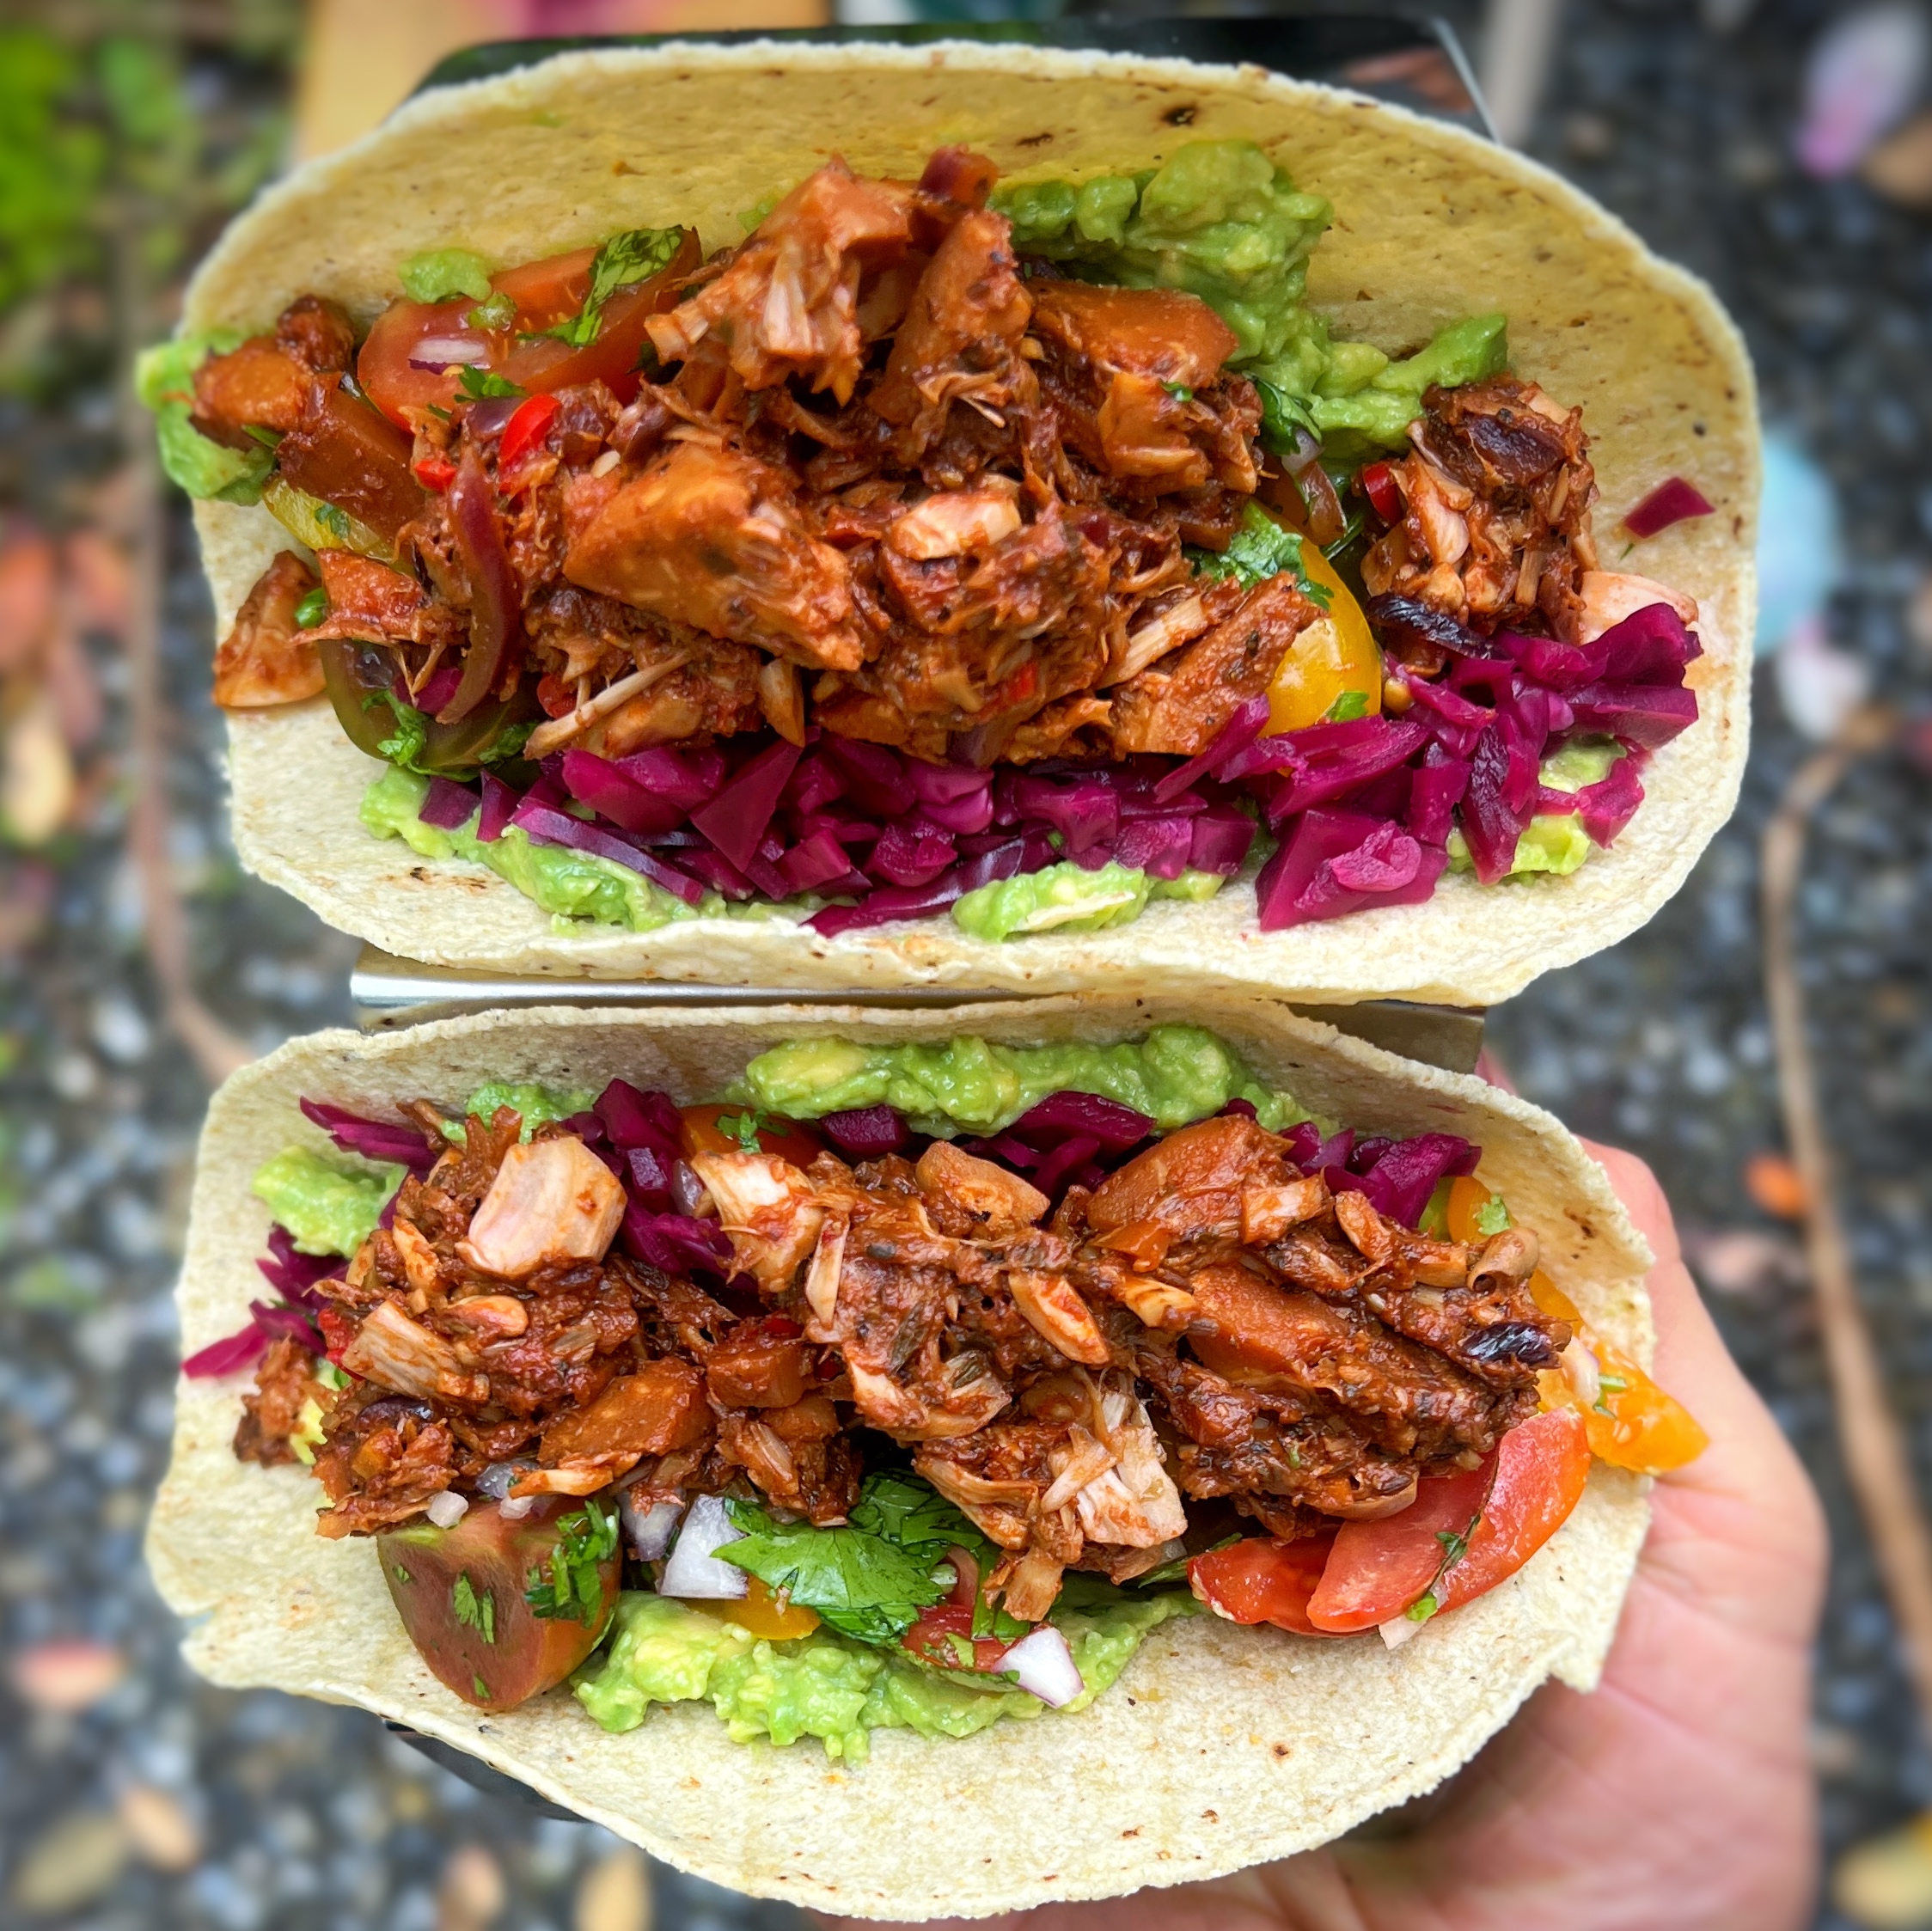
These are so incredibly tasty and they just taste like you want to eat more! The idea of caramelised banana in a salsa originally sounded like a bit of a joke but once we tried it we knew we were on to something! We make a spicy mayo, smokey spicy mushrooms and an epic caramelised banana salsa served on corn tacos.

Spicy mushroom Tacos with caramelised banana salsa
Takes
Serves 2
Ingredients
Spicy Mayo
- 100 ml plant based mayonnaise
- 1 tbsp smoked paprika
- 1 tsp chilli flakes
Caramelised Banana salsa
- 1 banana
- 100 g cherry tomatoes
- 10 g fresh coriander
- 1/2 red chilli
- 1/2 lime juice
- 1/2 red onion
- 1 tbsp oil
Spicy Mushrooms
- 150 g oyster mushrooms
- 1 tbsp cumin seeds
- 2 tbsp tamari
- 1 tbsp smoked paprika
- 1/2 tsp chilli flakes
To serve
- 4 corn tacos
Instructions
- For the spicy mayo mix together the ingredients until you get a lovely reddy sauce, this makes a delicious base layer to these tacos.
- Heat a non-stick frying pan on high heat and peel and slice the ripe banana in half and then in half lengthwise, giving you 4 pieces. Add them to the hot pan open side down and cook until they caramelise or start to go golden. Reduce the heat to low and cook at a low heat for 3-4 mins allowing them to stew slightly in their own juices. Turn off the heat and leave to cool while you prepare the rest of the ingredients for the salsa.
- Quarter the cherry tomatoes. Finely dice the red onion and coriander (or flat parsley) including the stalk. Peel and finely dice the chilli. Remove the banana from the pan and finely dice. Add all the ingredients for the salsa to the cooled pan and mix to incorporate the banana juices on the pan. Add to a bowl along with the limes juice, oil and pinch of salt. Taste and adjust the seasoning to your liking.
- Heat the same non stick pan on high heat and add 1 tbsp of oil. Rip the mushrooms into long thin stips and add to the hot pan along with the cumin seeds. Use another slightly smaller pan to compress the mushrooms. This will encourage more evaporation and concentration of their flavour as well as giving a better char (just ensure the base of the smaller pan is clean!)
- Cook until they turn brown on the bottom turn this should take anywhere from 2-4 mins and repeat. Add in the tamari and maple syrup and mix through and allow to cook down for 1-2 mins. Remove from the heat. Taste and adjust the seasoning to your liking.Cut the avocado in half remove the flesh and slice into long slices.
- To assemble, get the corn taco, add a generous dollop of spicy mayo, followed by the caramelised banana sala, followed by some avocado slices and lastly the mushrooms on top. Repeat the the remaining ingredients and tacos and enjoy!

Burnt Leek Spaghetti and Miso Salsa
Takes 30 minutes
Serves 2
Ingredients
- 2 leeks (600g)
- 1 tbsp miso
- 15 g flat-leaf parsley
- ½ red chilli
- ½ lemon (juiced)
- 2 cloves garlic
- 3 tbsp olive oil
- 1 tbsp capers (drained)
To serve
- 3 tbsp sauerkraut
- 20 g toasted walnuts (crushed)
Instructions
- Prepare the leeks:Wash the leeks thoroughly to ensure there is no sediment inside the green part.Preheat the oven to 250°C (or, if using a wood-fired oven, light a fire and wait until it reaches 250°C).
- Cook the leeks:Place the leeks, unpeeled, into the oven and cook until the outside is burnt all over. Turn them every 5-7 minutes to ensure an even char. The leeks should be black on the outside (don’t worry!) and soft inside, indicating they are cooked through.
- Make the salsa:While the leeks are cooking, prepare the salsa. Peel and finely dice the garlic, finely dice the red chilli, and chop the flat-leaf parsley.Add the garlic, chilli, parsley, miso, lemon juice, olive oil, and capers to a pestle and mortar or blender. Grind or blend until smooth but with a bit of texture remaining.
- Assemble the dish:Remove the leeks from the oven and allow them to cool for a few minutes so they are easier to handle. Once cool, peel off the burnt outer layer, revealing the soft green insides.Tear the leeks into long strips, resembling spaghetti, and divide them between two plates.Drizzle the salsa over the leeks, garnish with sauerkraut, and sprinkle the crushed walnuts on top.Serve and enjoy!
The Happy Pear Podcast
Dr. Peter Lovatt, also known as “Dr. Dance,” is a renowned psychologist and researcher who has dedicated his career to exploring the relationship between movement and human behavior. He is an expert in the field of dance psychology, and his work has been featured in numerous academic journals and media outlets.

Episode 122
In the latest episode we sit down with Dr. Dance to discuss the many benefits of dance and movement, both for physical health and mental well-being. Throughout the episode, we explore topics such as the connection between movement and creativity, the role of dance in building social connections, and the positive effects of dance on mental health.
With his infectious energy and enthusiasm, Dr. Dance shares his wealth of knowledge and insights on the power of movement to transform our lives. Whether you’re a seasoned dancer or a complete novice, this episode is sure to leave you feeling inspired and motivated to get up and move your body!
So, if you’re looking for some uplifting and informative listening, be sure to check out this episode with Dr. Peter Lovatt, aka “Dr. Dance.”
Lots of love,
Dave & Steve
This episode is sponsored by Vivobarefoot Footwear. Vivobarefoot Footwear have given our listeners an exclusive 15% discount when you enter the code HAPPYPEAR15
Genuinely these are the only shoes you will see Dave & Steve wearing!
Produced by Sean Cahill & Sara Fawsitt
Available now from all good podcast providers:
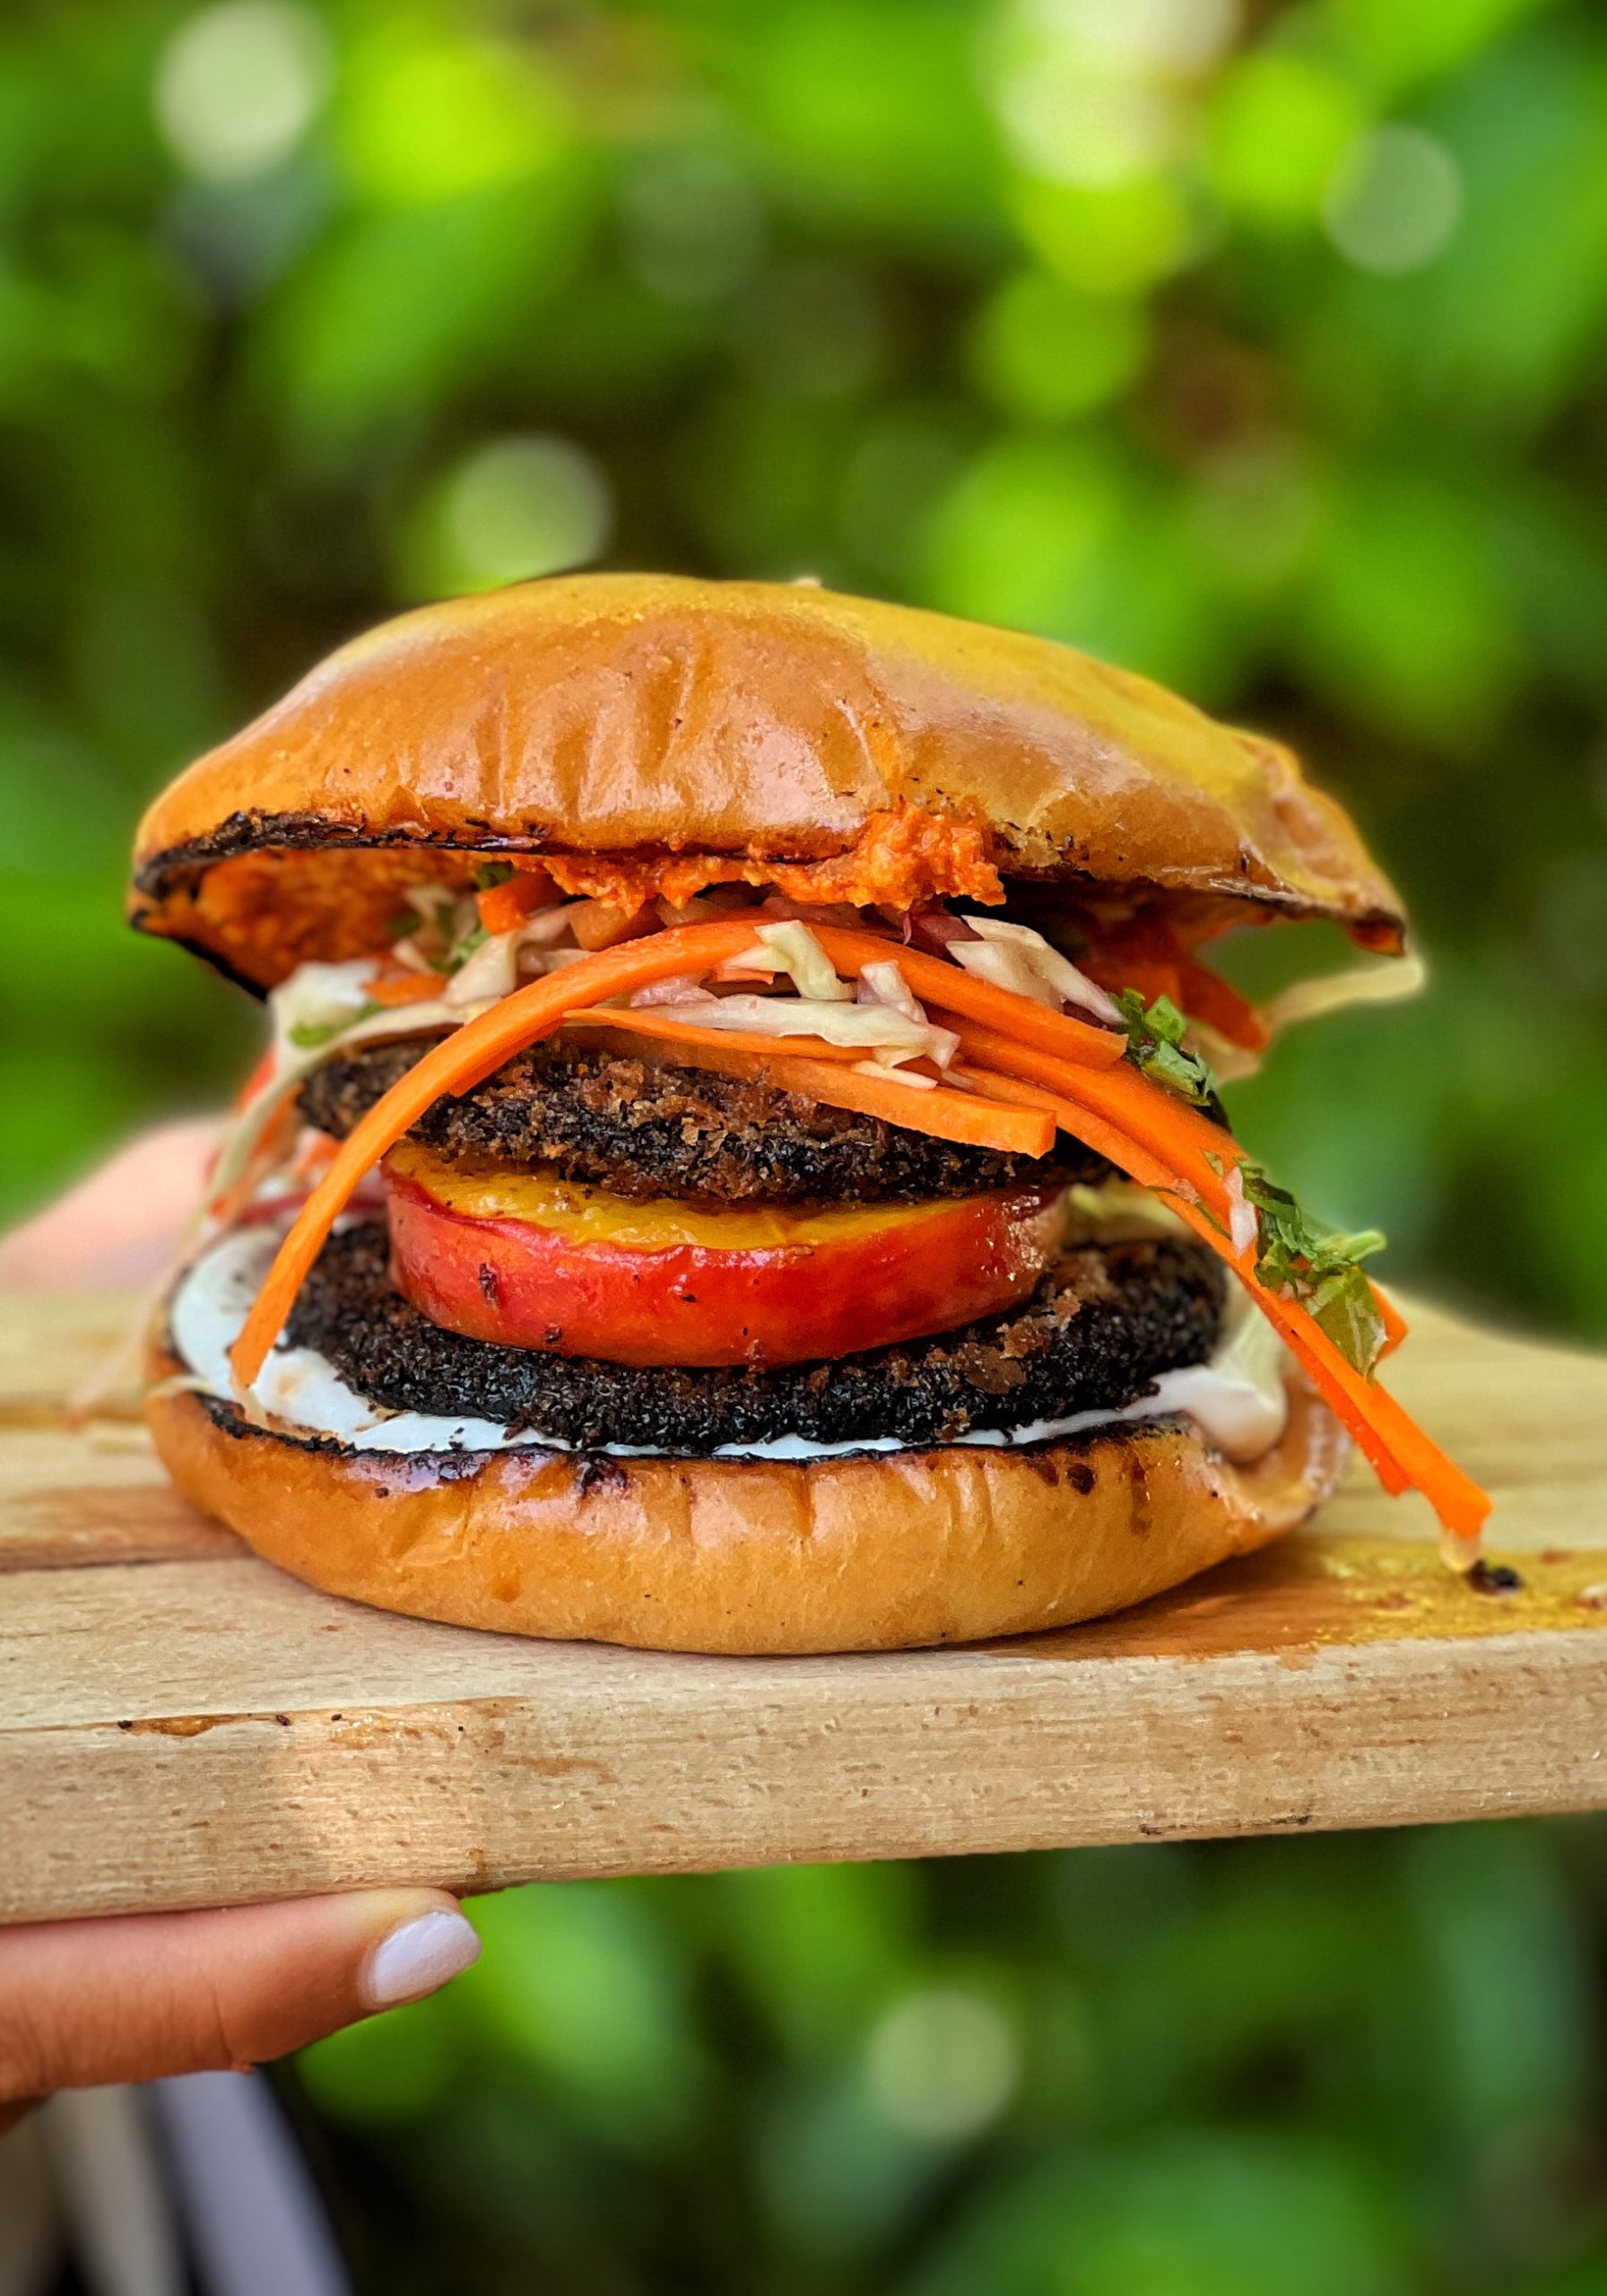
Jerk mushroom, charred peach & Caribbean picklese burger
Takes 43 minutes
Serves 2
Ingredients
- 4 large portobello mushrooms
- 3 tbsp tamari / soy sauce
- 3 tbsp maple syrup (2 tbsp for the mushrooms, 1 tbsp for the peaches)
- 2 tbsp jerk seasoning
- 50 g breadcrumbs
- 3 tbsp oil
- 30 g flour
- 100 ml plant-based milk
- 1 fresh ripe peach
PICKLESE
- 50 g cabbage
- 1/2 carrot
- 1/2 green or red pepper
- 1 small red onion
- 1 clove garlic
- pinch ground clove
- pinch ground cinnamon
- 1/2 tsp black pepper
- juice of 1 lime
- 1/2 tsp salt
- 200 ml vinegar of choice
To serve
- 3 tbsp pesto (we used our spicy red pepper pesto)
- 4 tbsp vegan mayo
- 2 burger bun
Instructions
- Make the Picklese: Finely slice the cabbage or grate it. Finely slice/julienne the carrot, pepper, red onion, and garlic. Dice the chilli, leaving the seeds in if you want more heat. Mix with the salt, black pepper, cinnamon, clove, and lime juice. Transfer the mixture to a jar, cover with the vinegar of choice until fully submerged, and let it pickle while you prepare the other components.
- Prepare the Mushrooms: Heat a non-stick pan on high heat. Once hot, add 1 tsp oil and the mushrooms, ensuring they are well spread out. Compress the mushrooms using another clean pan to help evaporate moisture and concentrate the flavours. Cook for 3-4 minutes on each side until golden.
- Glaze the Mushrooms: Add tamari and maple syrup to the pan and mix until the mushrooms are well coated. Turn off the heat and move the mushrooms around the pan to absorb the glaze evenly on both sides.
- Coat the Mushrooms: Place flour in one bowl, plant-based milk in a second bowl, and breadcrumbs mixed with 1 tsp of jerk seasoning and a pinch of salt in a third bowl. Coat the cooked mushrooms first in the flour, then dip in the milk, and finally coat with the breadcrumbs. Repeat for all mushrooms.
- Fry the Mushrooms: Heat 2 tbsp oil in a non-stick pan on high heat. Once hot, cook the mushrooms for 2 minutes on each side until golden and crispy. Set aside
- Char the Peaches: Cut the peach in half, remove the stone and slice into four pieces. Heat a non-stick pan on high and cook the peach slices for 2 minutes on one side. Add 1 tbsp maple syrup and move the peach slices to coat them evenly. Cook until charred and golden. Remove and set aside.
- Toast the Buns: Toast the burger buns in the pan for 1-2 minutes until golden.
- Assemble the Burgers: Spread vegan mayo on the bottom bun and pesto or ketchup on the top bun. Place a mushroom burger on each bottom bun, followed by 2 slices of charred peach. Top with a generous portion of picklese. Finish with the top bun and enjoy!
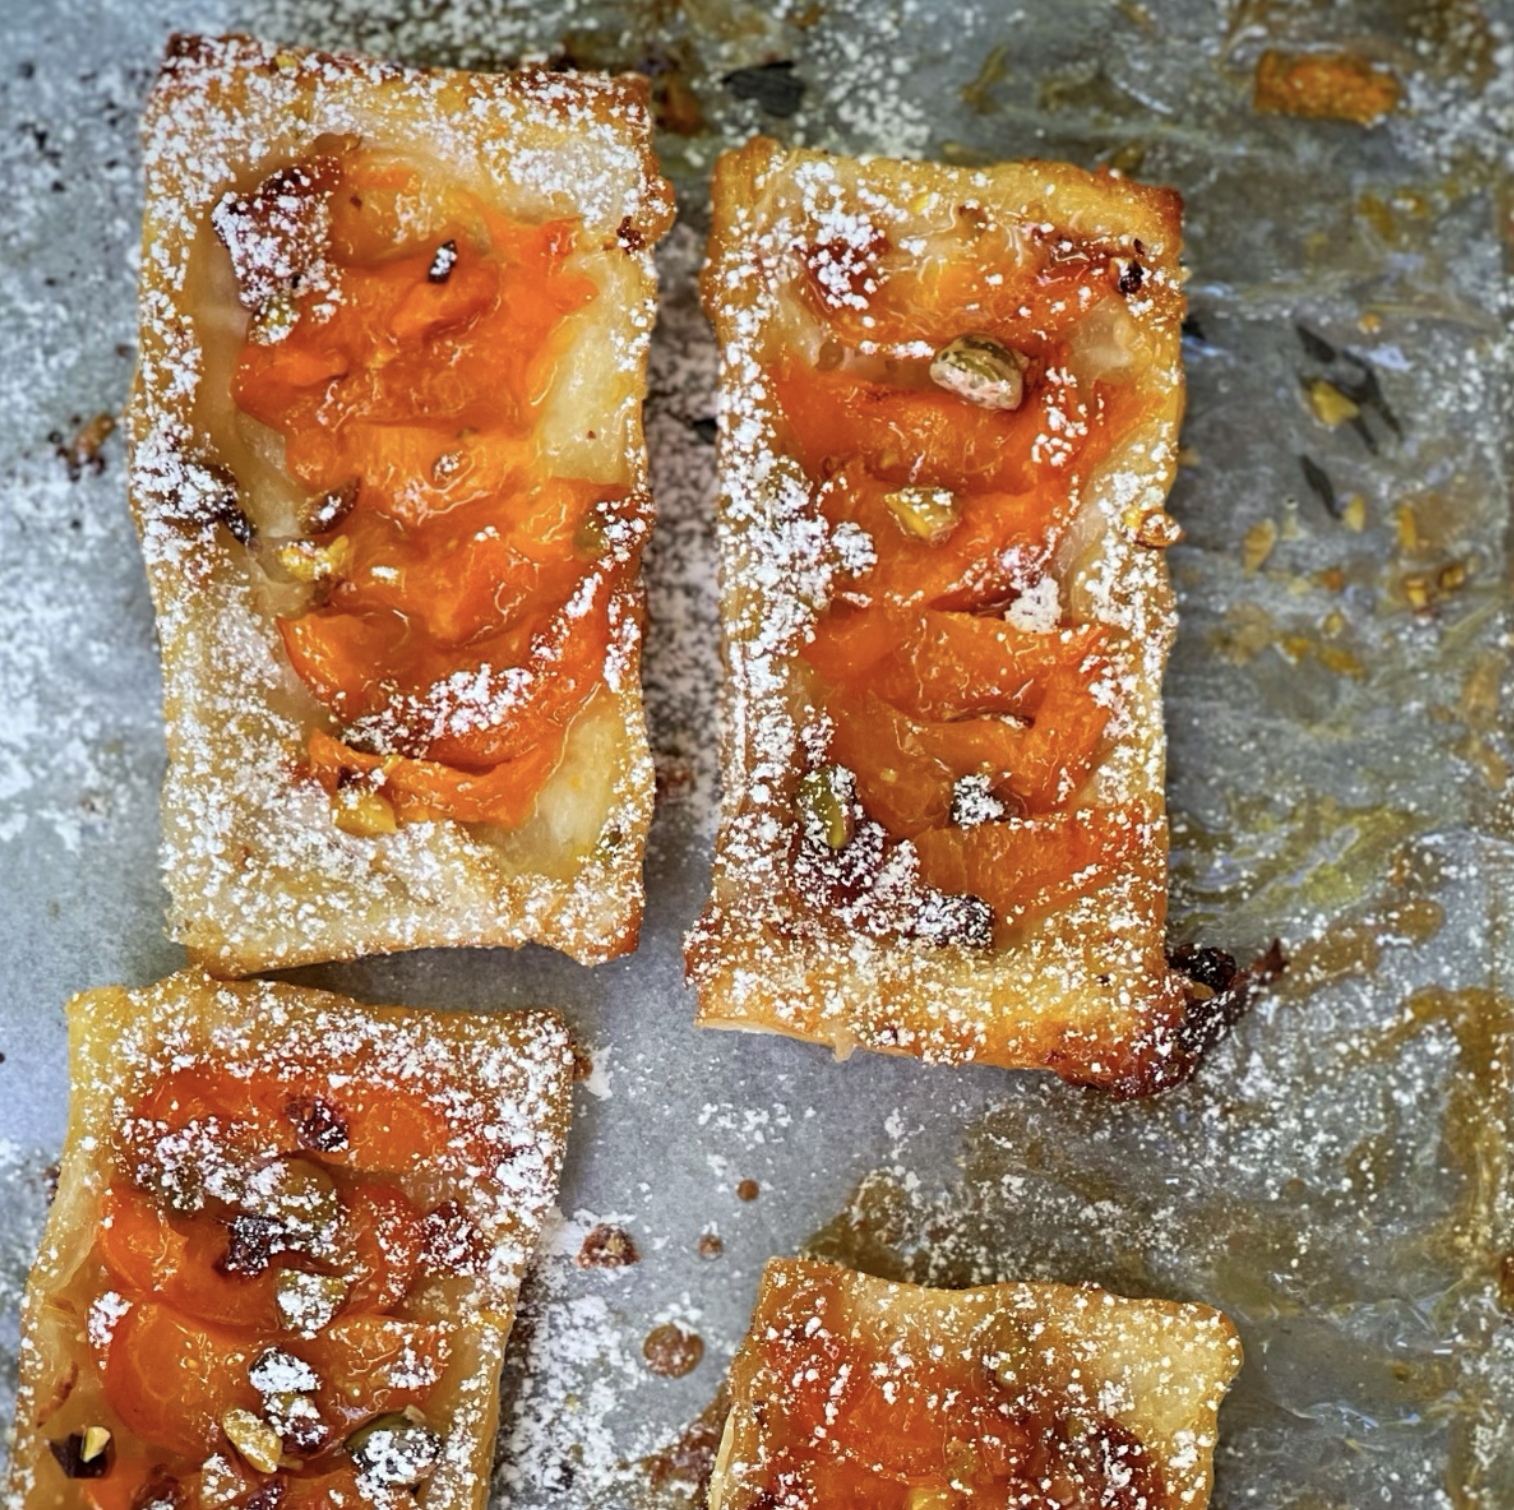
Maple Glazed Apricot and Pistachio Slice
Takes 30 minutes
Serves 4
Ingredients
- 4 apricots
- handful pistachios crushed
- 50 ml maple syrup
- 1 sheet puff pastry
- 20 g icing sugar
Instructions
- Preheat the Oven:Preheat the oven to 180°C.
- Prepare the Baking Tray:Line a baking tray with baking parchment. Drizzle 4 tablespoons of maple syrup onto the parchment in small patches where the pastries will sit.
- Prepare the Pistachios and Apricots:Finely slice the pistachios and sprinkle them over the maple syrup patches. Slice the apricots into approximately 8 slices per apricot and place them on top of the pistachios.
- Prepare the Puff Pastry:Slice the puff pastry sheet into 4 rectangles, each about 12 cm x 6 cm. Place these on top of the maple syrup, pistachio, and apricot layers, pressing down so the maple syrup coats the bottom side of the pastry. If any maple syrup seeps out, brush it on top of the pastry.
- Bake:Place the tray in the preheated oven and bake for 25 minutes until the pastry is golden and crispy.
- Finish and Serve:Remove the tray from the oven and, using a palette knife, carefully lift each slice and flip it over so the apricot side is facing up. Dust with icing sugar using a sieve before serving.
The Happy Pear Podcast
In this weeks’s episode we sit down with Colman Power, a fitness coach and personal trainer with over 20 years of experience in the health and wellness industry. Colman is also an expert in organic horticulture and has a wealth of knowledge to share on growing your own vegetables and herbs.

Episode 121
During the episode, Colman shares his passion for organic gardening and the benefits of growing your own produce. He explains how easy it can be to get started, even if you have limited space or experience. We discuss topics such as companion planting, soil health, and the importance of organic methods in promoting biodiversity and protecting the environment.
But it’s not just about gardening – Colman also provides insights on how to incorporate the fresh fruits and veggies you grow into your meals. He shares his favorite recipes and ideas for making the most of your harvest. He also discusses the importance of functional movement and how gardening can actually be a form of exercise.
A great episode which we had the pleasure of recording in person!
Lots of love,
Dave & Steve
This episode is sponsored by Vivobarefoot Footwear. Vivobarefoot Footwear have given our listeners an exclusive 15% discount when you enter the code HAPPYPEAR15
Genuinely these are the only shoes you will see Dave & Steve wearing!
Produced by Sean Cahill & Sara Fawsitt
Available now from all good podcast providers:
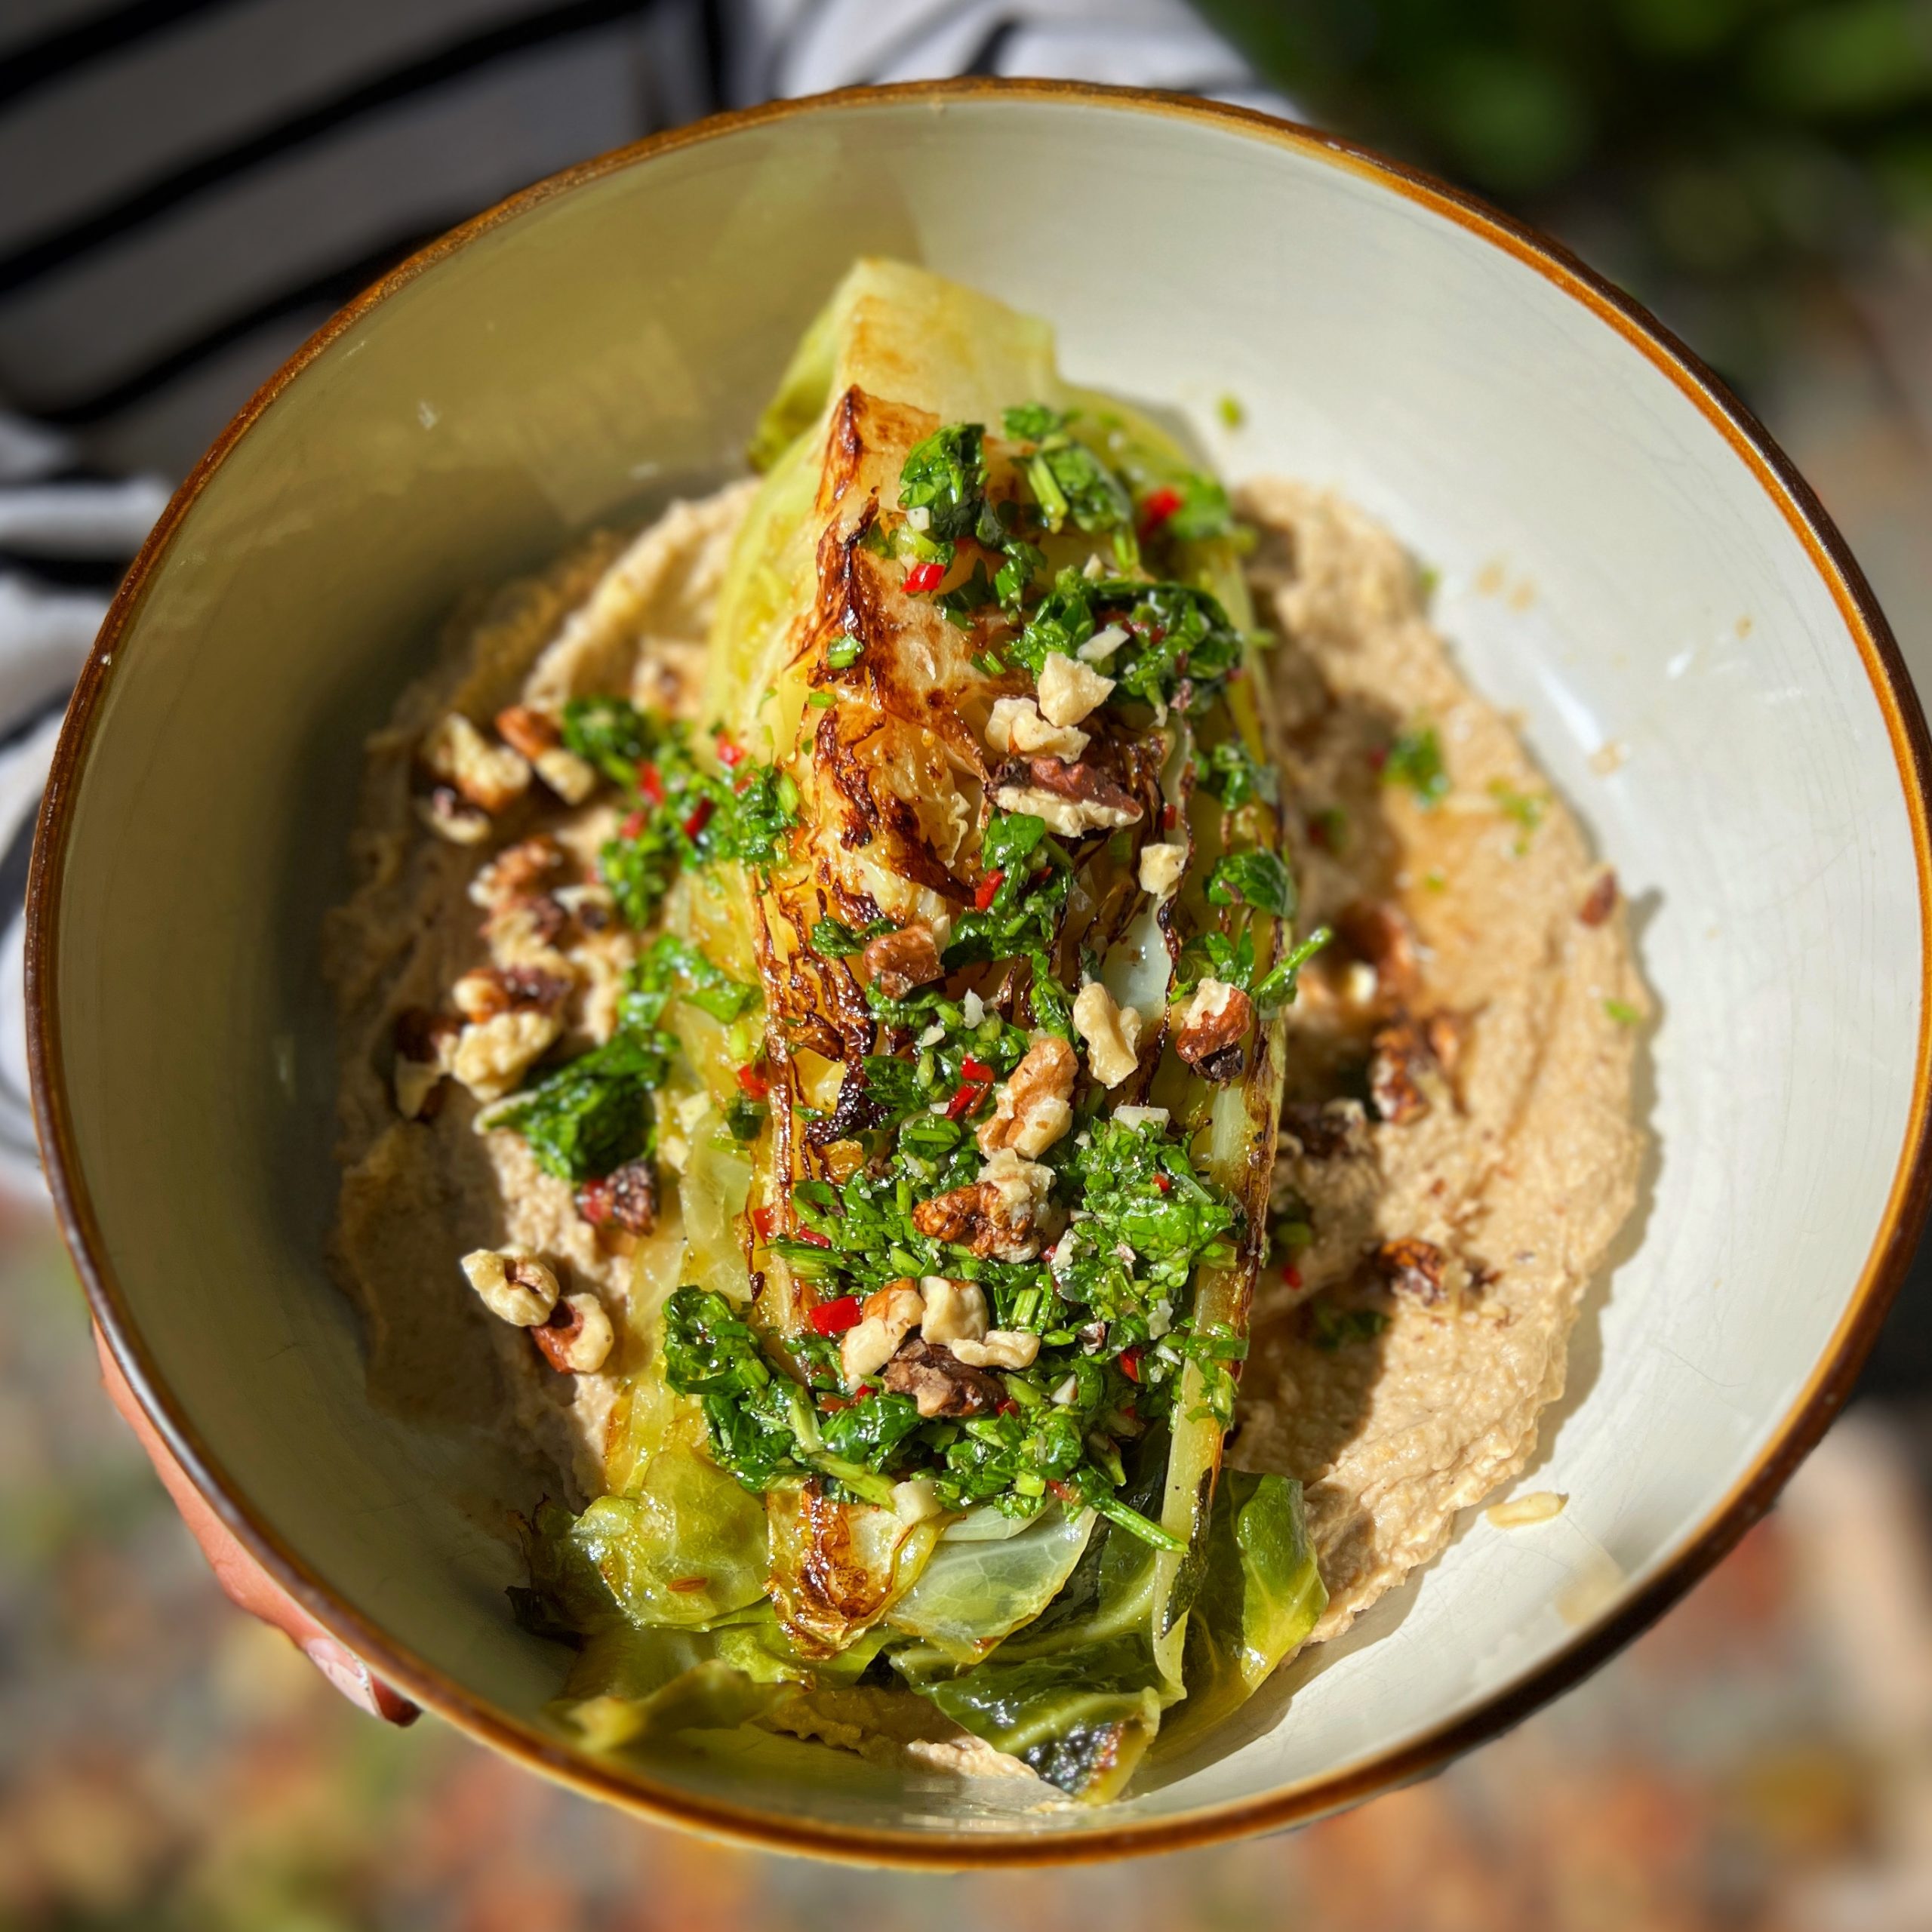
Charred Cabbage with Chimicurri
Takes 30 minutes
Serves 2
Ingredients
- 1 york or pointed cabbage
- 1 tsp pink peppercorns (optional)
- 1 tbsp cumin seeds (optional)
- ½ tsp chilli flakes (optional)
- 3 tbsp oil for frying
Chimichurri Sauce:
- ½ red chilli
- 2 garlic cloves
- 10 g fresh coriander
- 5 g fresh flat-leaf parsley
- 60 ml olive oil
- 40 ml red wine vinegar
- ½ tsp salt
For Serving:
- 180 g caramelised onion hummus
Instructions
- Prepare the Cabbage:Fill and boil the kettle. Cut the cabbage into 4 quarters, ensuring to keep the stalk on each piece so they hold their shape when cooked. Place the cabbage in a saucepan, add a generous pinch of salt, and cover with boiled water. For extra flavour, you can add 1 tsp pink peppercorns, 1 tbsp cumin seeds, and ½ tsp chilli flakes (all optional). Cover the pan with a lid and boil for about 10 minutes, until the cabbage is soft but still holding its shape.
- Make the Chimichurri Sauce:While the cabbage is cooking, prepare the chimichurri sauce. Peel and finely dice the garlic, finely chop the chilli (omit for less spice), and finely chop the parsley and coriander. Add everything to a bowl, along with a pinch of salt, the olive oil, and the red wine vinegar. Mix well and adjust the seasoning to taste. The sauce should be fresh, acidic, and well balanced.
- Char the Cabbage:Drain the cooked cabbage. Heat a frying pan over high heat, add 3 tbsp of oil, and wait until the oil is very hot. Add the cabbage quarters and cook for 3-4 minutes on each side until charred and golden. Sprinkle with a pinch of coarse sea salt while cooking.
- Assemble the Dish:Spread the caramelised onion hummus onto a large serving plate. Arrange the charred cabbage quarters on top, and drizzle or spoon over the chimichurri sauce.
The Happy Pear Podcast
Dr. Kathryn Pinkham is a highly esteemed sleep specialist with over a decade of experience helping people overcome their sleep issues. She is the founder of The Insomnia Clinic, which is a private clinic based in London that offers a range of evidence-based treatments for insomnia and other sleep disorders. Kathryn has also worked with a variety of well-known clients, including professional athletes, business leaders, and celebrities.

Episode 120
During this episode, Kathryn discusses the importance of getting a good night’s sleep and how it can impact our overall health and wellbeing. She shares some helpful tips and tricks for improving our sleep habits, including setting a regular sleep schedule, creating a calming bedtime routine, and avoiding screens before bed.
Kathryn also discuss the impact of stress and anxiety on sleep, as well as the benefits of mindfulness and relaxation techniques for improving sleep quality.
Overall, this episode is a must-listen for anyone struggling with sleep issues or looking to improve their overall sleep hygiene.
Lots of love,
Dave & Steve
This episode is sponsored by Vivobarefoot Footwear. Vivobarefoot Footwear have given our listeners an exclusive 15% discount when you enter the code HAPPYPEAR15
Genuinely these are the only shoes you will see Dave & Steve wearing!
Produced by Sean Cahill & Sara Fawsitt
Available now from all good podcast providers:
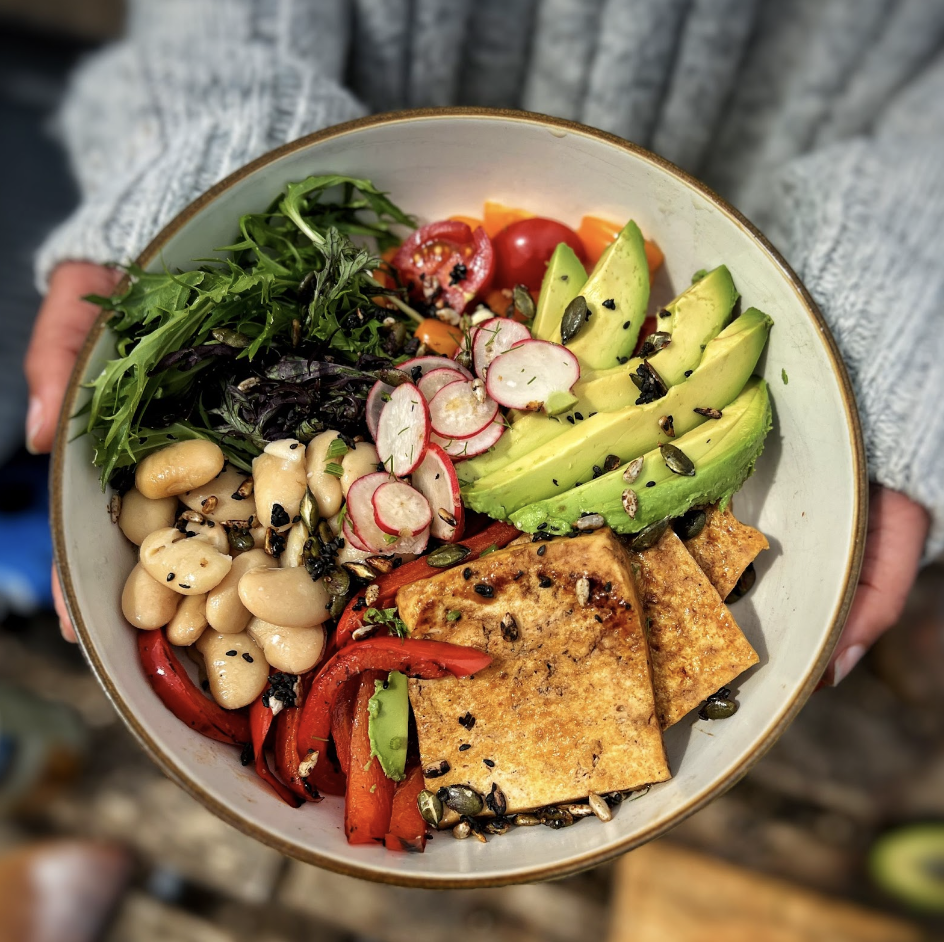
Beauty Bowl
Takes 20 minutes
Serves 2
Ingredients
- 1 red pepper
- 100 g green leaves
- 160 g firm tofu
- 2 tbsp tamari
- 1 tbsp maple syrup
- 1 tsp vinegar
- 50 g mixed seeds
- 12 cherry tomatoes
- 1 avocado
- 150 g cooked butter beans
Pickled Radish
- 4-5 radishes
- 40 ml apple cider vinegar
- Pinch of salt
- 5 g fennel (herb of choice)
To serve
- 2 slices sourdough
Instructions
- Make the pickled radishes:Thinly slice the radishes along with your herb of choice. Place in a glass or small bowl, add a pinch of salt, and cover with the apple cider vinegar (or vinegar of choice). Mix and leave to sit while you prepare the rest of the bowl.
- Prepare the pepper:Slice the red pepper into long strips. Heat a griddle pan or non-stick frying pan over high heat. Once hot, add the peppers with no oil and fry them on both sides until they start to char around the edges, about 5-7 minutes. Remove from heat and set aside.
- Cook the tofu:Slice the tofu into 4 pieces. Using the same hot pan, sear the tofu on both sides over high heat until it turns lightly golden brown. Mix the tamari, maple syrup, and vinegar together, then pour over the tofu. Move the tofu around in the pan to absorb the sauce. As the sauce cools, it will thicken and glaze the tofu. Remove from the pan and set aside.
- Toast the seeds:Keep the pan hot and add the mixed seeds. Stir regularly while cooking, and when the sesame seeds begin to pop (about 4-5 minutes), remove from heat.
- Prepare the vegetables:Drain and rinse the butter beans. Cut the avocado in half, remove the stone, scoop out the flesh, and slice into long strips. Quarter the cherry tomatoes.
- Assemble the bowl:Divide the green leaves between two bowls. Arrange the tofu, red pepper, butter beans, avocado slices, and cherry tomatoes on top. Remove the radishes from the vinegar and divide between the bowls. Sprinkle the toasted seeds on top. Serve with sourdough slices and enjoy!
Nutrition
This is a lovely healthier take on the classic, the airfryer means we don’t have to deep fry our “fish” thus reducing the oil content by approx 60%. Here we use tofu as our “fish” and by coating in a little seaweed and some tamari delivers a great flavour – we used the instabrand vortex plus versazone airfryer as the 2 drawers meant we could cook the “fish” and chips at the same time and have them finish together!
Here we used an Instant Versazone – Save 15% on any full price Instant air fryer with code HAPPY until 31st May.
Click here to avail of the offer
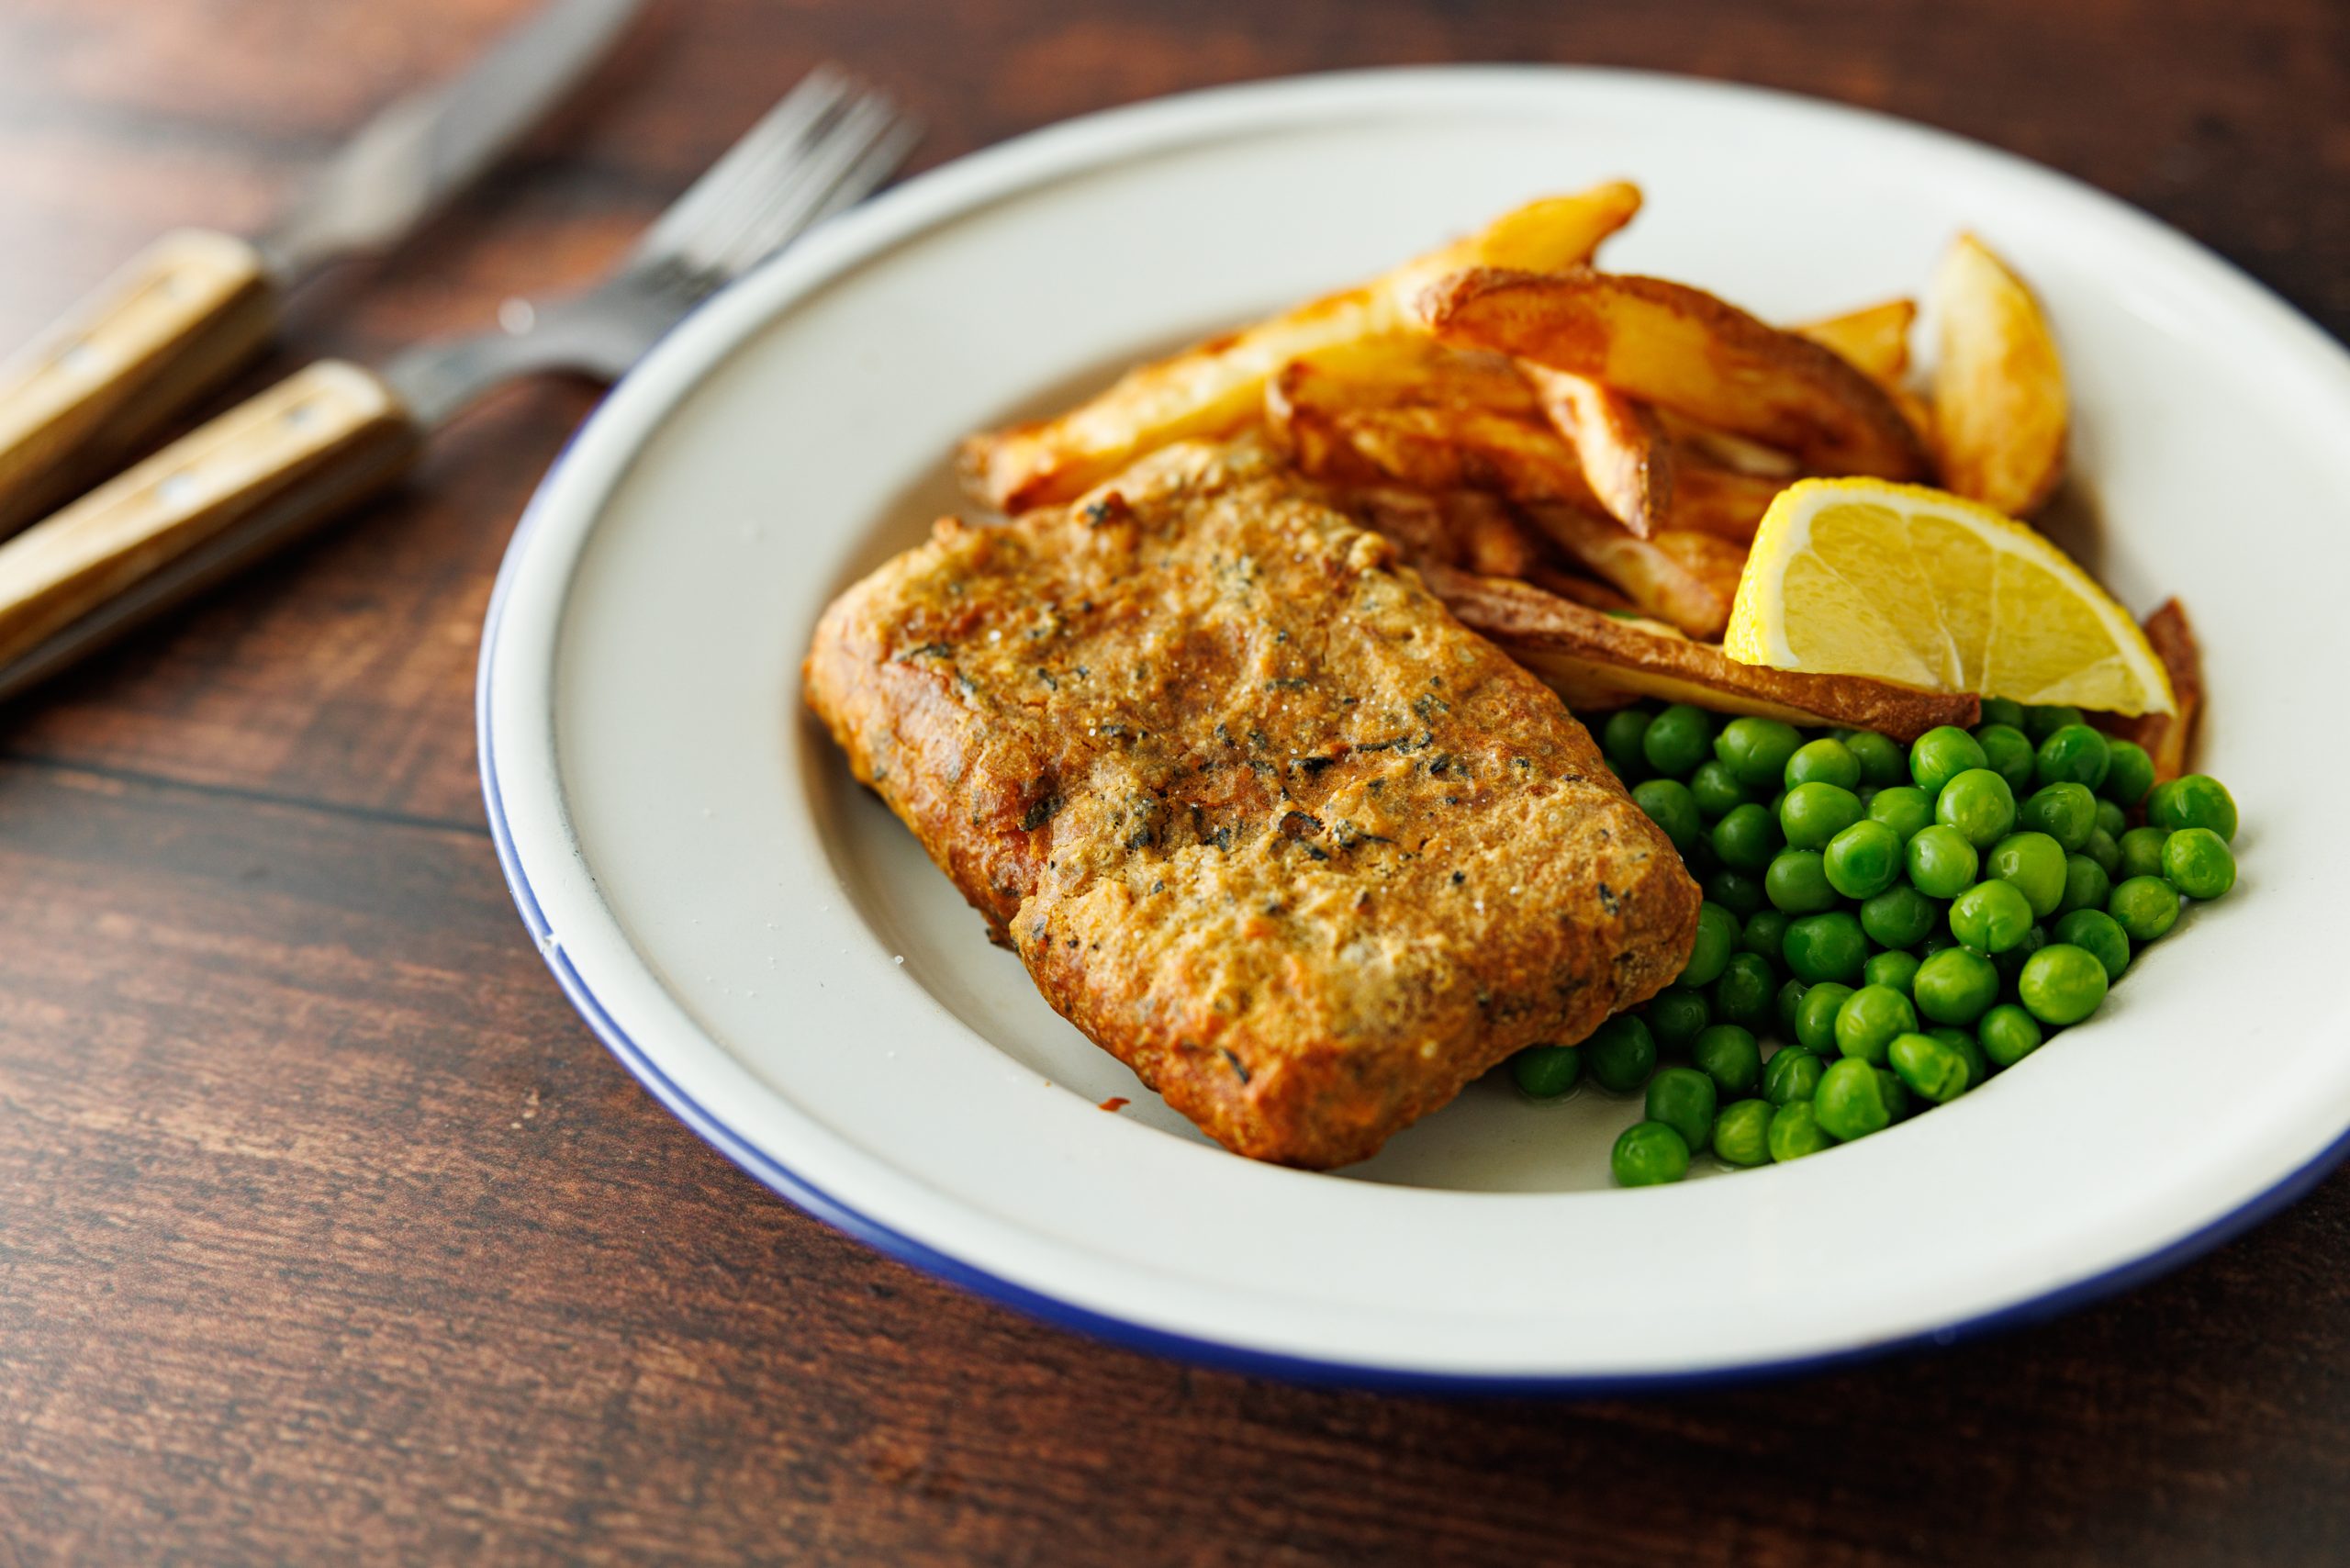
Beer Battered “Fish” Fingers and Chips in an airfryer
Takes 14 minutes
Serves 2
Ingredients
Beer Umami Bath
- 60 ml Ale / Beer of Choice
- 45 ml Tamari / Soya Sauce
Dry Sea Mix
- 35 g Cornflour
- 60 g Plain Flour
- 3 g Dry Seaweed of Choice / Seaweed Powder
- 1/4 tsp Salt
- 1/6 tsp Garlic Powder
Base Coat
- 200 g Firm Tofu
- Spray Oil for browning
Chips
- 400 g Potatoes
- Salt
Instructions
For the chips:
- Preheat the airfryer to 200 degrees c
- Cut the potatoes into chip size (approx 1cm x 1cm x 8cm) , rinse them in cold water and leave them to soak for a minute or 2 and rinse again. This process will remove some of the starch and result in a crispier chip! Add to one side of the airfryer and add 1/3 tsp of salt and 5 sprays of oil and mix well.
- Put them on bake function on the airfryer for 25 mins at 200 degrees c. If using an instabrand vortex plus versazone airfryer, use the dual sync function so the chips and the tofu end at the same time.
For the Tofu:
- Finely dice or rip up the seaweed, if using a sheet of nori finely dice using a knife and if using the likes of arame seaweed just finely dice with a knife or use a pestle and mortar, you want it to be a fine almost powder-like texture.
- Get 2 bowls, one for the beer and tamari mix, and one for the dry sea mix. Cut the tofu into long rectangle strips, approx 5cm x 10cm x 1cmIn the first bowl mix the seaweed, flour, cornflour, salt and garlic powder. In the second bowl mix together the beer and tamari/ soy sauce.
- Dip the tofu in the beer tamari mix, then into the dry sea mix, and repeat 3 times to give it a good coat that doesn't run.
- Carefully place in the airfryer and spray with an oil spray approx 5-10 times, this will give a more even golden colour, bake for 15 mins at 200 degrees c.
- Twice during the cooking process remove the tofu and coat in the tamari beer mixture and then the dry mixture and then the tamari beer mixture and put back in the airfryer to cook. This will ensure you get a good crusty batter.
- Once cooked, remove and serve the battered “fish” and chips with some peas and a slice of lemon, enjoy!
Video
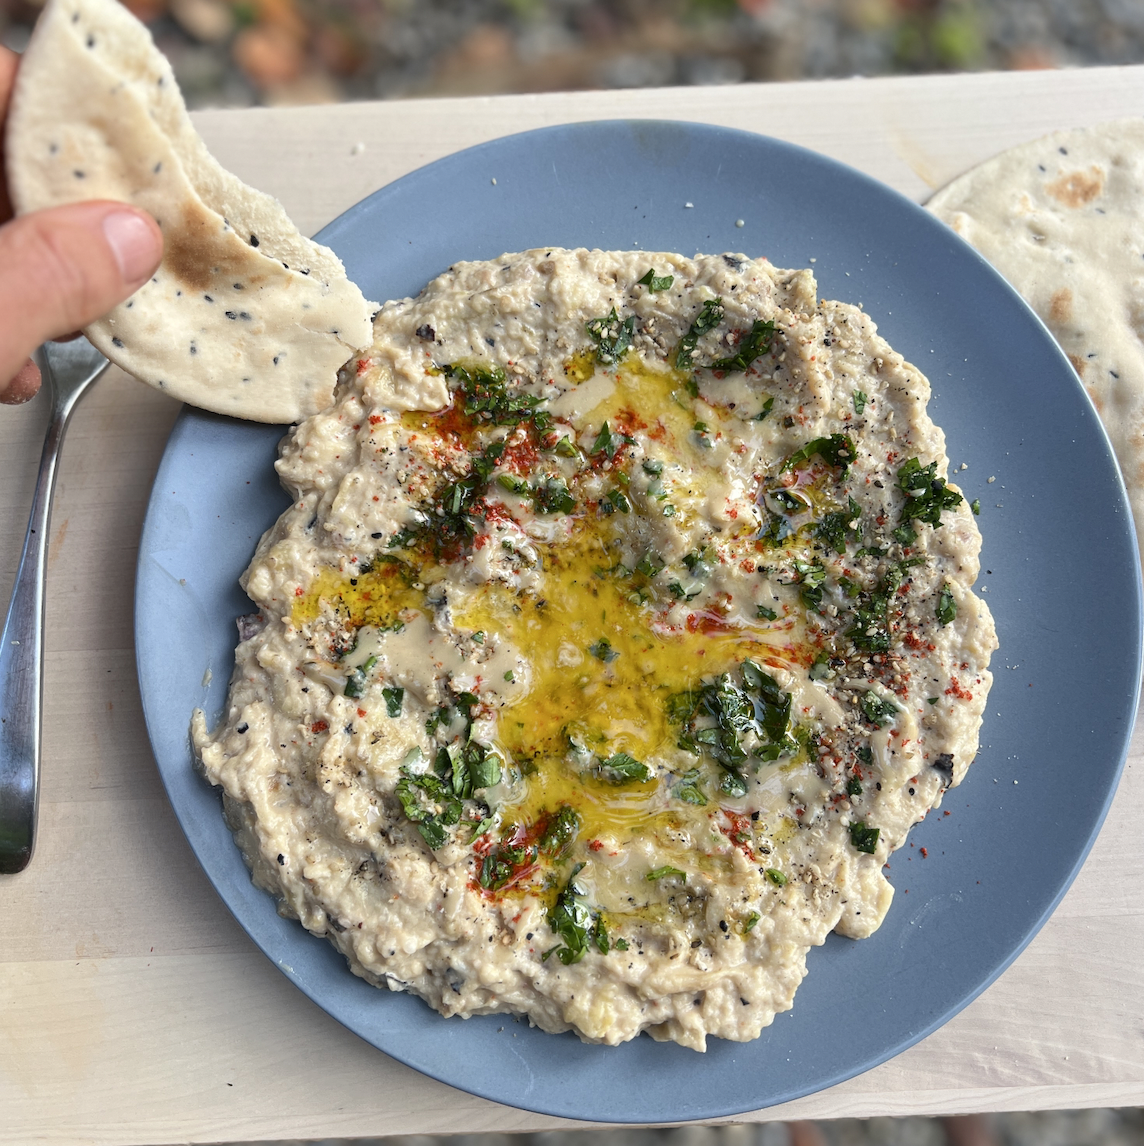
Baba Ganoush
Takes 18 minutes
Serves
Ingredients
- 2 aubergines
- 70 g tahini
- 3 tbsp lemon juice
- 1 clove garlic
- 3 tbsp plant-based yoghurt
- 1 tsp salt
- pinch ground pepper
- ¼ tsp sumac
Instructions
- In the oven: Preheat the oven to 220°C (fan).Cut the aubergines in half lengthways, rub a little oil on the inside of the aubergines, and place them on a baking tray, flesh side down. Sprinkle with salt and cook for 40 minutes until the aubergines are charred, collapsed, and super soft.
- On an open flame: If you have a gas stove, you can cook the aubergines directly on an open flame, turning occasionally for approximately 15 minutes, until charred, collapsed, and super soft inside.
- Finishing:Allow the aubergines to cool for a few minutes until you can handle them.In a medium mixing bowl, scrape out the soft flesh from the aubergines (it should come away easily from the skin).Add the remaining ingredients and mix well. Taste and adjust the seasoning with more lemon, salt, or heat according to your preference.
The Happy Pear Podcast
In this episode, we are joined by Michelle Wong, a cosmetic chemist and skincare blogger with a PhD in chemistry. Michelle has been sharing her expertise on all things skincare for over a decade, and her blog, Lab Muffin, is a go-to resource for those looking to learn more about the science behind beauty products.

Episode 119
The conversation covers a range of topics, including the importance of using sun cream, the difference between natural and unnatural cosmetic ingredients, and more. Michelle shares her insights and expertise throughout the episode, explaining complex scientific concepts in an approachable and engaging way.
We start off by discussing the science behind sun cream and how it works to protect the skin from UV radiation. Michelle emphasises the importance of using sun cream on a daily basis, regardless of skin tone or weather conditions, to prevent skin damage and reduce the risk of skin cancer.
The conversation then shifts to the topic of natural vs unnatural cosmetic ingredients. Michelle explains that these labels can be misleading, as there is no clear definition of what constitutes a “natural” ingredient. She also notes that many synthetic ingredients are safe and effective, and that the focus should be on choosing products that work well for your skin type and needs.
Throughout the episode, Michelle shares her expertise on skincare and beauty products, dispelling common myths and misconceptions and offering practical advice for listeners.
A fascinating and informative deep dive into the world of skincare, from the insights and expertise of Michelle Wong (Lab Muffin). Whether you’re a skincare enthusiast or simply curious about the science behind beauty products, this episode is for you..
Lots of love,
Dave & Steve
This episode is sponsored by Vivobarefoot Footwear. Vivobarefoot Footwear have given our listeners an exclusive 15% discount when you enter the code HAPPYPEAR15
Genuinely these are the only shoes you will see Dave & Steve wearing!
Produced by Sean Cahill & Sara Fawsitt
Available now from all good podcast providers:
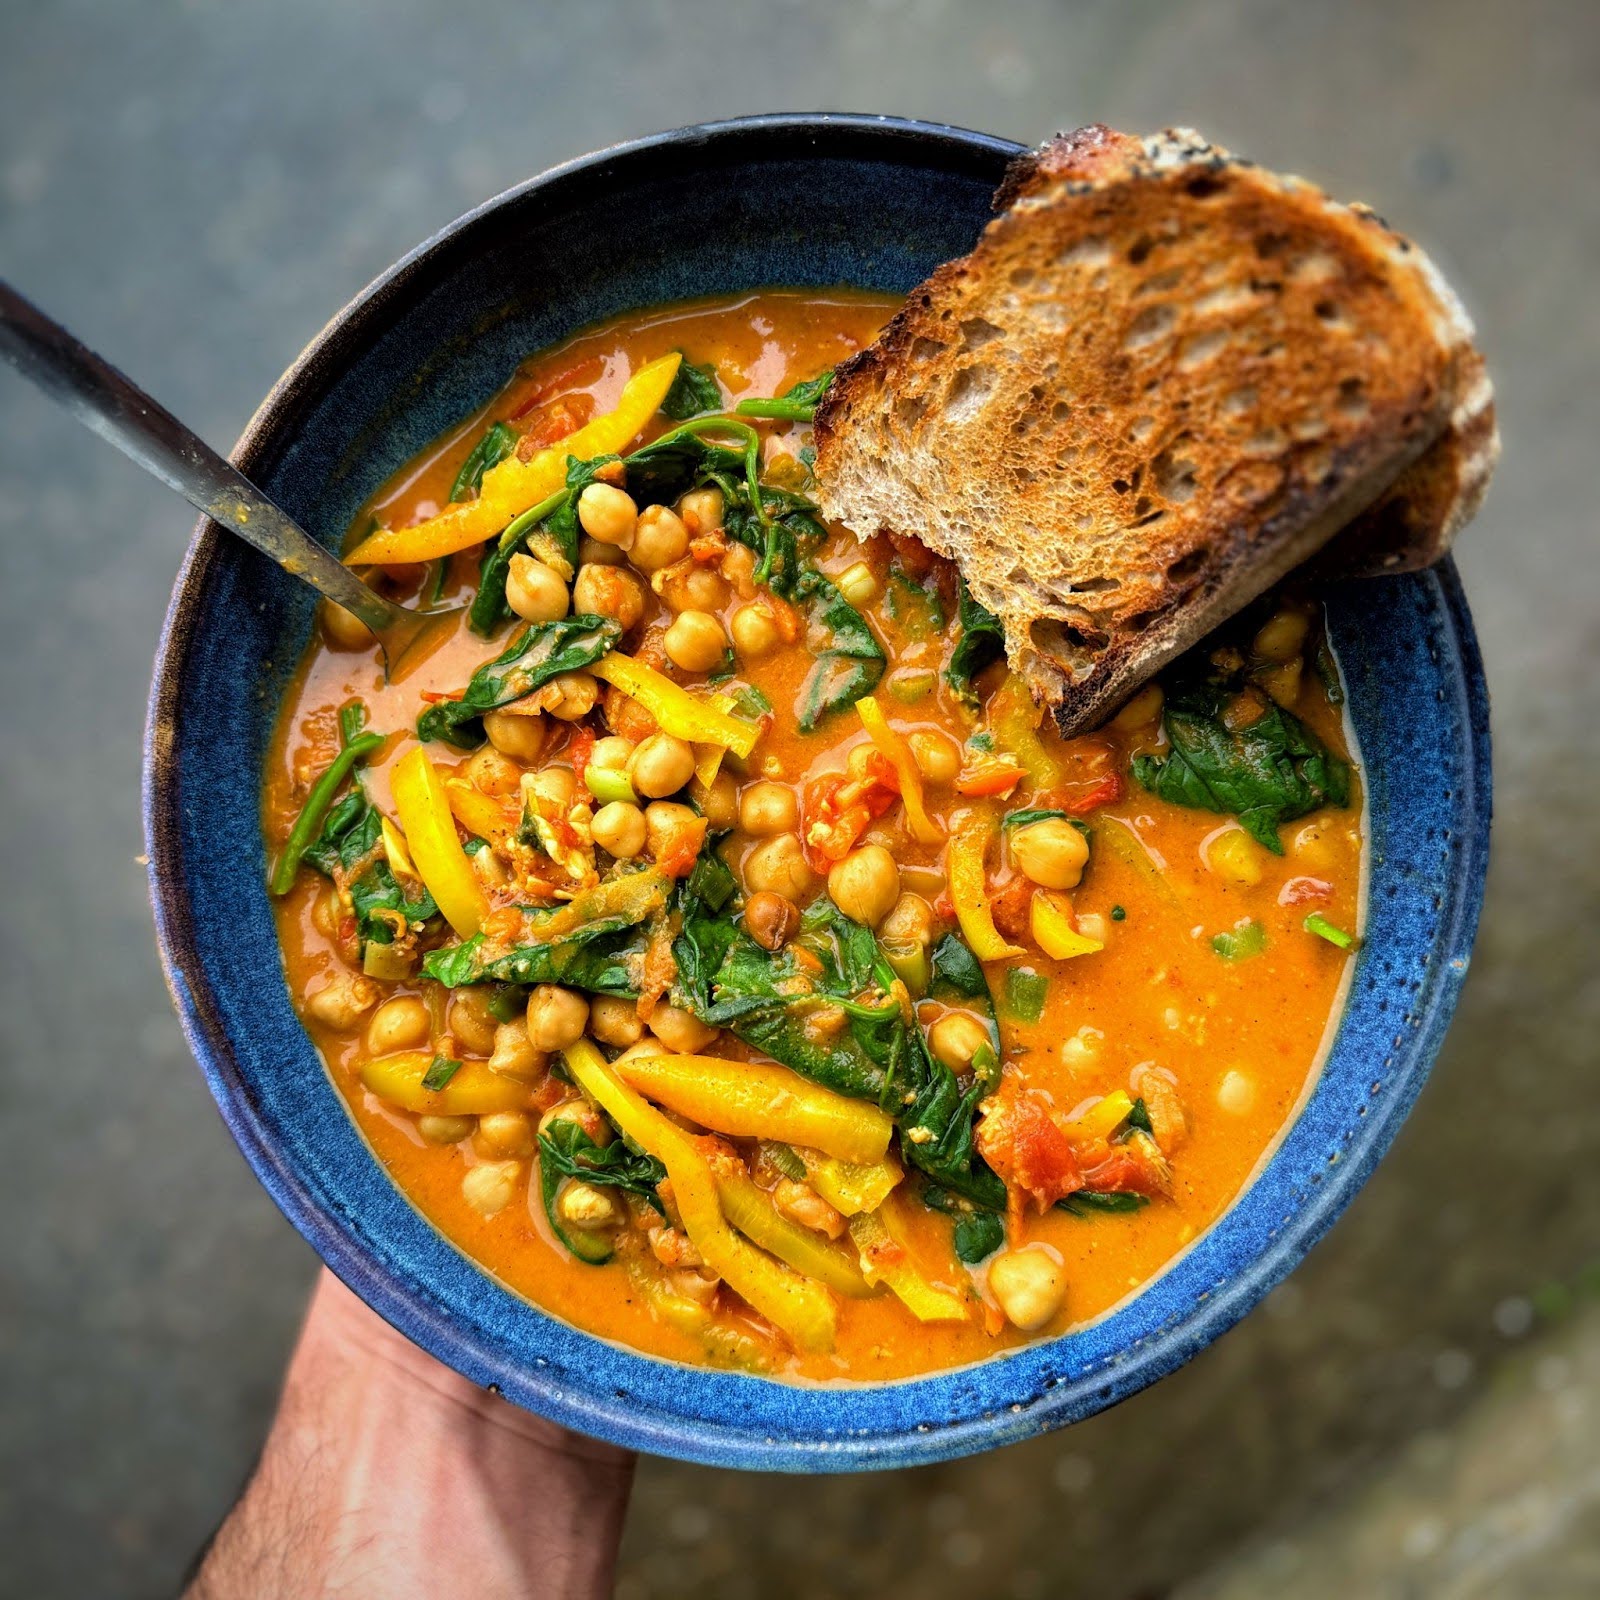
High Protein Chickpea Curry
Takes 20 minutes
Serves 4
Ingredients
- 100 g tempeh (3.5 oz)
- 2 cloves garlic
- 10 g fresh ginger (0.35 oz )
- 4 scallions (green onions)
- 1 tbsp miso paste
- 1 x 400g (14 oz) (tin of chopped tomatoes)
- 1 x 400g (14 oz ) (tin of low fat coconut milk)
- 100 g baby spinach (3.5 oz)
- 1 carrot
- 1 yellow pepper
- 2 x 400g (14 oz) (each tins of cooked chickpeas)
- 10 cherry tomatoes
- 1 tbsp cumin seeds
- ½ tsp fennel seeds (optional)
- 2 tbsp curry powder
- 1 tsp ground turmeric
- 1 tsp salt
- ¼ tsp ground black pepper
- Juice of ½ lime
Instructions
- Prepare Vegetables and Tempeh: Grate the carrot and ginger. Peel and finely dice the garlic. Finely slice the scallions or green onions. Use a potato peeler to slice the tempeh into thin slices. Drain and rinse 2 x 400g tins of cooked chickpeas. Quarter 10 cherry tomatoes. Slice the yellow pepper into thin slices.
- Sauté Vegetables and Tempeh: Heat a wide-bottomed frying pan on high heat. Once hot, add the sliced green onions, sliced yellow pepper, grated ginger, grated carrot, and sliced tempeh; fry for 2 minutes.
- Add Spices and Garlic: Next, add the diced garlic, 1 tbsp cumin seeds, and ½ tsp fennel seeds to the pan and cook for another 2 minutes.
- Combine Remaining Ingredients: Add in the drained chickpeas followed by the rest of the ingredients (1 x 400g tin chopped tomatoes, 1 x 400g tin coconut milk, 1 tbsp miso paste, 2 tbsp curry powder, 1 tsp ground turmeric, 1 tsp salt, and ¼ tsp ground black pepper) and mix well.
- Simmer and Season: Bring to a boil and reduce to a simmer for 3-4 minutes. Taste and adjust the seasoning to your liking by adding more salt, pepper, or lime juice.
- Serve: Toast 2 slices of sourdough bread. Serve the curry alongside the toasted bread for a delicious meal!

Thai Style Curry with Tofu and Beans
Takes 27 minutes
Serves 2
Ingredients
For the paste:
- 1 stick lemongrass
- 1 thumb-sized piece of ginger
- 2 cloves garlic
- 1 red chilli
- 1 tbsp coconut sugar (or brown sugar)
- Juice of 1/2 lime
- 2 tbsp tamari
For the curry:
- 250 g firm tofu
- 2 tbsp tamari
- 1 x 400 g tin of chickpeas
- 1 x 400 g tin of black beans
- 1 head pak choi
- 1 carrot
- 4 scallions
- 200 ml light coconut milk
- 200 ml water
- 15 g coriander
Instructions
- Make the paste:Cut the nub off the lemongrass and finely dice. Finely dice the 1/2 chilli, ginger, and garlic. Add them to a pestle and mortar or blender, along with the remaining paste ingredients (coconut sugar, lime juice, and tamari). Blend or grind until smooth.
- Prepare the vegetables:Drain and rinse the chickpeas and black beans. Finely dice the carrot, finely slice the scallions, chop the pak choi, and finely chop the coriander.
- Cook the tofu:Add the tofu, carrot, and scallions to a pan and fry for 4-5 minutes, turning the tofu occasionally until it becomes lightly golden on each side.
- Add the curry paste:Stir in 2 tbsp of tamari and mix well. Add the curry paste to the pan and cook for an additional 2 minutes to let the flavours combine.
- Simmer the curry:Pour in the coconut milk and water. Add the drained chickpeas, black beans, and pak choi. Cook for 4-5 minutes until the dish comes together and everything is well mixed.
- Taste and adjust:Taste the curry and adjust the seasoning as needed. Add more salt, lime juice, or coconut sugar/brown sugar to balance the flavours.
- Garnish and serve:Finely dice the remaining 1/2 chilli. Garnish the curry with red chilli and coriander. Serve with your favourite grain, such as rice, noodles, or quinoa. Enjoy!

Cinnamon Swirls
Takes 45 minutes
Serves
Ingredients
For the dough:
- 200 g self-raising flour
- 35 g caster sugar
- ¼ tsp salt
- 80 g cold vegan butter (cut into cubes)
- 100 ml oat milk
For the cinnamon filling:
- 2 tbsp vegan butter (melted)
- 90 g brown sugar
- 1 tsp ground cinnamon
For the cream cheese frosting:
- 4 tbsp vegan cream cheese
- 65 g icing sugar
- ¼ tsp vanilla extract
- 1 tsp oat milk
Instructions
- Preheat and preparePreheat the air fryer to 160°C using the bake function. Grease a 2lb loaf tin (approx. 900g).
- Make the doughIn a mixing bowl, combine the self-raising flour, caster sugar, and salt. Add the cold vegan butter and use your fingers to rub it into the flour mixture until it resembles damp sand or breadcrumbs.Stir in the oat milk until the dough comes together into a soft clump. Lightly coat the dough in flour to make it easier to handle.Dust your counter with flour and place the dough on the surface. Roll it out into a rectangle, approximately 45cm x 30cm.
- Prepare the cinnamon fillingMelt the vegan butter. In a separate bowl, mix the brown sugar and ground cinnamon together.Spread the melted butter evenly over the rolled-out dough, making sure to bring it right to the edges. Sprinkle the cinnamon-sugar mixture evenly over the buttered dough.
- Roll and cutStarting from the long edge (45cm side), tightly roll the dough into a log.Cut the log in half, then halve each piece again, and repeat once more to end up with 8 pieces.Place the cinnamon swirls into the greased loaf tin.
- BakePlace the loaf tin in the preheated air fryer drawer and bake for 18-20 minutes until golden and crispy.
- Make the frostingWhile the cinnamon rolls are baking, make the cream cheese frosting. In a bowl, mix the vegan cream cheese, icing sugar, vanilla extract, and oat milk. Use a fork to break down the mixture and stir until smooth and creamy.
- ServeRemove the cinnamon rolls from the air fryer and drizzle the frosting over the top.Serve warm and enjoy!

This is a beautifully rich fragrant hummus that is absolutely more-ish and we love that it’s made without using any artificial preservatives.
INGREDIENTS
Cooked Chickpeas (44%) [Chickpeas, Water], Rapeseed Oil, Tahini (15%) (SESAME SEEDS), Water, Sultanas (6%) [Sultanas, Sunflower Oil], Garlic, Lemon Juice Concentrate, Sea Salt, Smoked Paprika, Rowanberry Extract, Ground Coriander, Cumin, Cinnamon, Chilli Flakes
ALLERGEN INFORMATION
For allergens, see ingredients highlighted.
May contain traces of nuts.
NUTRITIONAL INFORMATION
| Typical | per 100g |
|---|---|
| Energy | 1497kJ |
| 361kcal | |
| Fat | 29.0g |
| of which: Saturates | 2.7g |
| Carbohydrates | 15g |
| of which: Sugars | 4.9g |
| Fibre | 4.5g |
| Protein | 7.8g |
| Salt | 1.2g |
The Happy Pear Podcast
This week we are joined by the incredible Dan Saladino, a renowned food journalist and presenter. Dan’s latest book, ‘Eating to Extinction,’ takes centre stage in this discussion as they explore the vital link between our food choices and the preservation of our planet.

Episode 118
A passionate advocate for sustainable food systems, Dan Saladino is a familiar name in the world of food journalism and presenting. With his wealth of knowledge and experience, Dan has been a driving force in raising awareness about the environmental impact of our food choices.
Get ready to be inspired as Dan unveils the motivation behind his powerful book, ‘Eating to Extinction.’ Discover the profound connection between our diets and biodiversity loss, and how simple shifts in our food choices can contribute to a more sustainable future. From embracing plant-based diets to supporting local and organic farming, Dan offers practical strategies to make a lasting impact.
Join us as we discuss overcoming barriers to change and fostering a sense of community support along the journey to sustainable food choices. Together, we explore the significant role that both the food industry and policy play in creating a sustainable food system.
A brilliant episode! Every meal is an opportunity to make a positive impact on our planet, so let’s embrace sustainable food choices and create a brighter and more sustainable future together!
Lots of Love,
Dave & Steve
To learn more about Dan & his work check out: @eating2extinct & www.fooddiversityday.com
This episode is sponsored by Vivobarefoot Footwear. Vivobarefoot Footwear have given our listeners an exclusive 15% discount when you enter the code HAPPYPEAR15
Genuinely these are the only shoes you will see Dave & Steve wearing!
Produced by Sean Cahill & Sara Fawsitt
Available now from all good podcast providers:

Vegan Hoisin Duck Pancakes
Takes 30 minutes
Serves 2
Ingredients
- 250 g oyster mushrooms
Marinade
- 3 tbsp tahini
- 5 tbsp water
- 1 tbsp miso paste
- 3 tsp brown sugar
- 1 tsp chinese 5 spice
- 1/2 tsp chilli powder
- 2 tbsp rice wine vinegar
- 2 tbsp tamari
Pancakes
- 150 g plain flour
- 300 ml water
- 2 tsp ground flax
Garnish
- 1/2 cucumber
- 1/2 bunch spring onions
- 1 red chilli
- 1 tbsp sesame seeds
Instructions
- Preheat the ovenPreheat the oven to 180°C.
- Prepare the mushroomsCut the oyster mushrooms into thin, long strips.
- Make the marinadeWhisk all the marinade ingredients (tahini, water, miso paste, brown sugar, Chinese five spice, chilli powder, rice wine vinegar, and tamari) in a medium-sized bowl. Add ¾ of the marinade to the mushrooms and mix well, ensuring all the mushrooms are coated. Set aside to marinate while you prepare the pancake batter.
- Make the pancake batterAdd all the pancake ingredients (plain flour, water, and ground flaxseed) to a blender and blend for 30 seconds until smooth. Set aside for 2-3 minutes to allow the flaxseed to thicken.
- Bake or fry the mushroomsTo bake, spread the marinated mushrooms onto a baking tray in an even, single layer to allow the edges to crisp.Bake for 20 minutes.To fry, for a crispier version, heat a wide-bottomed non-stick pan on high heat.Add 2-3 tbsp of oil and fry the mushrooms, stirring constantly, until they brown all over, about 5 minutes.Remove from the pan once they are crispy and taste fantastic!
- Prepare the garnishWhile the mushrooms are cooking, prepare the cucumber, spring onions, and chilli. Cut the cucumber into 10 cm long thin strips. Slice the spring onions diagonally into thin slices. Slice the red chilli (remove the seeds if you prefer less heat).
- Cook the pancakesHeat a medium non-stick pan on high heat. Once hot, add a thin layer of pancake batter (about 40-50 ml per pancake) to make a 15 cm pancake.Reduce the heat to medium. Cook for 1 minute, then carefully turn the pancake over with a silicone spatula and cook for a further minute. Repeat until all the batter is used. Keep the pancakes warm in foil while you cook the rest.
- Assemble the pancakesTo assemble, spread 1 tsp of the remaining hoisin sauce on each pancake.Add 2-3 tbsp of the cooked mushrooms, 3-4 cucumber strips, and sprinkle with spring onions, chilli slices, and sesame seeds. Wrap and enjoy!
Nutrition
Tofu is something people either love or hate, but these two methods will turn any hater into a lover! Packed with flavour, air frying makes it easy to achieve that crispy exterior, taking it to the next level.
Sticky spicy barbeque nuggets
Takes 20 minutes
Serves 2
Ingredients
For the Tofu
- 250 g firm tofu
- 1 tbsp oil
- 2 tbsp cornstarch (or flour)
- 1/2 tsp garlic powder
- Pinch of black pepper
- 2 tbsp tamari or soy sauce
- 1 tbsp water
For the Spicy Sticky Sauce
- 4 tbsp maple syrup
- 1 clove garlic (or 1/2 tsp garlic powder)
- 1- inch piece of fresh ginger (or 1 tsp ginger powder)
- 1/2 tsp chilli flakes
- 2 tsp tomato puree
- 3 tbsp tamari or soy sauce
- 1 tbsp vinegar
- 2 tsp cornflour (or flour + 1 tsp water mixed)
Instructions
- Start by pressing the tofu to remove excess water. This will help it achieve a crispier texture when fried.
- Cut the tofu into small cubes, roughly 1.5 cm in size. If using fresh garlic and ginger, finely dice them.
- In a bowl, toss the tofu cubes with the cornstarch (or flour), garlic powder, and black pepper, making sure the cubes are well coated.
- Heat 1 tbsp of oil in a wide, non-stick pan over high heat. Once hot, add the tofu cubes, frying on each side until they begin to char and develop a golden sear. This should take about 5-6 minutes.
- While the tofu is frying, mix together all the ingredients for the sauce—maple syrup, garlic, ginger, chilli flakes, tomato puree, tamari or soy sauce, vinegar, and the cornflour-water mixture.
- Stir well to ensure the sauce is smooth and lump-free.
- Once the tofu is seared on all sides, add 2 tbsp of tamari or soy sauce and 1 tbsp of water to the pan.
- Stir to ensure each piece of tofu absorbs some of the tamari.
- Pour the spicy sticky sauce over the tofu, stirring to coat each piece evenly. Cook for an additional 1-2 minutes until the sauce becomes thick and sticky. Remove from the heat.
- Your sticky, spicy tofu nuggets are ready to enjoy!

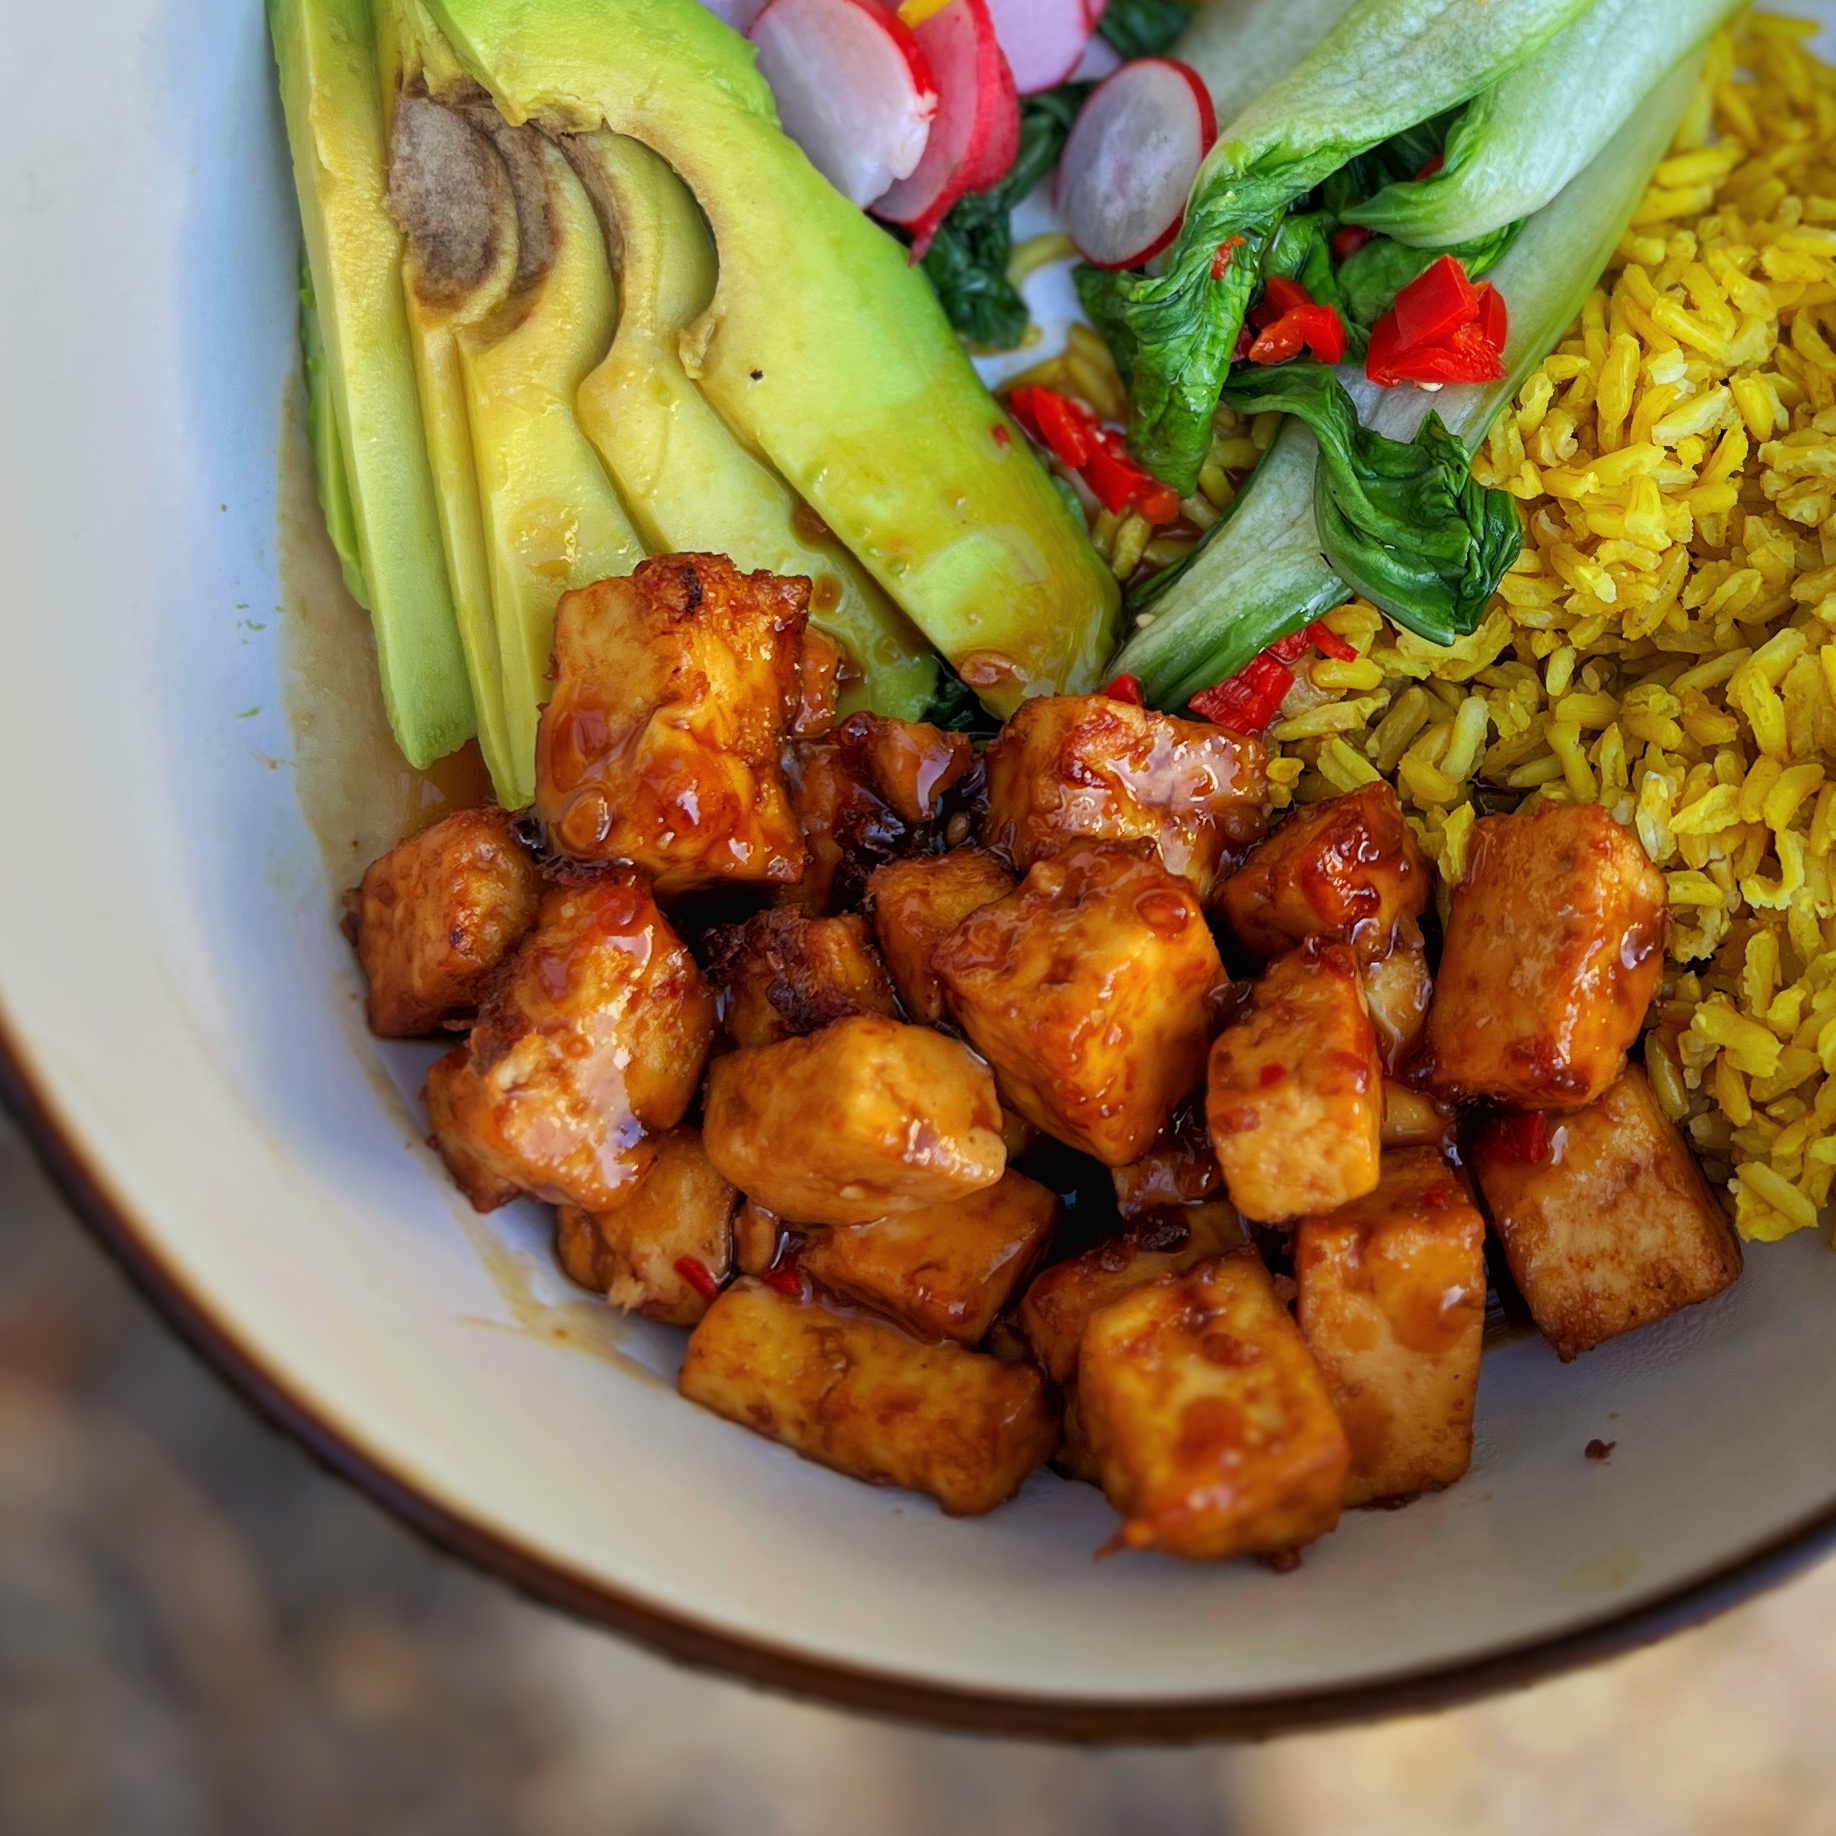
Sesame teriyaki tofu
Takes 20 minutes
Serves 2
Ingredients
- 250 g of tofu
Sauce/marinade:
- 3 tbsp tamari
- 2 tbsp maple syrup
- 1 tsp vinegar of choice (or mirin)
- 1 tsp garlic powder
- 1 tsp ginger powder
- 1 tsp fresh chilli (finely chopped)
For glaze:
- 2 tbsp coconut sugar
- 1 tbsp cornstarch (or cornflour)
Instructions
- Cut the tofu into 1 cm thick rectangles, approximately 3 x 6 cm.
- Mix together the sauce/marinade ingredients. Marinade the tofu in ¾ of the sauce for 1-2 minutes, turning to coat well while the air fryer preheats.
- Bake the tofu in the air fryer at 200°C for 10 minutes.
- While the tofu is baking, add the remaining ¼ of the marinade, coconut sugar, and cornstarch to a saucepan.
- Cook over medium heat, whisking constantly until the sauce thickens and reduces.
- Be careful not to burn it! If it thickens too much, add 2 tbsp of water and mix through. Remove from heat and set aside.
- Take the tofu out of the air fryer and coat it in the glaze, ensuring all pieces are covered. Drizzle any remaining glaze over the tofu.
- Return the tofu to the air fryer and bake again at 200°C for 5 minutes.
- Sprinkle with sesame seeds and enjoy!
We literally make tonnes of granola each week and here we show how easy, accessible and delicious it is to make. The basic framework for granola that we follow is 50% oats of choice, 10% sweetener, 10% fat of choice, 10% nuts, 10% seeds and 10% dried fruit. Here we make it in an instant brand airfryer, we find them brilliant. Link here to get 15% off with the code: HAPPY
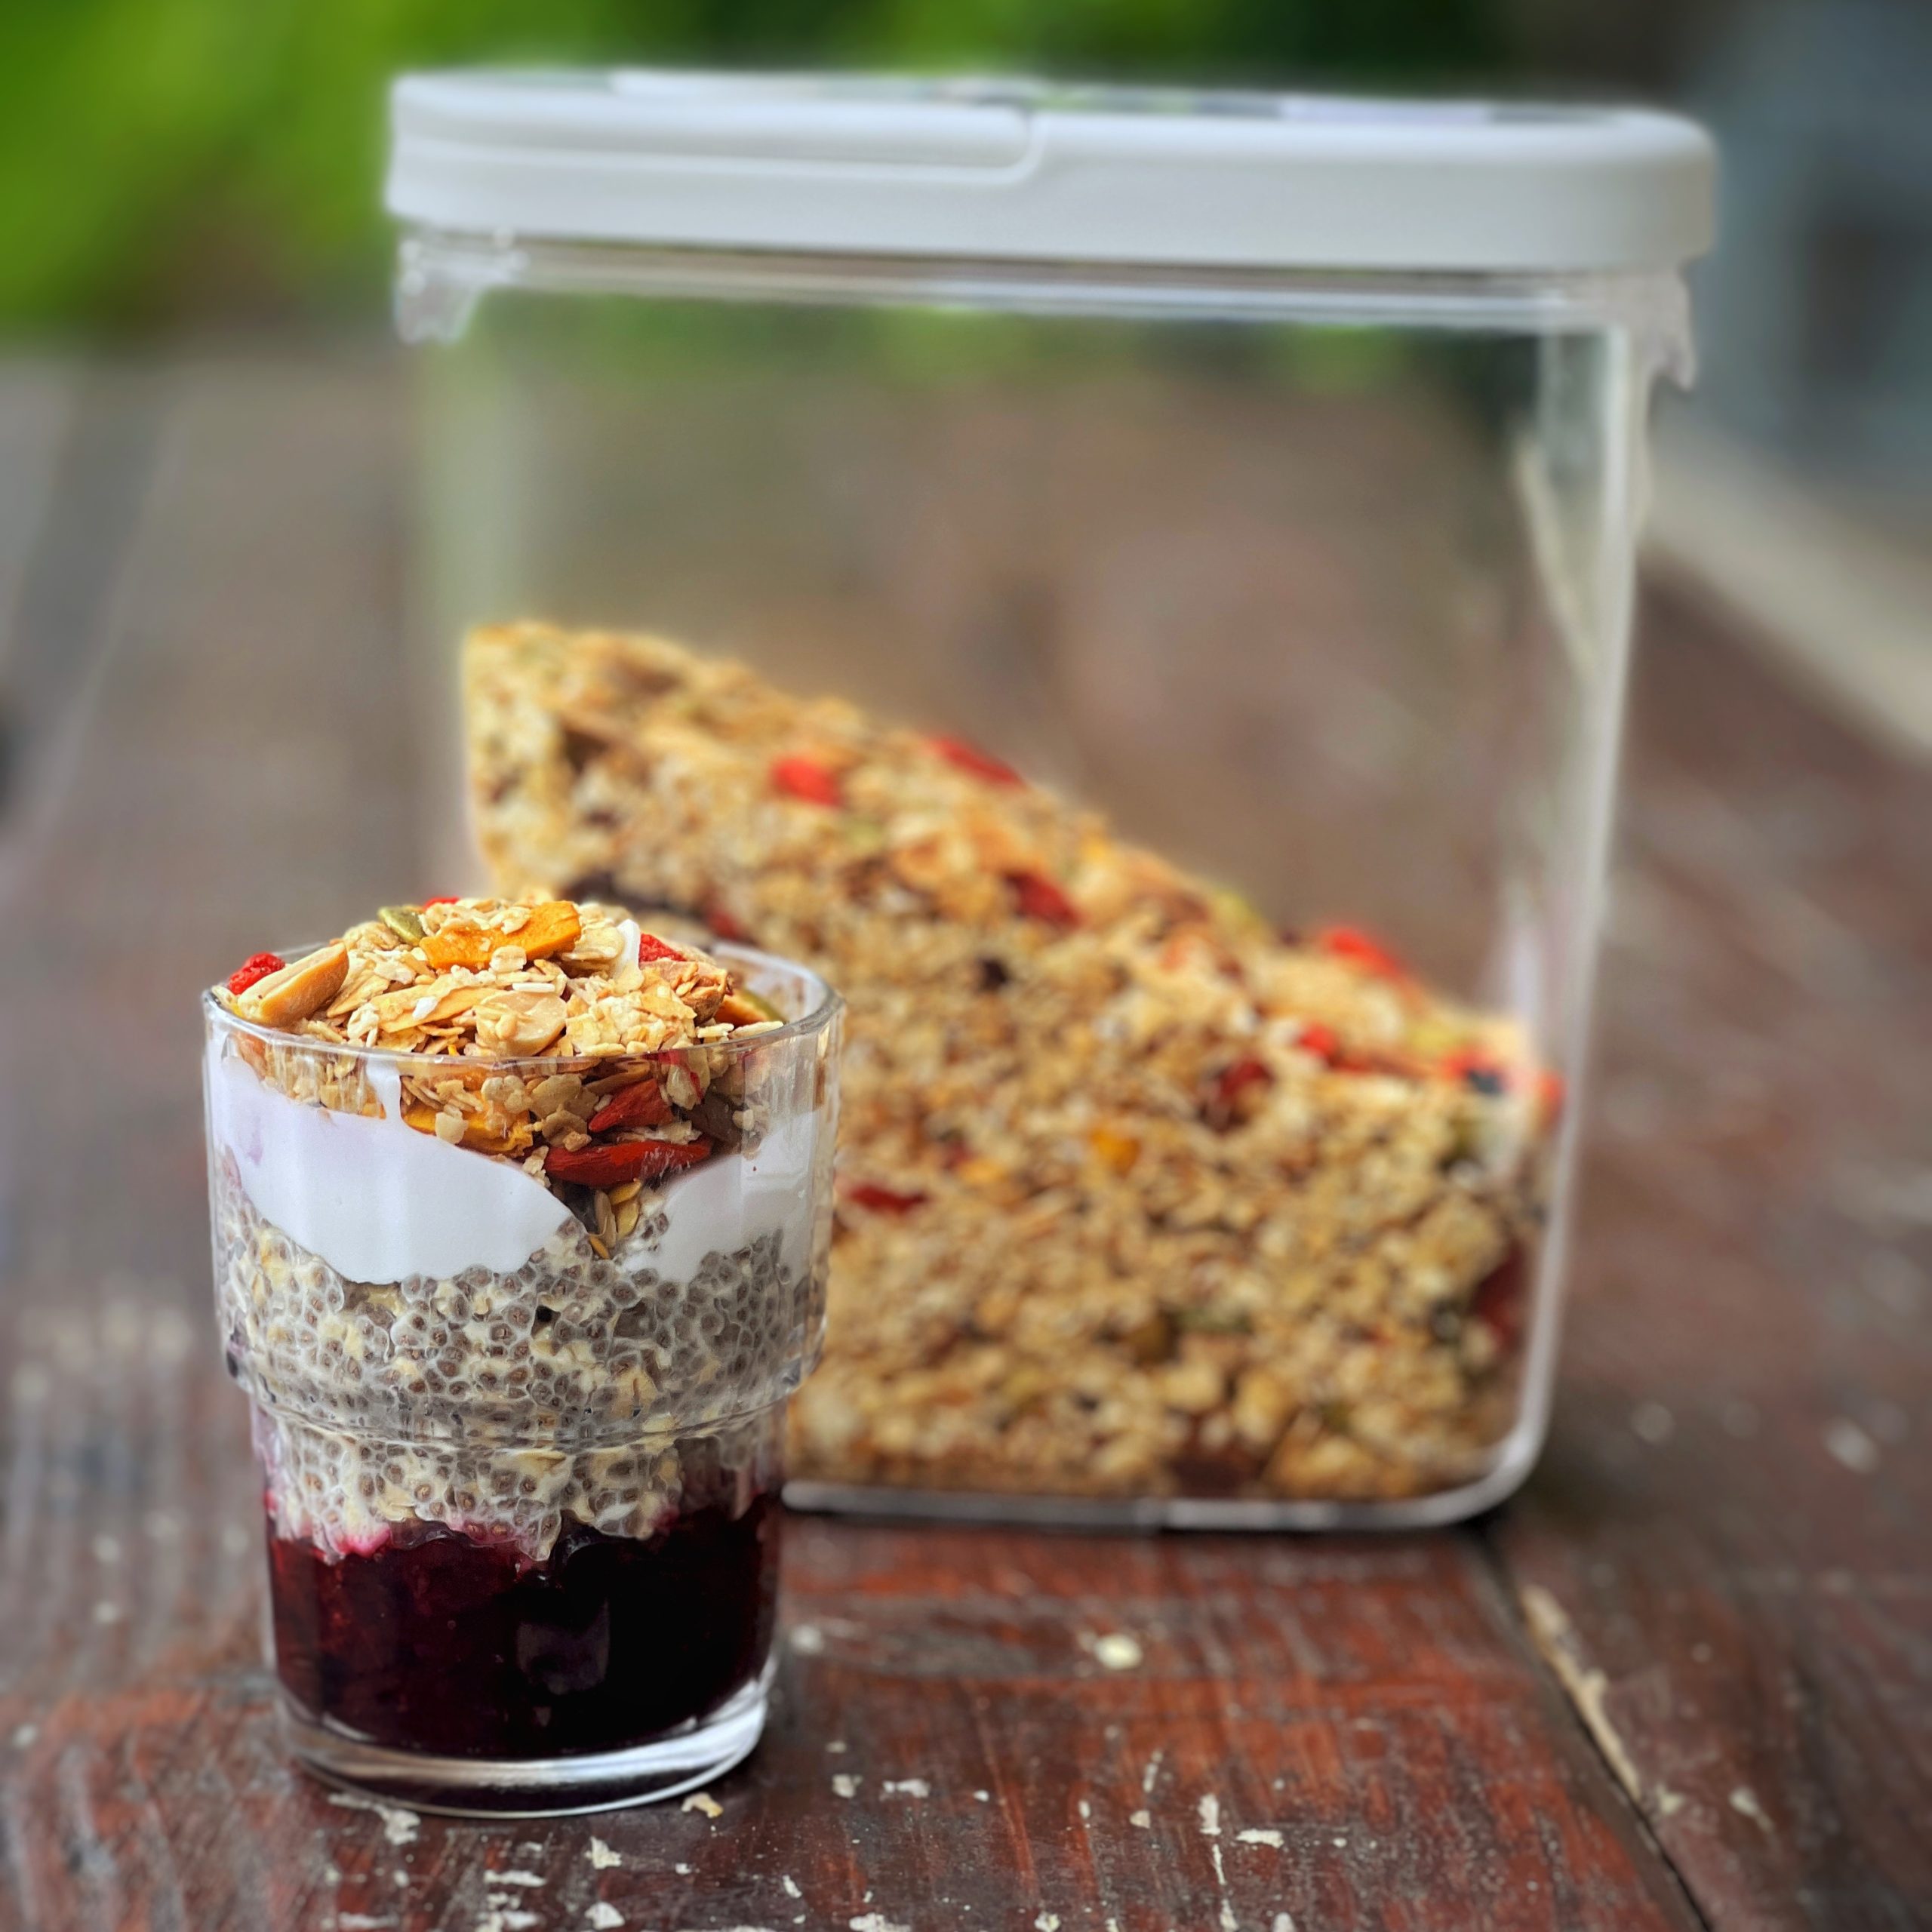
Healthier Granola in an airfryer
Takes
Serves
Ingredients
- 250 g Jumbo oats
- 50 ml Maple syrup
- 50 g Coconut oil or other neutral tasting oil such as sunflower
- Pinch of salt
- 25 g Dried mango
- 10 g Dessicated coconut
- 25 g Goji
- 40 g Cashews
- 10 g Flaked almond
- 10 g Sunflower seeds
- 40 g Pumpkin seeds
Instructions
- Method
- Preheat the oven to 160℃.
- Melt the coconut oil by putting in a small pot on a medium heat till melted (about 3 minutes).
- In a large bowl, mix all the dry ingredients together – oat flakes, nuts, seeds, desiccated coconut with a tiny pinch of salt. Make sure to leave the dried fruit as they will be mixed at the very end once the granola is cool. If you prefer to eat your nuts raw, then leave them aside with your dried fruit, otherwise include them for a crunchier more flavourful nut.
- In a separate bowl/jug, mix the wet ingredients – the maple syrup and the oil together into a wet mix.
- Add the wet mix into the dry mix bowl and mix thoroughly so that each flake, nut and seed gets an even coating.
- Transfer the mix to the air fryer basket and spread it out evenly in a thin layer. (If it is not spread out evenly it will steam as well as bake and result in some soft and some crunchy bits in your granola).
- Put basket in air fryer and cook for 20 minutes in the preheated air fryer at 180C.
- While your granola is baking in the oven, get your dried fruit ready in a bowl. If you are using the dried mango you will need to cut it with a scissors/knife into bite size pieces.
- Once the granola is baked, leave it to cool for 20 minutes. Then add the dried fruit and mix.
- Once properly cooled, store in an airtight container for up to 6 months.
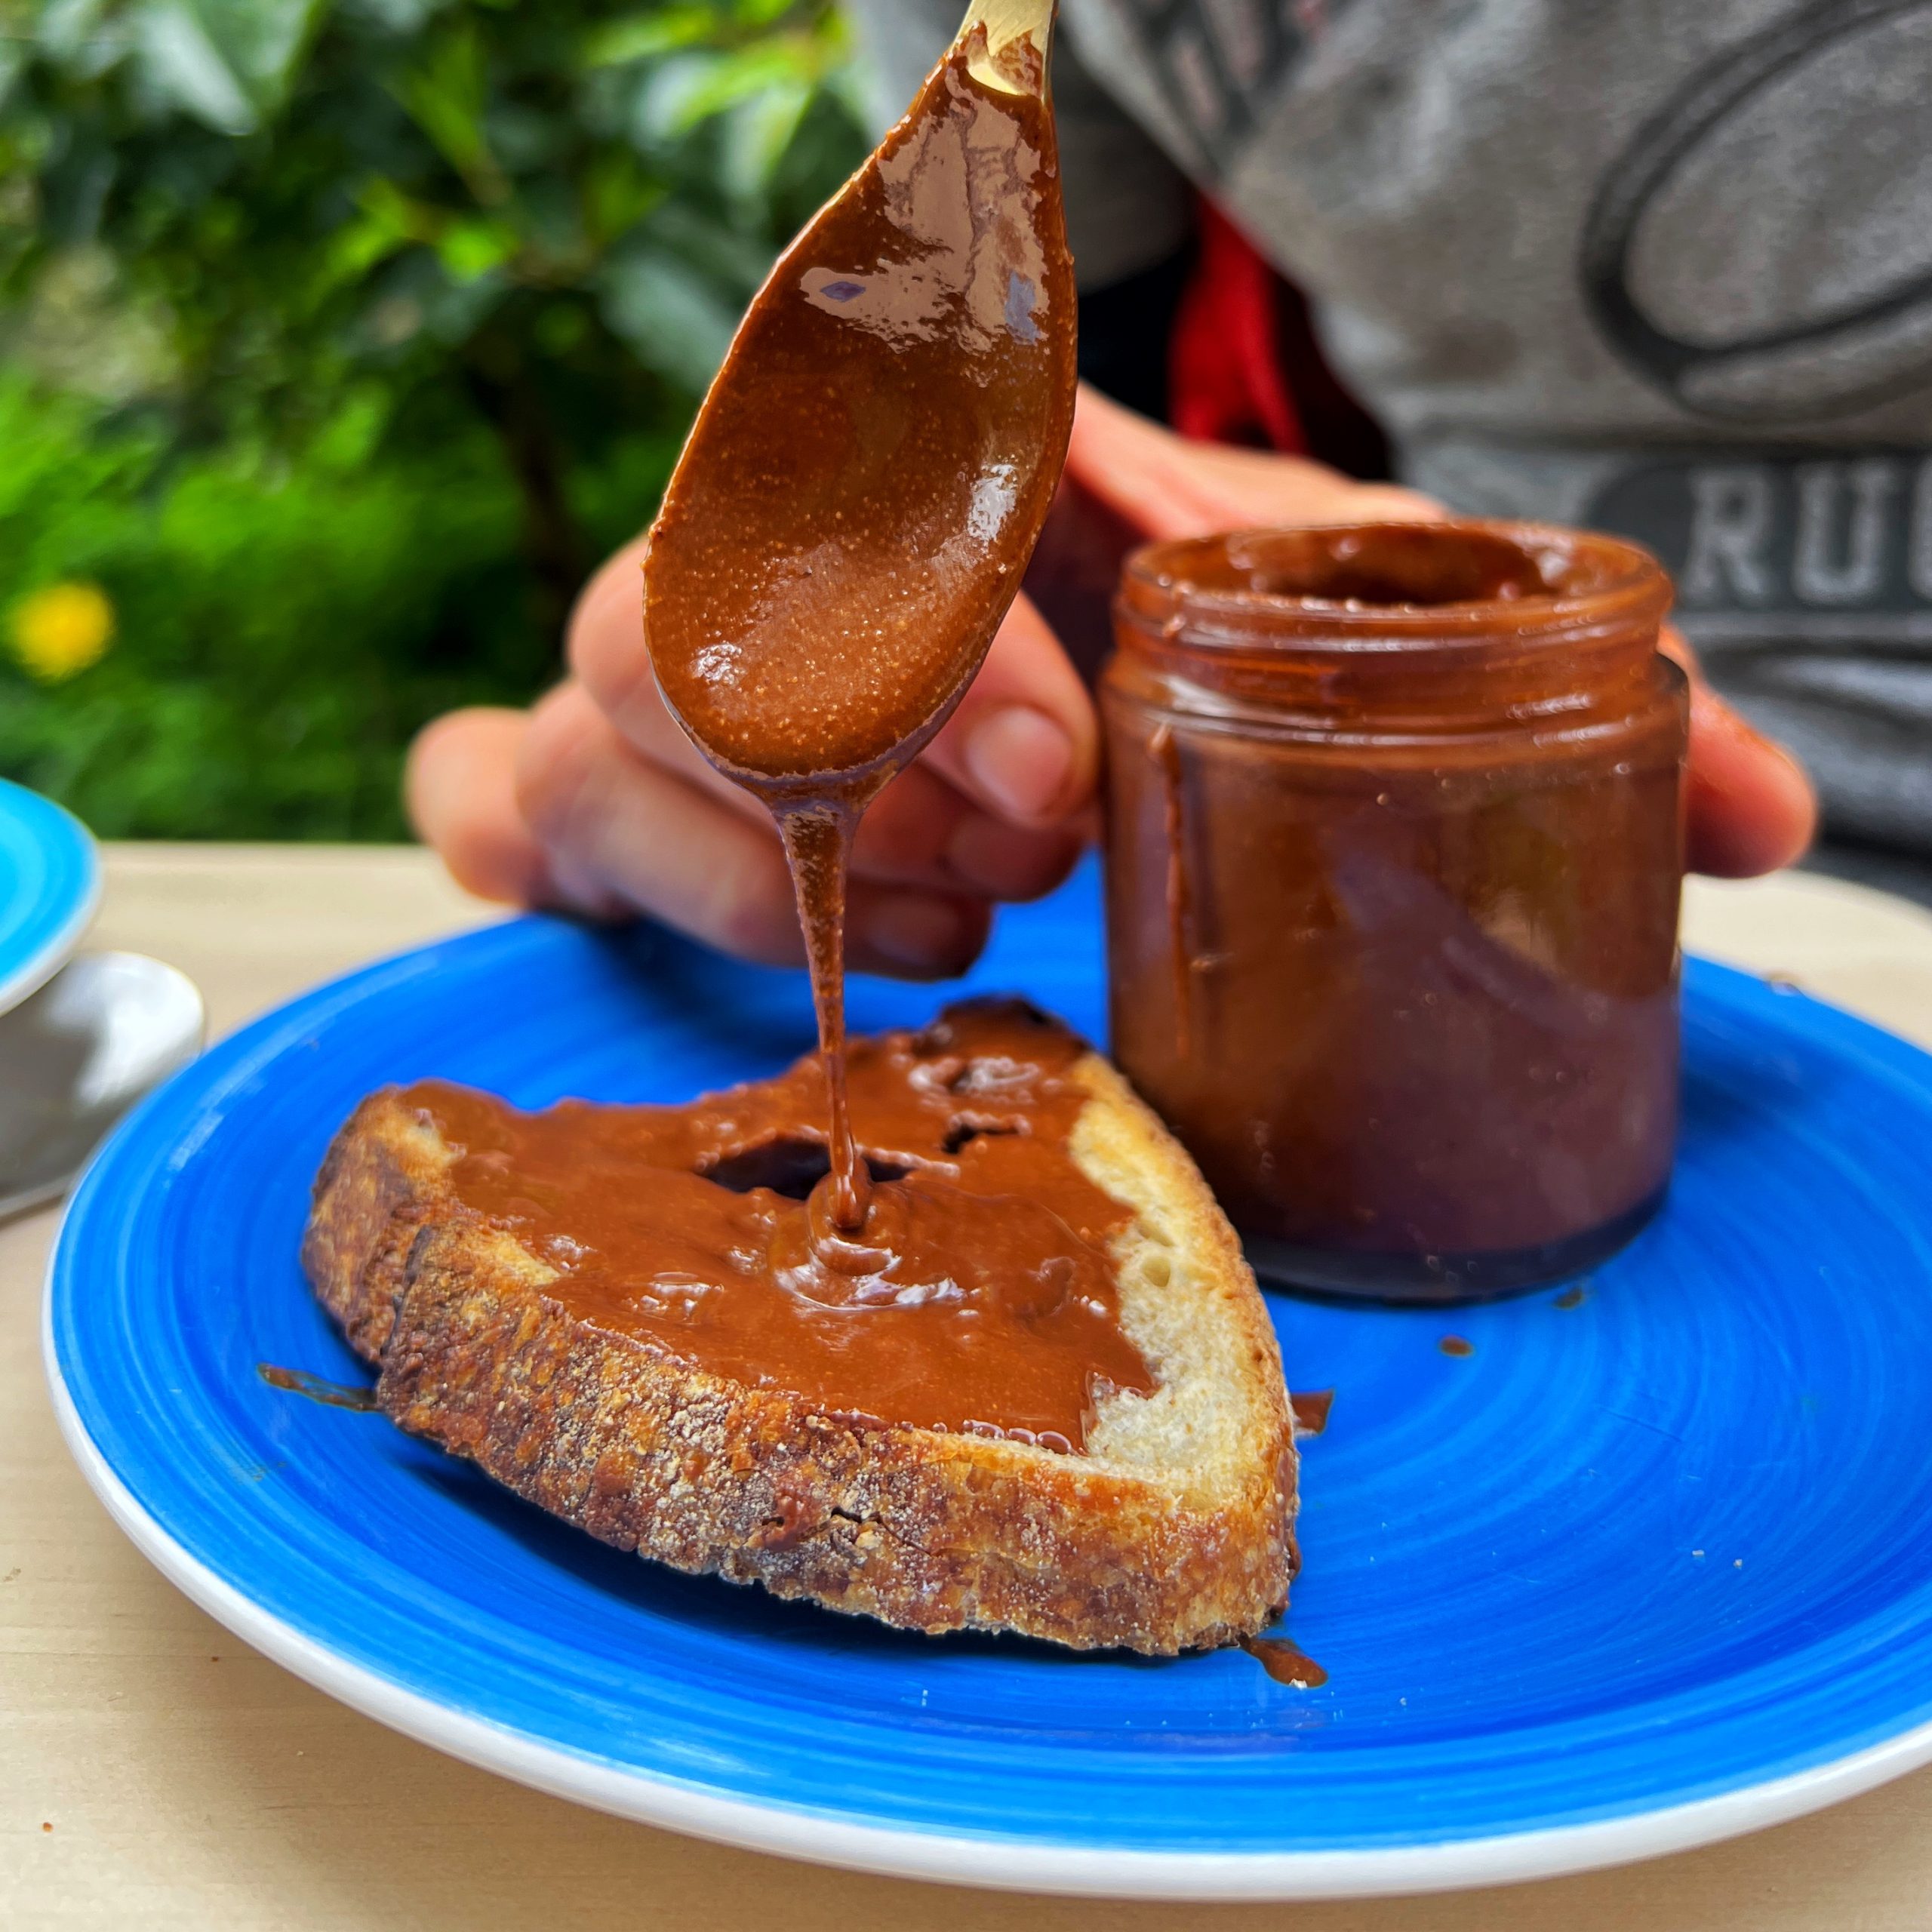
Easy 4 Ingredients Homemade Nutella
Takes 20 minutes
Serves 10
Ingredients
- 200 g hazelnuts
- 1/2 tsp vanilla
- 1/3 tsp salt
- 60 g chocolate
Instructions
- Preheat the oven:Preheat the oven to 180°C.
- Roast the hazelnuts:Spread the hazelnuts on a baking tray and roast them for 10-12 minutes until the skins turn dark brown.
- Remove the skins:Pour the roasted hazelnuts into a clean tea towel and rub them for 1-2 minutes to loosen the skins. Discard the skins and keep the roasted hazelnuts.
- Make the hazelnut butter:Add the de-skinned hazelnuts to a food processor or high-speed blender and blend until they begin to turn into nut butter. This may take 2-4 minutes, depending on your machine. If your appliance starts to overheat, stop and allow it to cool down to avoid damaging the motor.
- Melt the chocolate:Melt the chocolate using a bain-marie (double boiler) or microwave.
- Blend the ingredients:Add the melted chocolate, salt, and vanilla extract to the hazelnut butter.Blend until the mixture is super smooth.
- Store and enjoy:Transfer the Nutella to a sealed jar and store it in the fridge for 1-2 weeks. Enjoy it on toast, pancakes, or straight from the spoon!
Nutrition

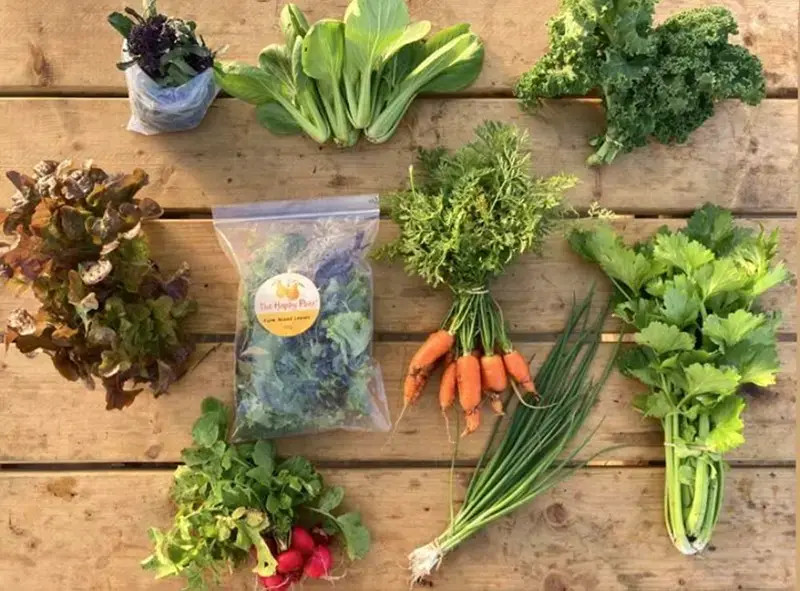
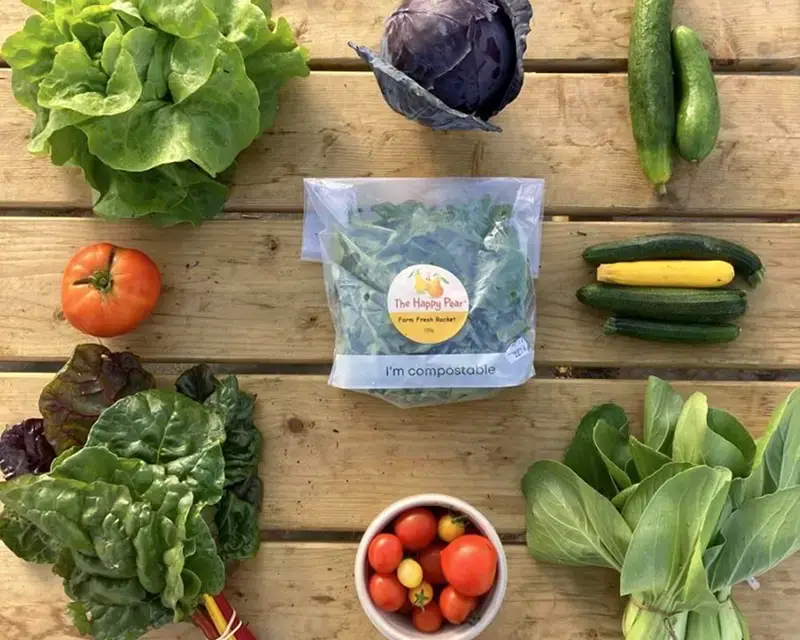
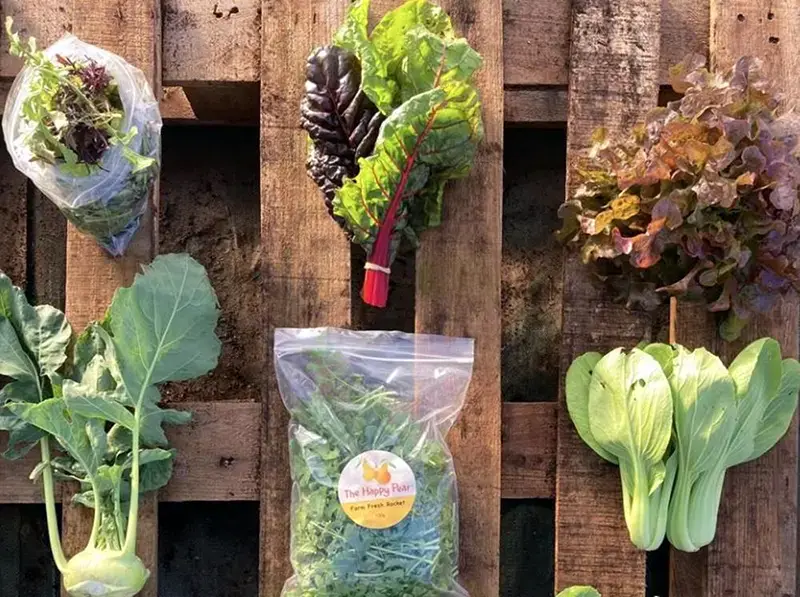
FARM VEG BOX
Organic, fresh, seasonal produce directly from our regenerative farm to you!
What is The Happy Pear Organic Farm?
The Farm is a 4 acre regenerative organic farm growing seasonal fruit & veg and supplying it direct to the local community via a weekly veg box scheme.
The Goal
The farm exists to connect the local community to its food and to create a financially viable blueprint for small scale farms that is easily replicable for others to do.
We are now offering the best organic veggies direct to your door. The veg is grown using organic and regenerative techniques just off the main street in Kilcoole, Co Wicklow.

Choose Your Veg Box
Large Veg Box
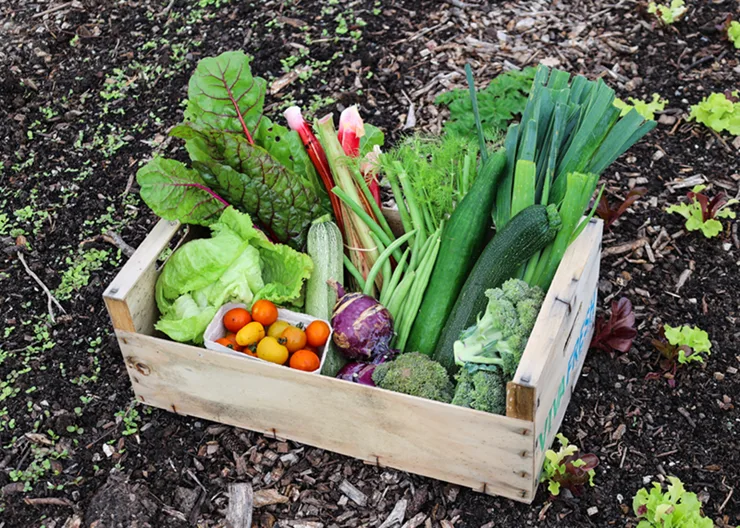
A changing selection of 9-10 organic seasonal veggies. For an idea of what to expect, take a look at next week’s box contents
Medium Veg Box
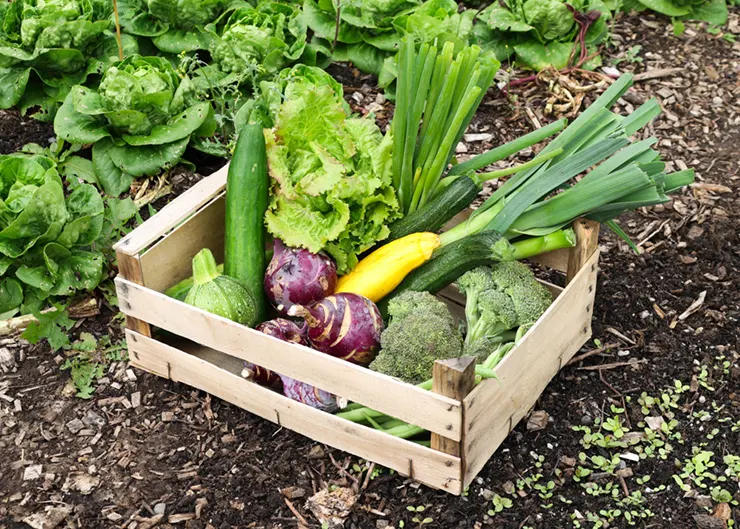
A changing selection of 8 organic seasonal veggies. For an idea of what to expect, take a look at next week’s box contents
Small Veg Box
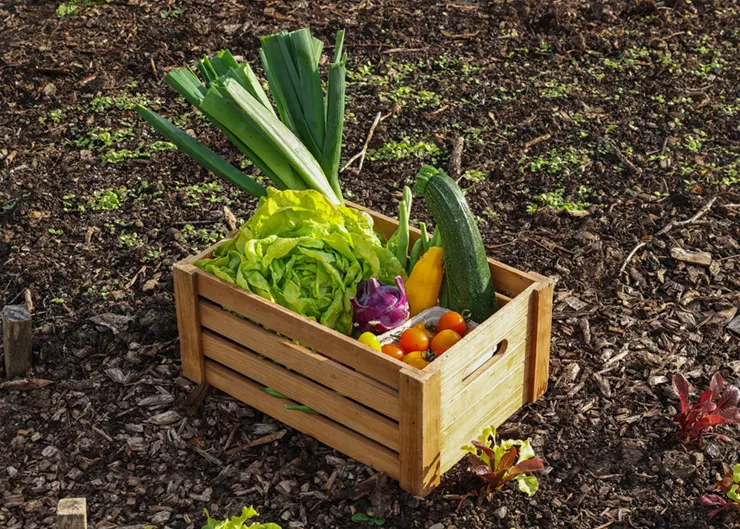
A changing selection of 5-6 organic seasonal veggies. For an idea of what to expect, take a look at next week’s box contents

Weekly Veg Box
Sign up to a weekly subscription of the Seasonal Organic Farm Produce
Each week, you’ll receive:
- The best and freshest seasonal veg that’s available on the farm. Choose to have it delivered to your door for a small extra fee or click here for more details on the pickup location options.
- A weekly newsletter filled with photos from the farm, seasonal recipes featuring the veg that’s in the box, inspiration, and cooking tips for the produce
- Invitations to events at the farm.

Frequently Asked Questions
You can read our FAQ on our Farm Veg Box here
About The Happy Pear Organic Farm
The Happy Pear farm is a 4 acre organic, regenerative farm based in Kilcoole, Co Wicklow just 10 mins south of Greystones, focused on minimum till or no dig practices where we not only adhere to the current organic growing standards but also focus on improving the soil microbe health and increasing the biodiversity around the farm through planting a mix of different pollinator species.
We produce up to 40 different crops across the full year and we provide these through a number of different channels. Our central focus is on our weekly veg box scheme where you can subscribe to receive a weekly veg box of the freshest local and in season veg and can collect it from a number of different collection points in the local area or have it delivered to their door.
We provide as much organic veg to The Happy Pear kitchen and shop in Greystones as we can across the year, we provide fresh herbs to our production facility and we sell a number of crops to local stores around the wider Greystones area.
We also have a purpose built indoor farm specialising in growing the most nutrient dense foods on the planet namely living sprouts, micro greens and wheatgrass which are available across Ireland through SuperValu, Centra and through leading foodie stores such as Nolan’s of Clontarf, Fresh supermarket, The Hopsack etc.
We began this venture in 2009 and have been using certified organic seeds since the beginning and in 2018, our Bean Mix and Alfalfa sprouts have become certified organic products themselves.
Each sprout we grow has a range of different benefits. Our Organic Bean Mix is high in protein and high in fibre. Our Organic Alfalfa Sprouts are great for stabilising blood sugar levels and are packed full of digestive enzymes making them easier to digest and absorb. Our Super Sprout Mix not only tastes great but is high in protein and a great source of fibre.

Choose Your Veg Box
Large Veg Box
A changing selection of 9-10 organic seasonal veggies. For an idea of what to expect, take a look at next week’s box contents
Medium Veg Box
A changing selection of 8 organic seasonal veggies. For an idea of what to expect, take a look at next week’s box contents
Small Veg Box
A changing selection of 5-6 organic seasonal veggies. For an idea of what to expect, take a look at next week’s box contents
The Happy Pear Podcast
We’re super excited to share this episode with you, where we chat with Nicole Masters, a soil health expert and agro-ecologist.

Episode 117
We’ve always been passionate about sustainability and living in harmony with nature, so talking to Nicole was a dream come true for us. She really knows her stuff when it comes to healthy soil, and we learned so much from her about how we can make a positive impact on the environment through regenerative agriculture and composting.
One of the things we loved about this episode was how Nicole made such a complex topic so accessible and interesting. We asked her all sorts of questions about soil health, from the benefits of cover crops to the importance of microbial diversity, and she had so many great insights to share.
We hope you enjoyed this episode as much as we did!
Lots of Love,
Dave & Steve
This episode is sponsored by Vivobarefoot Footwear. Vivobarefoot Footwear have given our listeners an exclusive 15% discount when you enter the code HAPPYPEAR15
Genuinely these are the only shoes you will see Dave & Steve wearing!
If you would like to find our more, Nicole at Integrity Soils has a range of self-directed online courses so you can read the health of your soil like a pro! Deepen your knowledge and hands-on skills to measure soil health at any scale. If you’ve been unsure about current on-farm practices and are looking to make sense of the endless recommendations that may not “add up,” these courses will give you the foundations to support you in making informed decisions to improve the health of your soil.
The Soil Horse Course: LINK
Soil Health Masterclass: LINK
Produced by Sean Cahill & Sara Fawsitt
Available now from all good podcast providers:
Focaccia Pizza in an Air Fryer
Takes
Serves 2
Ingredients
- 250 g white flour
- 200 ml warm water
- 7 g dried active yeast
- 15 g sugar (optional for a sweeter dough and more caramelisation)
- 9 g salt
- 5 tbsp olive oil
- 50 g veg toppings (mushroom, pepper and olives work great!)
Instructions
- Prepare the Dough:In a large bowl, combine the lukewarm water and yeast, stirring until well mixed. Add the flour, sugar (if using), and salt. Carefully bring the mixture together in the bowl. Knead for about 10 minutes to develop gluten. The dough will start off sticky and wet but will come together after working it for 10 minutes, becoming similar to sticky chewing gum. Alternatively, you can use a stand mixer with the dough hook on medium speed for 6-8 minutes
- First Proofing:Grease a 1lb loaf tin with 1 tbsp of olive oil, then add the dough to the tin. Cover with a towel to retain moisture and leave the dough in a warm spot to proof until it doubles in size—this should take 1-2 hours, depending on the room temperature. If using an air fryer, you can proof the dough on the "reheat" setting at 49°C for 45 minutes until it doubles or even triples in size.
- Prepare the Toppings:Thinly slice the vegetables you're using as toppings.
- Top and Dimple the Dough:Once the dough has doubled in size, sprinkle the prepared vegetables over the dough, followed by 4 tbsp of olive oil and a generous pinch of salt. Coat your fingers with a little oil to prevent sticking, and begin to "play the focaccia piano" by dimpling the dough. The vegetables should press into the dough as you create thick indents.
- Second Proofing:Cover the dough with a towel and allow it to proof a second time until it doubles in size again. Alternatively, you can speed up the process by proofing in the air fryer on the "reheat" setting at 49°C for 20 minutes.
- Bake the Focaccia:Lightly grease your fingers with some oil, then add 1 tbsp of olive oil to the dough. Dimple the dough again and sprinkle with a pinch of salt. Preheat the air fryer to 170°C and bake the focaccia for 15 minutes.
- Add the Pesto:Remove the focaccia from the air fryer, spoon over 2 tbsp of pesto, and bake for a further 5 minutes at 170°C. Take out and leave to cool before serving.
Jackfruit Carnitas with Mango Salsa
Takes
Serves 2
Ingredients
Jackfruit carne
- 1 small red onion
- 1 clove garlic
- ½ fresh red chilli
- 400 g jackfruit
- 1 tbsp cumin seeds
- 1 tbsp dried oregano
- 2 bay leaves
- 2 tbsp tamari
- 1 tsp salt
- 3 tbsp tomato puree
Smashed Avocado
- 1 ripe avocado
- ½ a lime
- Pinch of salt
Charred Mango Salsa
- 1 ripe mango
- 200 g cherry tomatoes (ideally assorted colours)
- ½ red onion
- 15 g fresh coriander
- ½ a lime
Other Ingredients
- 50 g pickled cabbage (sauerkraut)
- 6 corn or wheat tacos
Instructions
- Prep the ingredients for the jackfruit carne:Peel and dice the red onion and garlic.Finely dice the red chilli.Drain, rinse, and finely chop the jackfruit.
- Fry the base flavours:Heat 1 tsp of oil in a wide-bottomed pan on high heat.Add the cumin seeds, diced onion, and chilli. Fry for 3-4 minutes until softened.
- Add garlic and jackfruit:Add the diced garlic and chopped jackfruit to the pan.Fry for an additional 4-5 minutes, stirring occasionally.
- Incorporate the spices and liquids:Stir in the oregano, bay leaves, tamari, tomato purée, and salt.Mix well until all the flavours are evenly combined.
- Braise the mixture:Add 2 tbsp of water and allow the mixture to braise, stirring to deglaze any bits stuck to the pan.Taste and adjust the seasoning as needed. Remove from the heat and set aside.
- Make the charred mango salsa:Cut the cheeks off the mango and char them in a hot pan until golden on the flesh side.Remove the skin and cut the flesh into small pieces.Quarter the cherry tomatoes, peel and finely dice the red onion, and finely chop the coriander.Mix these ingredients together with the juice of half a lime.Season with salt and black pepper to taste.
- Prepare the smashed avocado:Remove the flesh from the avocado and mash it with the juice of the remaining lime half and a pinch of salt.Mash until smooth, then taste and adjust the seasoning.
- Char the tacos:Lightly char the corn or wheat tacos in a dry pan until slightly crispy.
- Assemble the tacos:Spread a layer of smashed avocado on each taco.Add the mango salsa, pickled cabbage, and jackfruit carne.Repeat for the remaining tacos and fillings.Serve and enjoy!
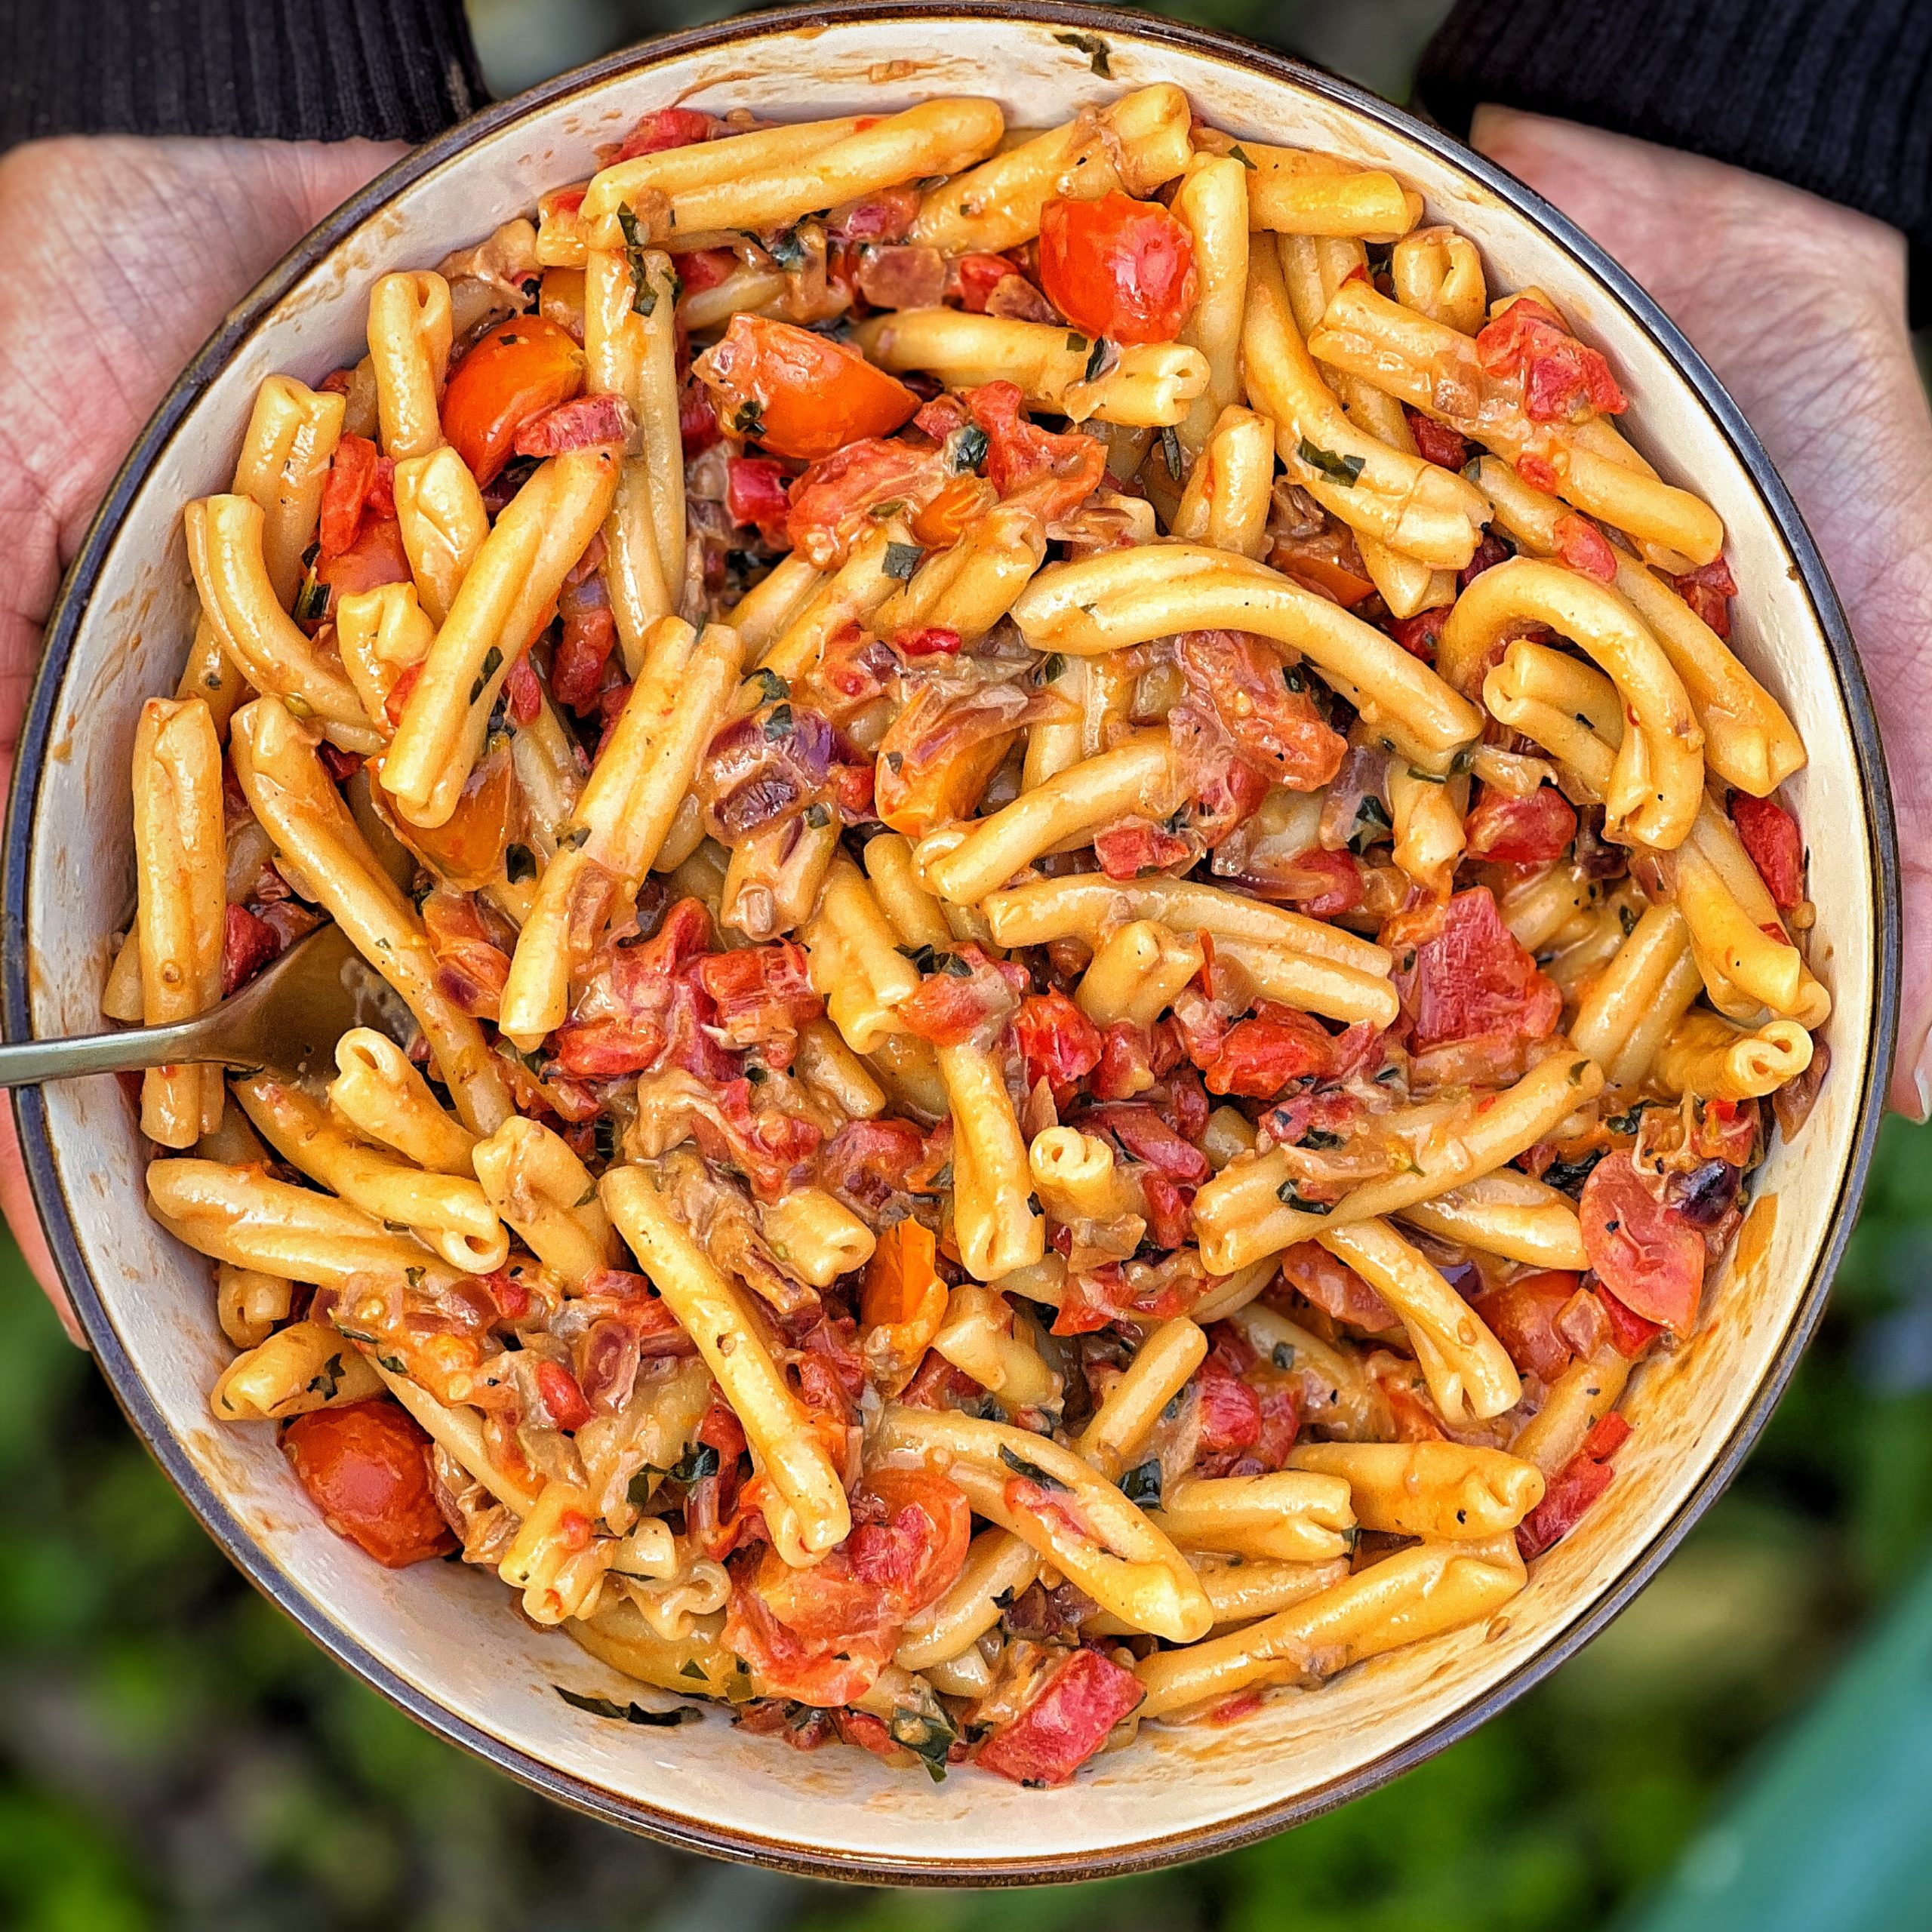
Creamy Tomato and Wild Garlic Pasta
Takes 30 minutes
Serves 2
Ingredients
- 300 g pasta (we used Casarecce)
- 250 g cherry tomatoes
- 150 g oyster mushrooms
- 340 g roasted peppers
- 2 tbsp tamari
- 1 red onion
- ½ chilli
- 35 g wild garlic or 3 spring onions
- 2 sprigs rosemary
- 200 g yoghurt
- 2 tbsp olive oil
Instructions
- Cook the pastaFill and boil the kettle. Once boiled, fill a large saucepan with the hot water and a generous pinch of salt. Add the pasta and cook according to the packet instructions. Once cooked, drain the pasta and rinse, reserving 1 cup (approx. 240ml) of the pasta water.
- Prepare the vegetablesPeel and finely dice the onion.Quarter the cherry tomatoes.Finely dice half the chilli.Shred the oyster mushrooms using a fork until they are completely torn apart.Finely dice the wild garlic or scallions.Remove the rosemary leaves from the stalks and finely chop.
- Cook the vegetablesHeat a non-stick frying pan on high heat. Add the olive oil and, once hot, fry the diced onion for 3-4 minutes until it starts to brown around the edges.Add the shredded mushrooms and rosemary to the pan, cooking for another 4 minutes. Then, stir in the tamari (or soy sauce), ensuring each mushroom absorbs the flavour.Add the quartered cherry tomatoes and wild garlic/scallions, along with a pinch of salt, and mix well. Cook while you finely chop the roasted red peppers.
- Add the roasted peppersDiscard any brine from the roasted peppers (or save it for pickling), then add the chopped peppers to the pan. Mix well and cook for 2-3 minutes.
- Create the creamy saucePour in half of the reserved pasta water (approx. 100ml), along with the yoghurt. Stir through and let it simmer for 2 minutes. Taste and adjust the seasoning as needed.
- Combine pastaAdd the cooked pasta to the pan and mix well to coat in the sauce. Serve immediately – and if possible, enjoy in the sunshine for an extra-special meal!
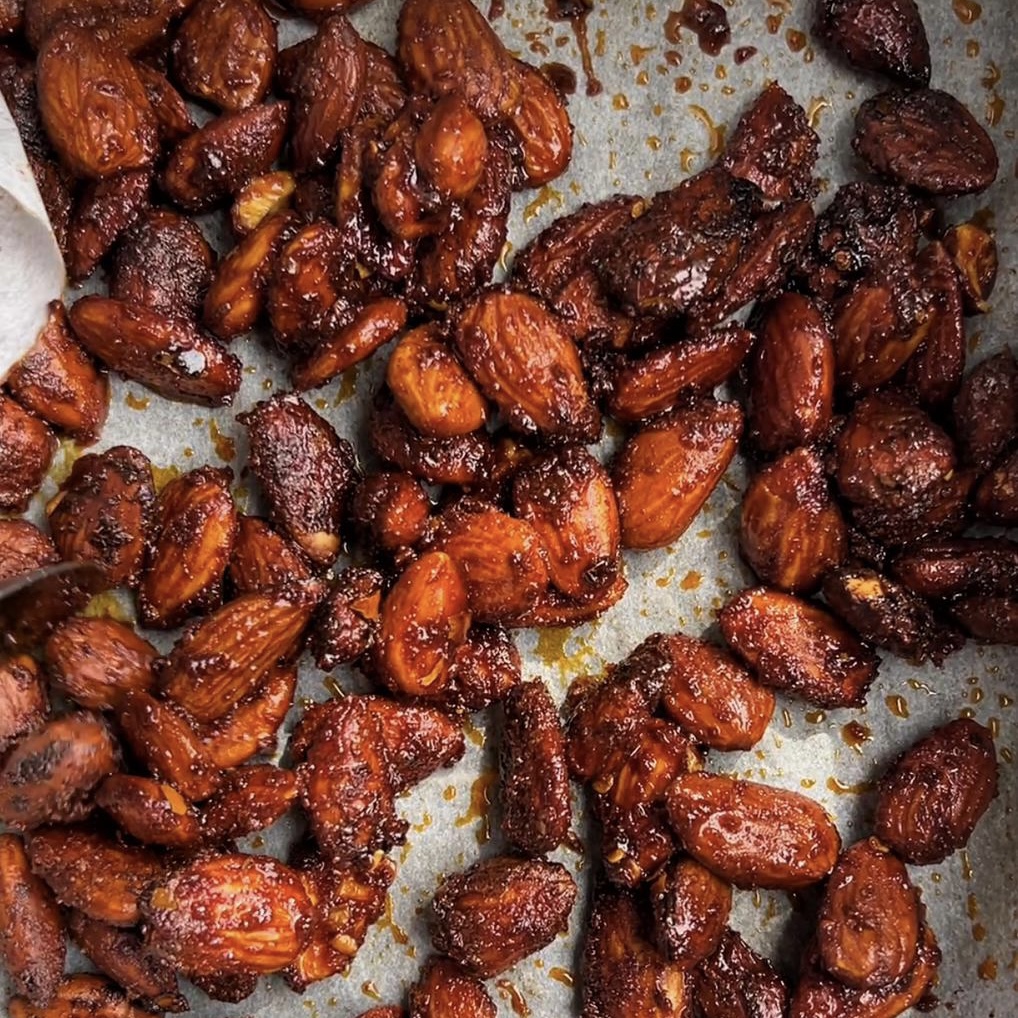
Roasted Spiced Almonds
Takes
Serves
Ingredients
- ½ tbsp oil (10 sprays)
- 100 g raw almonds
- 1 tbsp tamari
- 1 tbsp maple syrup
- ¼ tsp garlic powder
- ¼ tsp smoked paprika
- ½ tsp sweet paprika
- ¼ tsp chilli powder
- Pinch of salt
Instructions
- Preheat the air fryer to 180°C.
- Place the almonds in a bowl.
- Add the oil, tamari, and maple syrup to the almonds, mixing well to ensure they're evenly coated.
- Sprinkle the garlic powder, smoked paprika, sweet paprika, chilli powder, and salt over the almonds.
- Mix well to coat the almonds with the spices.
- Transfer the almonds to the air fryer and bake for 5 minutes at 180°C.
- Once done, remove the almonds from the air fryer and allow them to cool.
- Enjoy!
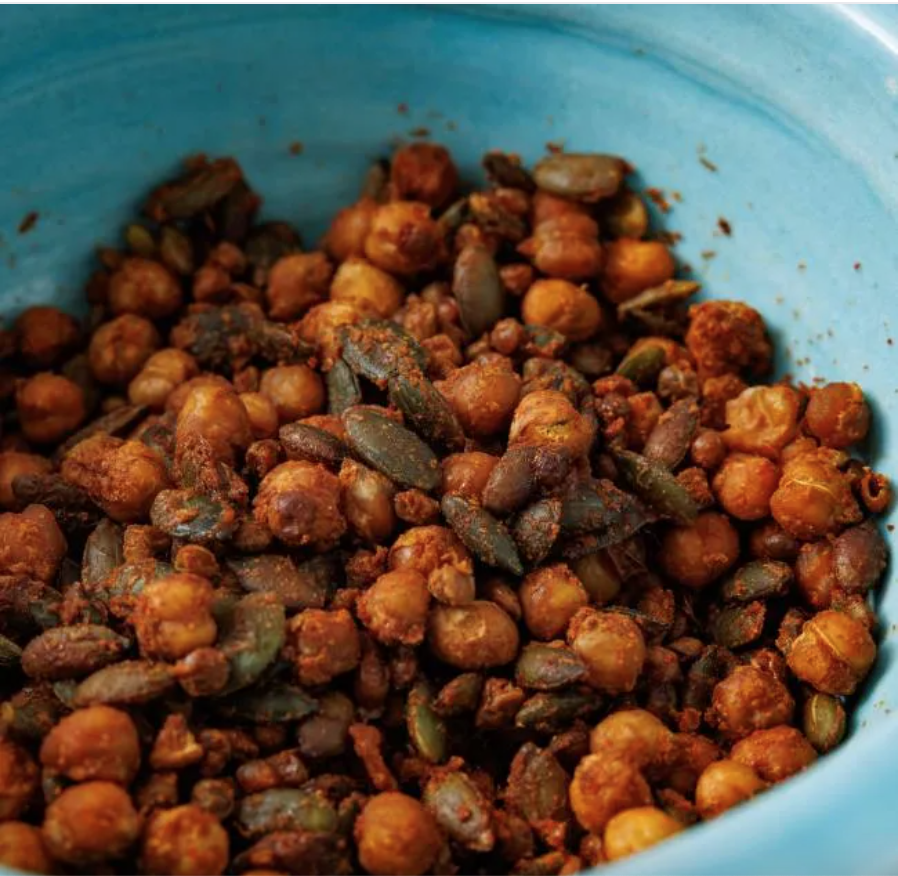
Crispy Cajun Spiced Protein Pulses
Takes 13 minutes
Serves
Ingredients
- 150 g cooked chickpeas
- 100 g cooked lentils
- 50 g pumpkin seeds
- 4 tbsp tamari
- 4 tbsp nutritional yeast
- ½ tsp garlic powder
- ⅓ tsp chilli powder
- 1 tsp smoked paprika
- Good pinch of salt
- 10 sprays oil
Instructions
- Preheat the air fryer to 180°C.
- If using tinned chickpeas and lentils, drain and rinse them (no need to dry).
- In a bowl, combine the chickpeas, lentils, pumpkin seeds, tamari, nutritional yeast, garlic powder, chilli powder, smoked paprika, and salt.
- Mix well to ensure everything is evenly coated.
- Transfer the mixture to the air fryer basket.
- Cook for 15 minutes at 180°C.
- Once done, remove from the air fryer and allow the pulses to cool.
- Enjoy!
The Happy Pear Podcast
Today we had an amazing conversation with the wonderful author of 14 parenting books, Sarah Ockwell-Smith.
Sarah studied psychology and after becoming a mother began to dive deep into the psychology and science of parenting. She has recently re-released her book: The Gentle Parenting book

Episode 115
In this episode we started off by discussing the history of parenting advice and how it has evolved over time. Sarah explained how in the past, parenting was much more community-based, with family members and neighbors providing support and guidance. However, with the industrial revolution, families became more isolated and parenting advice began to be sold as a commodity.
We then delved into current parenting trends, such as attachment parenting and positive parenting, and how these approaches have become more popular in recent years. Sarah emphasized that while it’s great to have a framework to work within, ultimately a parent’s own intuition is the most important part of parenting.
We also talked about the importance of empathy and understanding in parenting, and how it can be challenging to stay calm and patient in the face of difficult behavior from our children. Sarah provided some great tips on how to handle these situations with grace and compassion.
Overall, it was an incredibly insightful conversation and we learned so much from Sarah. We hope you enjoy listening to this episode as much as we enjoyed recording it!
Enjoy!
Lots of Love,
Dave & Steve
This episode is sponsored by Instant Vortex Plus VersaZone Air Fryer . Currently on special offer: now £159.99 a saving of £60 until 8th May. Follow this link to find out more: https://bit.ly/3KPCiEj
Produced by Sean Cahill & Sara Fawsitt
Available now from all good podcast providers:
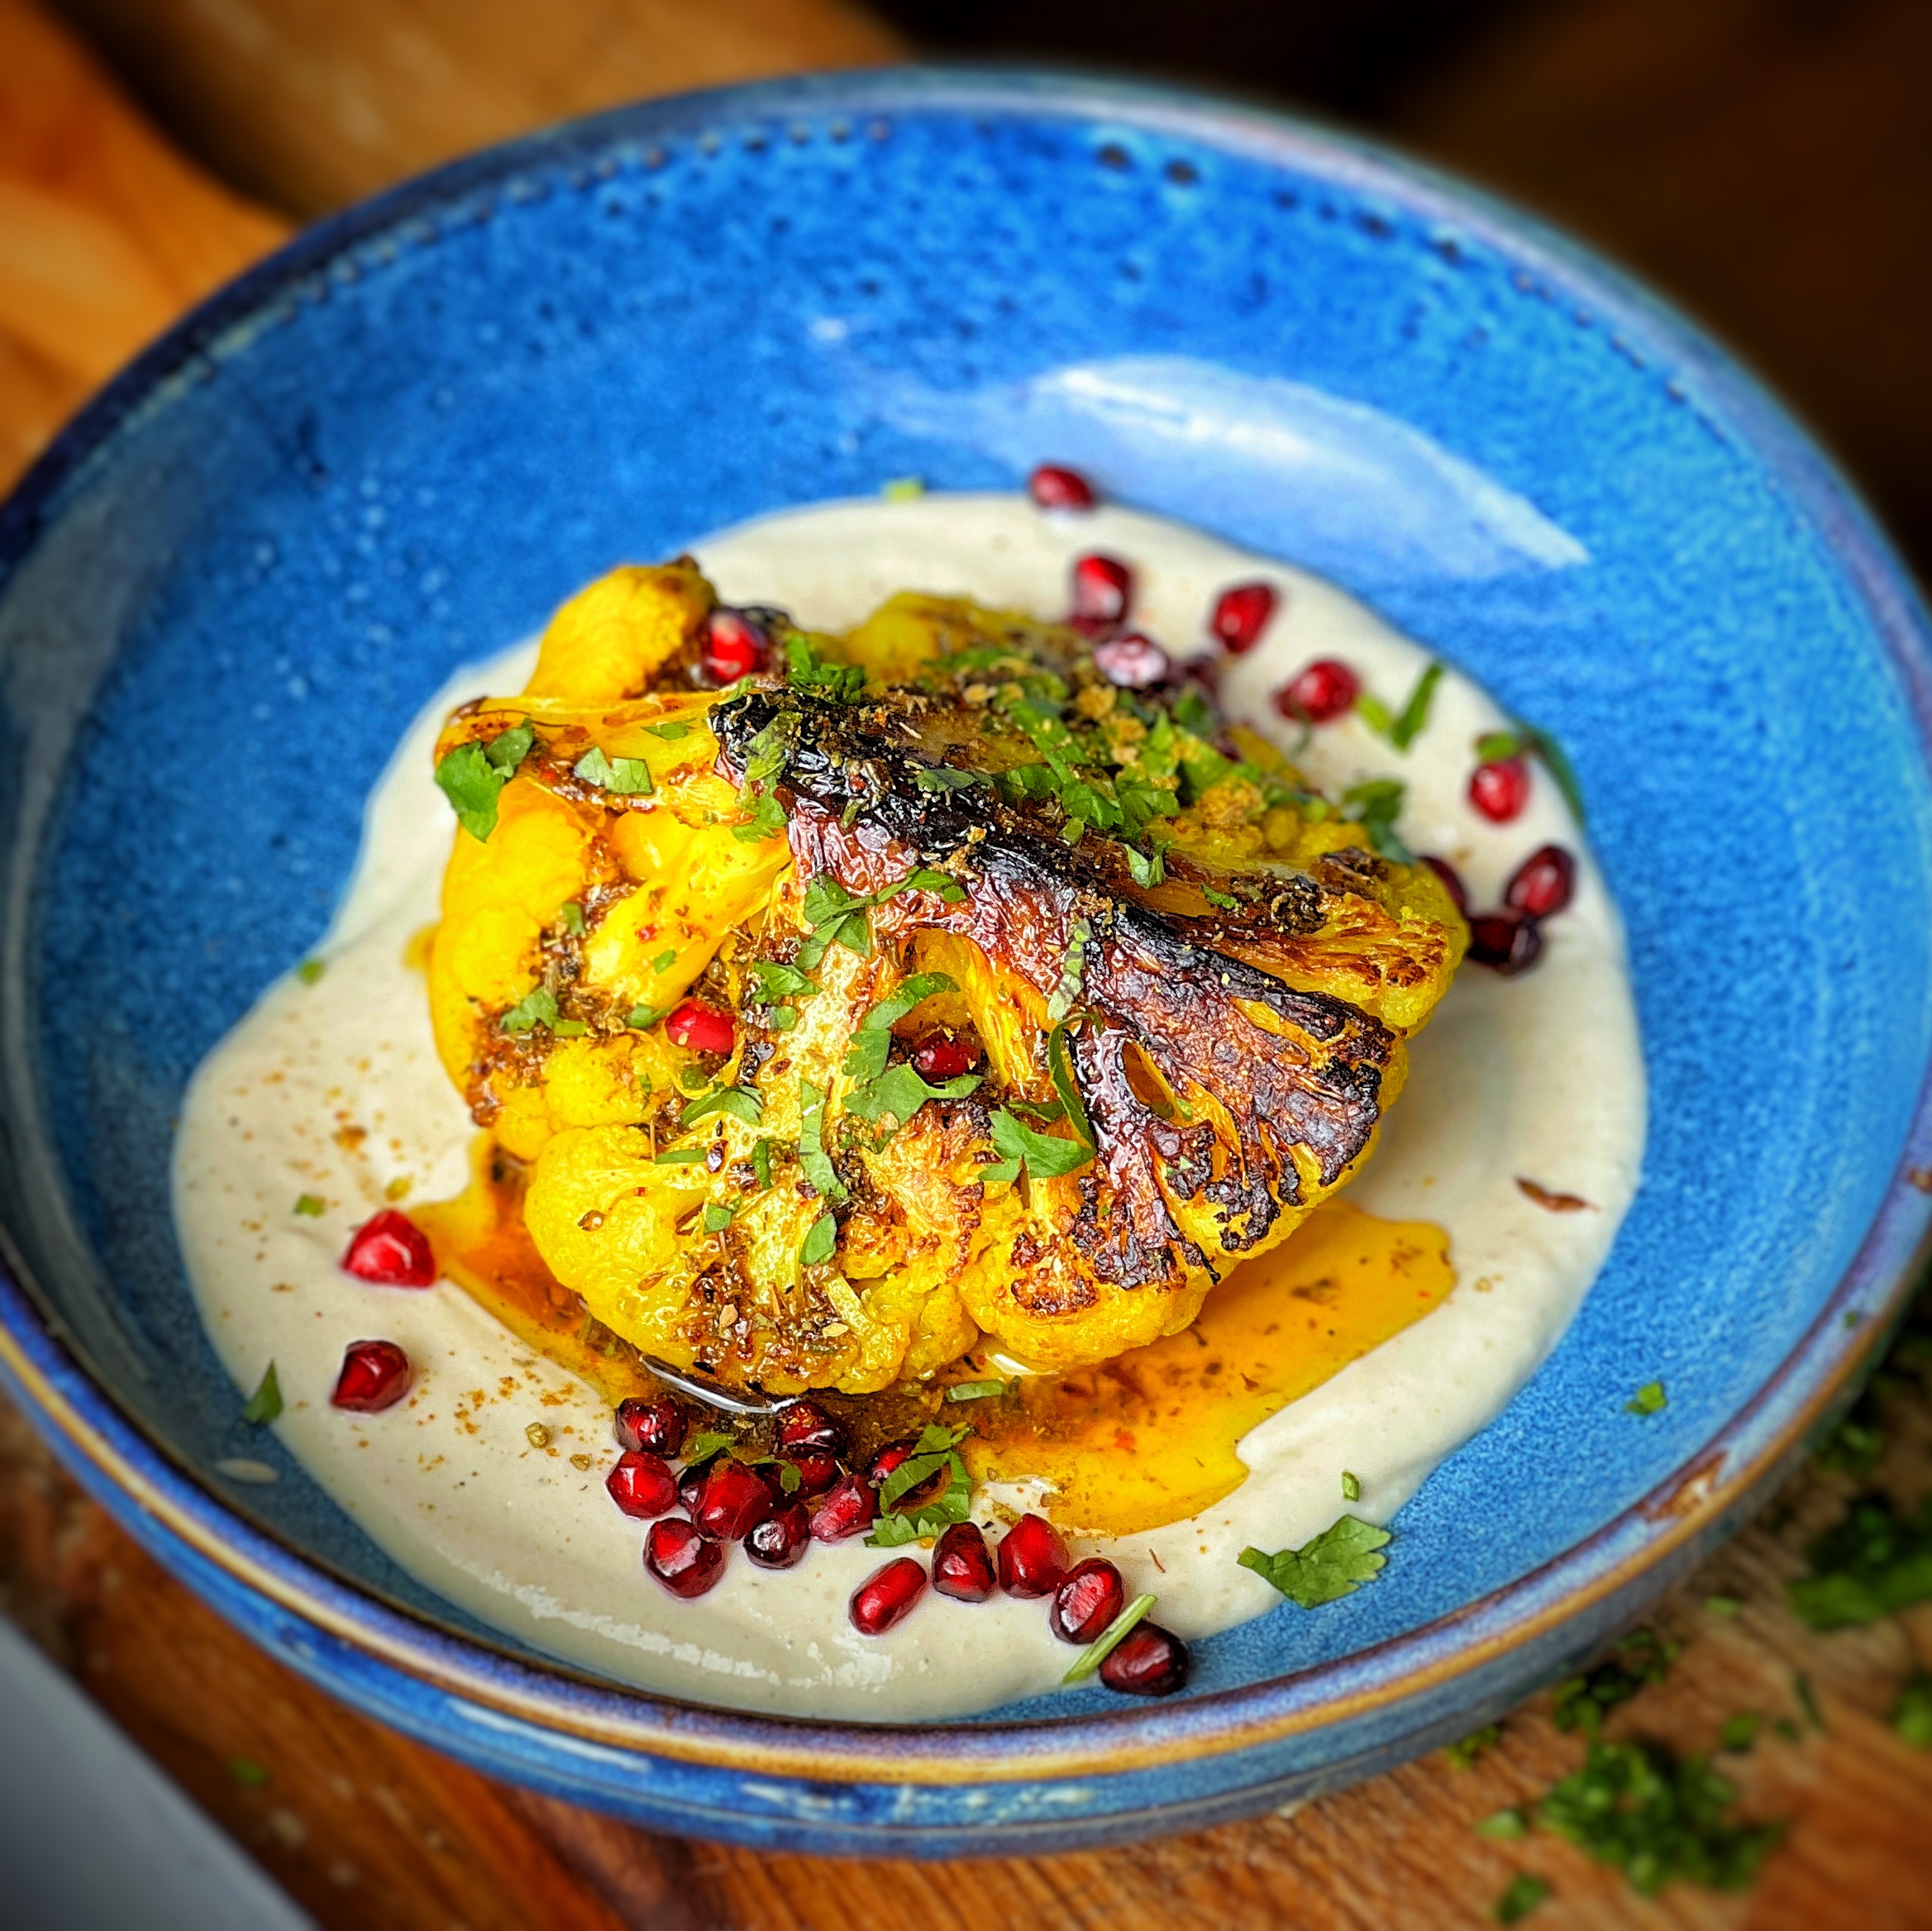
Za’atar Charred Cauliflower with Tahini Cream
Takes 25 minutes
Serves 3
Ingredients
Cauliflower
- 1 cauliflower
- 1 tbsp ground turmeric
- 2 tbsp cumin seeds
Tahini Cream
- 500 g soy yoghurt
- 8 tbsp light tahini
- 1 lemon (juiced)
Za'atar glaze
- 2 tbsp za'atar
- 2 tbsp tamari
- 1 tbsp maple syrup
- 3 tbsp oil
- ½ tbsp smoked paprika
To serve
- 1 pomegranate
- Fresh coriander (or flat parsley)
Instructions
- Fill and boil the kettle. Cut the cauliflower into 4 even quarters, including the leaves, and give it a good wash.
- Remove the tender, smaller leaves and cut them in half lengthwise.
- Place the cauliflower and leaves in a large saucepan, then fill it with the just-boiled water, a generous pinch of salt, and 1 tbsp of ground turmeric.
- Cook on high heat for approximately 8–10 minutes until the cauliflower is cooked but still firm enough to hold its shape.
- Drain and rinse the cauliflower, allowing it to dry for a minute.
- For the tahini cream, mix together the tahini, soy yoghurt, lemon juice, and a pinch of salt until well combined and creamy.
- Heat a wide-bottomed, non-stick pan on high heat and add 2 tbsp of oil. Once hot, add the cumin seeds, then carefully place the cauliflower quarters cut-side down in the pan. Cook each side until golden brown and charred.
- While the cauliflower is cooking, mix together the ingredients for the za’atar glaze until well combined.
- Finely dice the fresh coriander and deseed the pomegranate.
- To serve, spread a generous amount of tahini cream on the bottom of a plate or a wide-bottomed bowl.
- Place a charred cauliflower quarter, cut-side up, on top of the tahini cream.
- Drizzle 2–3 tbsp of the za'atar glaze over the cauliflower, then garnish with pomegranate seeds and chopped coriander.
- Serve and enjoy!
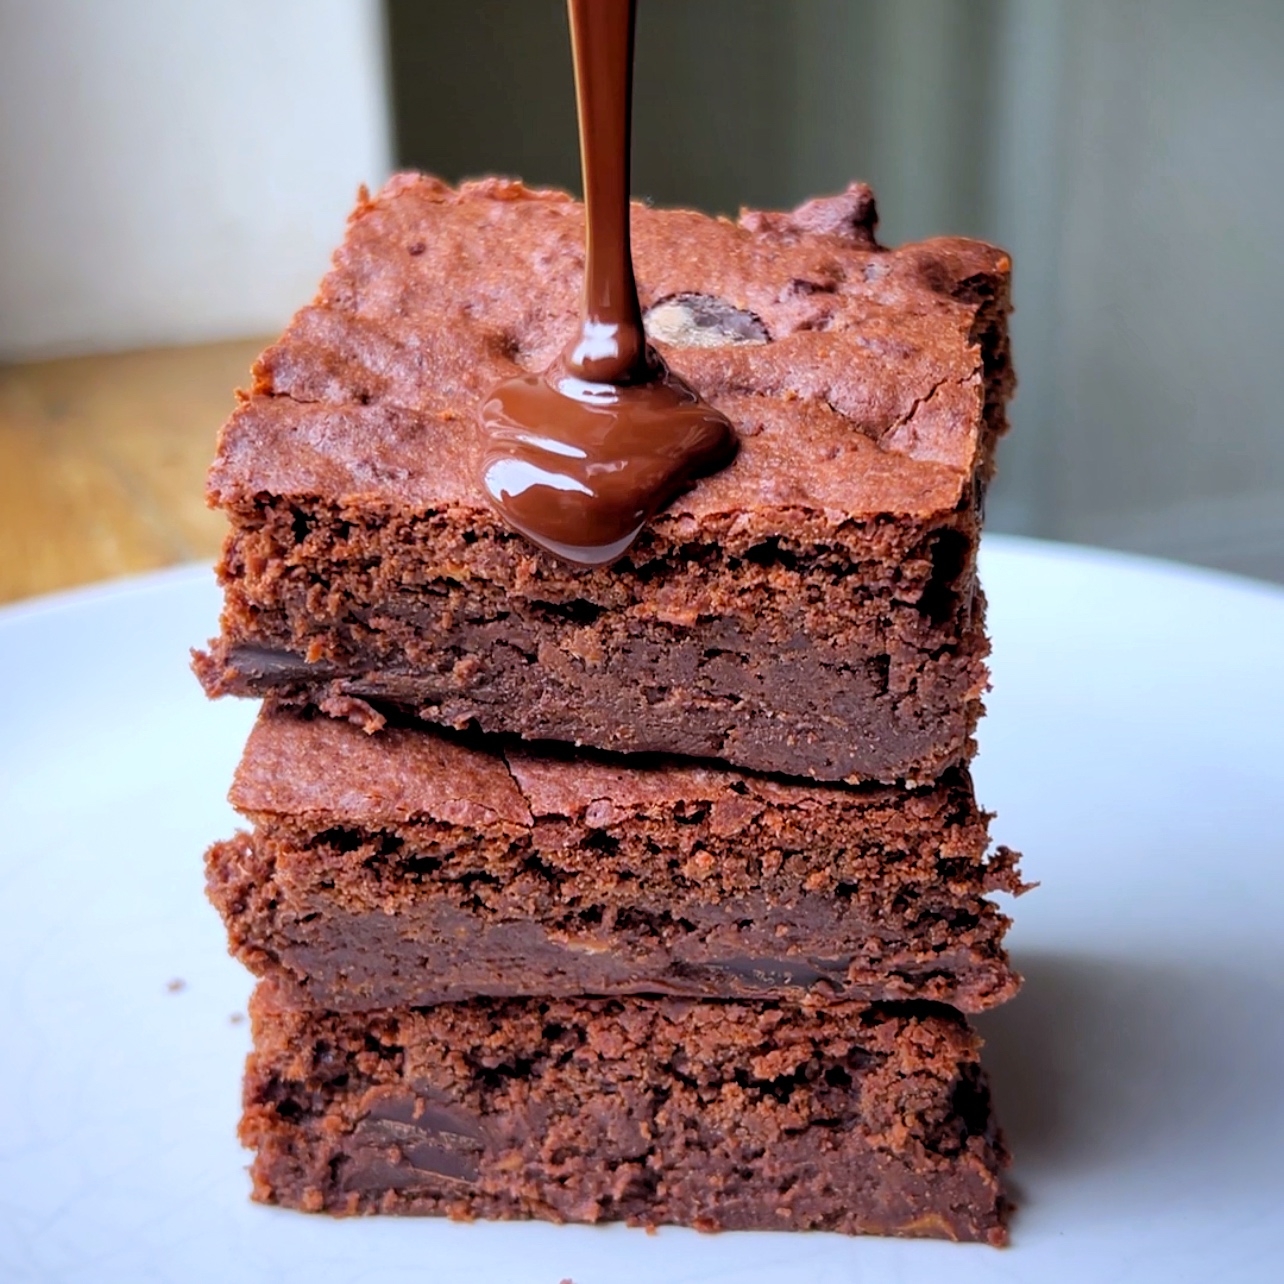
Sweet Potato Fudgy Brownies
Takes 45 minutes
Serves 8
Ingredients
- 200 g sweet potato (50g cooked)
- 65 g vegan butter
- 100 g chocolate
- 75 ml water
- 75 g self raising flour
- 30 g cornstarch
- 150 g caster sugar
Instructions
- Prepare the Sweet Potato:Peel and chop the sweet potato into small bite-sized pieces. Place the sweet potato in a 1 lb loaf tin (approx. 450 g tin with high sides) and bake in the air fryer at 160°C for 15 minutes.
- Melt the Chocolate and Butter:Break the chocolate into small pieces (similar to chocolate chips). Melt the vegan butter over a bain-marie (water bath). Once the butter is almost melted, add in half of the chocolate and the water. Stir until fully melted, then remove from the heat.Add the baked sweet potato to the chocolate mixture and blend until super smooth. You can use a blender, stick blender, or food processor for this step.
- Combine Dry and Wet Ingredients:In a separate bowl, mix the self-raising flour, cornstarch, and caster sugar together. Make a well in the centre and pour in the blended chocolate and sweet potato mixture. Stir until well combined.Gently fold in the remaining chocolate pieces.
- Bake the Brownies:Line the loaf tin with baking paper and pour in the brownie batter.Bake in the air fryer at 170°C for 25 minutes.Once baked, leave the brownies to cool and set for 1 to 2 hours before slicing. Though waiting is difficult, it’s well worth it!
The Happy Pear Podcast
Mary is a reformed internationally acclaimed landscape designer who launched her career at the Chelsea flower show in 2002, being the youngest contestant to win gold. The story of which was made into a 2016 movie called “Dare to be Wild”.

Episode 114
She is a bestselling author, inspirational speaker, occasional television presenter and founder of the global movement “We are the ARK”, a practical groundswell movement who’s aim is to shift the environmental game in nature’s favour.
“The time for gardens as canvases for our creative pleasure is over. Everything must change and if we are to save the planet, then we must start with our own patches of it. It’s time to reimagine our work as gardeners, to become leaders in the race to save our beautiful planet, to save ourselves.”
We had the privildege of recording this episode in person, it was truly inspiring, chilling and brilliant. Mary is wonderful!
Enjoy!
Lots of Love,
Dave & Steve
To find our more about Mary, her book and her work, visit: https://marymary.ie/
Produced by Sean Cahill & Sara Fawsitt
Available now from all good podcast providers:

Easy Air Fried Lasagne
Takes
Serves 6
Ingredients
For the Lasagne
- 250 g lasagne sheets (½ pack)
For the White Sauce (Cashew Cream)
- 150 g raw cashew nuts
- 300 ml oat milk
- 3 tbsp nutritional yeast (optional)
- 1 tsp lemon juice
- ⅓ tsp salt
- ½ tsp black pepper
- ½ tsp garlic powder (optional)
For the Tomato Sauce
- 1 onion (peeled and finely chopped)
- 3 cloves garlic (minced)
- 1 medium carrot (grated)
- 150 g mushrooms (finely sliced)
- 1 sweet potato (350g, cut into bite-sized pieces)
- ½ red chilli (finely chopped, omit if you prefer less spice)
- 2 x 400g tins chopped tomatoes
- 100 g tomato purée
- 1 tbsp maple syrup
- 1 tsp salt
- ½ tsp black pepper
- 2 tbsp tamari or soy sauce
Instructions
- Preheat the Air FryerPreheat the air fryer to 180°C.
- Cook the Sweet PotatoChop the sweet potato into bite-sized pieces. Place them in the air fryer with a pinch of salt and 5 sprays of oil (or ¼ tsp).Bake for 20 minutes, then set aside.
- Make the Cashew CreamPlace the cashew nuts in a small pot and cover with boiling water. Simmer for 10 minutes to soften them. Once softened, drain and rinse the cashews.Put all the cashew cream ingredients (oat milk, cashews, nutritional yeast, lemon juice, salt, black pepper, and garlic powder) into a blender. Blend until smooth, which should take about 2 minutes. Taste and adjust seasoning if needed.
- Make the Tomato SauceHeat a wide non-stick pan on high heat. Once hot, add a few sprays of oil, then the chopped onion, mushrooms, and a pinch of salt. Cook for 5 minutes, stirring regularly. If the vegetables start to stick, add 1 tbsp water or a few sprays of oil to deglaze the pan.Add the tamari/soy sauce and mix to coat the vegetables. Next, add the grated carrot, garlic, and chilli. Cook for 3 minutes, stirring regularly. If any vegetables start to stick, add water or oil as before. Cook until the onions begin to brown at the edges and the mushrooms are reduced.Add the chopped tomatoes, tomato purée, maple syrup, salt, black pepper, and the baked sweet potato. Bring to a boil, then reduce heat and simmer for 10 minutes. Taste and adjust seasoning if needed. Set aside.
- Assemble the LasagnePreheat the air fryer to 180°C again. Spread a thin layer of cashew cream on the bottom of a lasagne tray.Add a layer of lasagne sheets, breaking some to fit and ensuring no overlaps (overlapping sheets won't cook properly).Spread half of the tomato sauce evenly over the lasagne sheets.Add another layer of lasagne sheets on top of the tomato sauce.Spread half of the remaining cashew cream over the lasagne sheets.Add the rest of the tomato sauce and spread evenly.Add another layer of lasagne sheets.Finally, top with the remaining cashew cream.
- Cook the LasagnePlace the assembled lasagne in the air fryer and cook at 180°C for 20 minutes.
- ServeOnce cooked, allow the lasagne to cool slightly. To cut the lasagne easily, use kitchen scissors. Serve and enjoy!
Nutrition

Caramelised Banana Cake with Chocolate
Takes 1 hour
Serves 12
Ingredients
- 3 bananas (for caramelised topping)
- 150 g caster sugar
- 2 tbsp water (for caramel)
- 100 g chocolate chips
- 200 g self-raising flour
- 1½ tsp ground cinnamon
- 120 ml sunflower oil
- 150 g maple syrup
- 2 tbsp ground flaxseeds
- 6 tbsp water (for flax egg)
- 3 bananas (for the cake batter)
- 50 g walnuts (roughly chopped)
Instructions
- Preheat the oven:Preheat your oven to 160°C (fan) / 180°C (conventional).
- Prepare the cake tin:Line a 9-inch springform tin with baking parchment. Slice the 3 bananas for the topping lengthwise and place them, cut side down, in the prepared tin.
- Make the caramel:In a wide saucepan, heat the 150g caster sugar over medium heat. Add the 2 tbsp water and stir just once. From this point, avoid stirring and simply swirl the saucepan occasionally. Allow the sugar to melt and turn golden, forming a smooth caramel. Stir towards the end if necessary to achieve a smooth consistency. Remove from heat before the caramel turns too dark, as it can quickly burn. Pour the caramel evenly over the bananas in the tin and leave to cool.
- Prepare the flax egg:In a small bowl, mix the ground flaxseeds with 6 tbsp water. Leave to sit for 5 minutes, allowing the mixture to thicken and coagulate.
- Prepare the cake batter:In a large bowl, combine the self-raising flour, ground cinnamon, and chopped walnuts.In a blender, combine the 3 peeled bananas, sunflower oil, maple syrup, and the flax egg mixture. Blend until smooth.If you don't have a blender, mash the bananas in a separate bowl and whisk together with the oil, syrup, and flax egg until well mixed.Add the wet mixture to the dry ingredients and stir until you achieve a smooth batter. Fold in the chocolate chips.
- Assemble the cake:Pour the cake batter over the caramel-coated bananas in the tin, spreading it evenly.
- Bake the cake:Place the cake in the preheated oven and bake for 35-45 minutes, or until a skewer inserted into the centre comes out clean.
- Flip the cake:Once baked, run a palette knife around the edges of the tin to loosen the cake.Place a flat plate or board on top of the tin, then carefully flip the cake so that the caramelised bananas are on top. If any bananas stick to the tin, gently scrape them off and arrange them back on the cake.
- Cool and serve:Allow the cake to cool slightly before slicing. Serve and enjoy!
Nutrition

A mighty Korma bursting with wholesome veggies, coconut & chilli. 2 of your 5 a day and only 307 kcals per pot.
INGREDIENTS
Coconut Milk (21%) [Coconut Extract, Water], Tomatoes (15%), Water, Carrots (9%), Yellow Split Peas (8%), Peas (8%), Onions, Red Peppers, Coconut Flakes, Spring Onion, Spices, Garlic Purée, Corn Starch, Ginger Purée, Rapeseed Oil, Agave Syrup, Desiccated Coconut, Salt, Red Chillies (0.4%), Coriander, Garlic Powder, Mustard
ALLERGEN INFORMATION
For allergens, see highlighted ingredients.
May contain traces of Nuts.
NUTRITIONAL INFORMATION
| Typical | per 100g |
|---|---|
| Energy | 330kJ / 80kcal |
| Fat | 5.2g |
| Of which Saturates | 4.1g |
| Carbohydrate | 4.5g |
| Of which Sugars | 3.5g |
| Fibre | 3.2g |
| Protein | 2.1g |
| Salt | 0.55g |

A creamy fusion of tomato, coconut milk and aromatic spices & brown rice. 2 of your 5 a day and only 337 kcals per pot.
INGREDIENTS
Coconut Milk (20%) [Coconut Extract, Water], Tomatoes (16%), Water, Carrots (10%), Onions, Red Peppers (6%), Sweet Corn, Yellow Split Peas, Brown Rice (3%), Spinach, Tomato Paste, Spices (1%), Garlic Purée, Agave Syrup, Rapeseed Oil, Ginger Purée, Corn Starch, Paprika, Salt, Red Chillies, Coriander, Ginger Powder, Garlic Powder, Mustard
ALLERGEN INFORMATION
For allergens, see highlighted ingredients.
May contain traces of Nuts.
NUTRITIONAL INFORMATION
| Typical | per 100g |
|---|---|
| Energy | 373kJ / 89kcal |
| Fat | 4.0g |
| Of which Saturates | 2.7g |
| Carbohydrate | 9.7g |
| Of which Sugars | 4.5g |
| Fibre | 3.0g |
| Protein | 2.1g |
| Salt | 0.6g |

Charred Aubergine Tagliatelle
Takes 26 minutes
Serves 3
Ingredients
- 400 g tagliatelle
- 150 g oyster mushrooms
- 2 aubergines
- 1 carrot
- 1 onion
- 3 cloves garlic
- 100 g tomato purée
- 700 g tomato passata
- 1 tbsp maple syrup
- 1.5 tbsp tamari
- Salt and pepper (to taste)
- Basil (to serve)
Instructions
- Char the aubergines: Using tongs, cook the aubergines over a gas flame for 5-10 minutes until they are charred and cooked through to the centre. A fork should easily pierce the aubergines when they are ready. The centre should be soft and break down effortlessly.Alternatively if you don’t have a gas flame, cut the aubergines in half and place them face down on a baking tray. Sprinkle with a generous pinch of salt and bake at 200°C for about 30 minutes until they are soft enough to be easily scooped out or torn apart.
- Prepare the vegetables: Peel and dice the onion and garlic. Finely dice the carrot into 1/2 cm cubes. Using a fork, shred the oyster mushrooms to give them a distinct, pulled texture. Be careful not to scrape your fingers when doing this.
- Cook the vegetables: Heat a non-stick pan over high heat and add 1 tablespoon of oil. Once hot, add the onion, carrot, and a pinch of salt. Cook for 3-4 minutes, then add the mushrooms and garlic. Cook for another 4-5 minutes until the onions and mushrooms start to brown at the edges.
- Flavour the sauce: Add the tamari and mix it through, allowing the mushrooms to absorb the flavour. Next, add the tomato passata, tomato purée, and maple syrup. Stir well and taste the sauce. Adjust the seasoning with salt and pepper to your liking.
- Chop the aubergine: Once the aubergines are done, chop them into small pieces and stir them into the sauce.
- Cook the pasta: Follow the instructions on the packet to cook the tagliatelle. Once done, drain and rinse the pasta, then add it to the sauce.
- Finish and serve: Finely chop the basil and sprinkle it over the top. Mix everything together, double-check the seasoning, and enjoy!
Nutrition
Here we have pulled together some of our favourite ways to use red cabbage. We know it can sometimes be challenging to know what to do with it! It packs a punch of vitamins C and K, along with a synergy of antioxidants that promote overall well-being. Its deep, purple-hued leaves bring not only a pop of colour to your plate but also a spectrum of nutritional benefits, including anti-inflammatory properties and digestive support.
Red cabbage is a chameleon in the kitchen, capable of starring in a variety of dishes. From the tangy crunch of a fresh slaw to the comforting warmth of a braised side, its culinary potential is boundless. Whether you’re pickling, fermenting, sautéing, or tossing it raw into salads, red cabbage adds a flavourful twist to any meal. Let’s embark on a journey of taste and health as we explore the delicious possibilities of red cabbage in your kitchen.
Red Cabbage Sauerkraut
Why not turn it into homemade probiotics? It takes 15 mins of prep and a week or so to ferment till you have this superfood probiotic red cabbage powerhouse!!
Total Time Needed: 20 Mins + fermenting time
Difficulty: Easy

Asian Style Salad
This salad is a great way of using carrots, red cabbage, spinach and even beetroot. Its packed with nutrition and flavour
Total Time Needed: 25 Mins
Difficulty: Easy
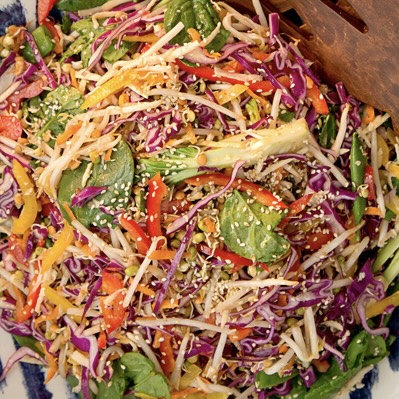
Red Cabbage, Apple & Walnut Salad
Indulge in the crisp, refreshing flavours of our Red Cabbage & Apple Salad, a dish that celebrates the harmonious blend of sweet and tangy. This salad is not only a feast for the eyes but also a powerhouse of health. Perfect for a light lunch or as a side to your main course. Add spinach too if you so desire!
Total Time Needed: 20 Mins
Difficulty: Easy

Asian Style Rainbow Crunch Salad
Takes 20 minutes
Serves 6
Ingredients
- 1 medium carrot
- 250 g red cabbage
- 1 regular red pepper
- 100 g sprouted beans like mung beans or aduki beans, can be replaced with bean sprouts
- 50 g sugar snap peas 1 handful
- 30 g sunflower seeds
- 30 g sesame seeds
- 100 g baby spinach
For Dressing
- 1 Thumb sized piece Fresh Ginger approx 8g
- 1 clove Garlic
- 1½ tbsp of Tamari or Soy Sauce
- 1 Lemon (juice of)
- ¼ medium Red Chilli
- 2 tablespoons Maple Syrup
- 60 ml sesame oil or other oil
Instructions
- Prep the veg: Grate the carrot and red cabbage or if your knife skills are good finely slice the cabbage into long thin stips and julienne the carrot into small matchstick size cuts.. Finely slice the red pepper (removing the seeds and stalk) and slice the sugar snap peas lengthwise so you open them up into thin long strips.
- Toast seeds: Toast the sesame and sunflower seeds in a dry pan over high heat for about 5 minutes, until they turn slightly brown and start to pop
- Put salad veg in a bowl: Combine the cabbage, carrot, peppers, sugar snap peas, sprouted beans, and baby spinach in a large salad bowl.
- Blend the dressing: For the dressing, blend together all ingredients for the dressing in a blender or food processor until nice and smooth and the garlic and ginger and fully blended.
- Dress, mix & serve: Add the dressing to the salad and mix until well coated. Sprinkle toasted seeds on top and enjoy!
Nutrition
The Happy Pear Podcast
This week’s episode is with Mary-Frances O’Connor, a psychologist and author of “The Grieving Brain: The Surprising Science of How We Learn from Love and Loss.”

Episode 112
Mary-Frances conducts studies to better understand the grief process both psychologically and physiologically. She is a leader in the field of prolonged grief, a clinical condition in which people do not adjust to the acute feelings of grief and show increases in yearning, avoidance, and rumination.
Her work primarily focuses on trying to tease out the mechanisms that cause this ongoing and severe reaction to loss. In particular, she is curious about the neurobiological, immune, and cardiovascular factors that vary between individual responses to grief.
In this episode we explore the different facets of grief, how it affects our brain, how to deal with it and how we can support others.
A heavy topic, and we are complete novices here but we learnt a lot and hope that you did to.
Lots of love,
Dave & Steve
Available now from all good podcast providers:
This episode is sponsored by Vivobarefoot Footwear. Vivobarefoot Footwear have given our listeners an exclusive 15% discount when you enter the code HAPPYPEAR15
Genuinely these are the only shoes you will see Dave & Steve wearing!
Produced by Sean Cahill and Sara Fawsitt
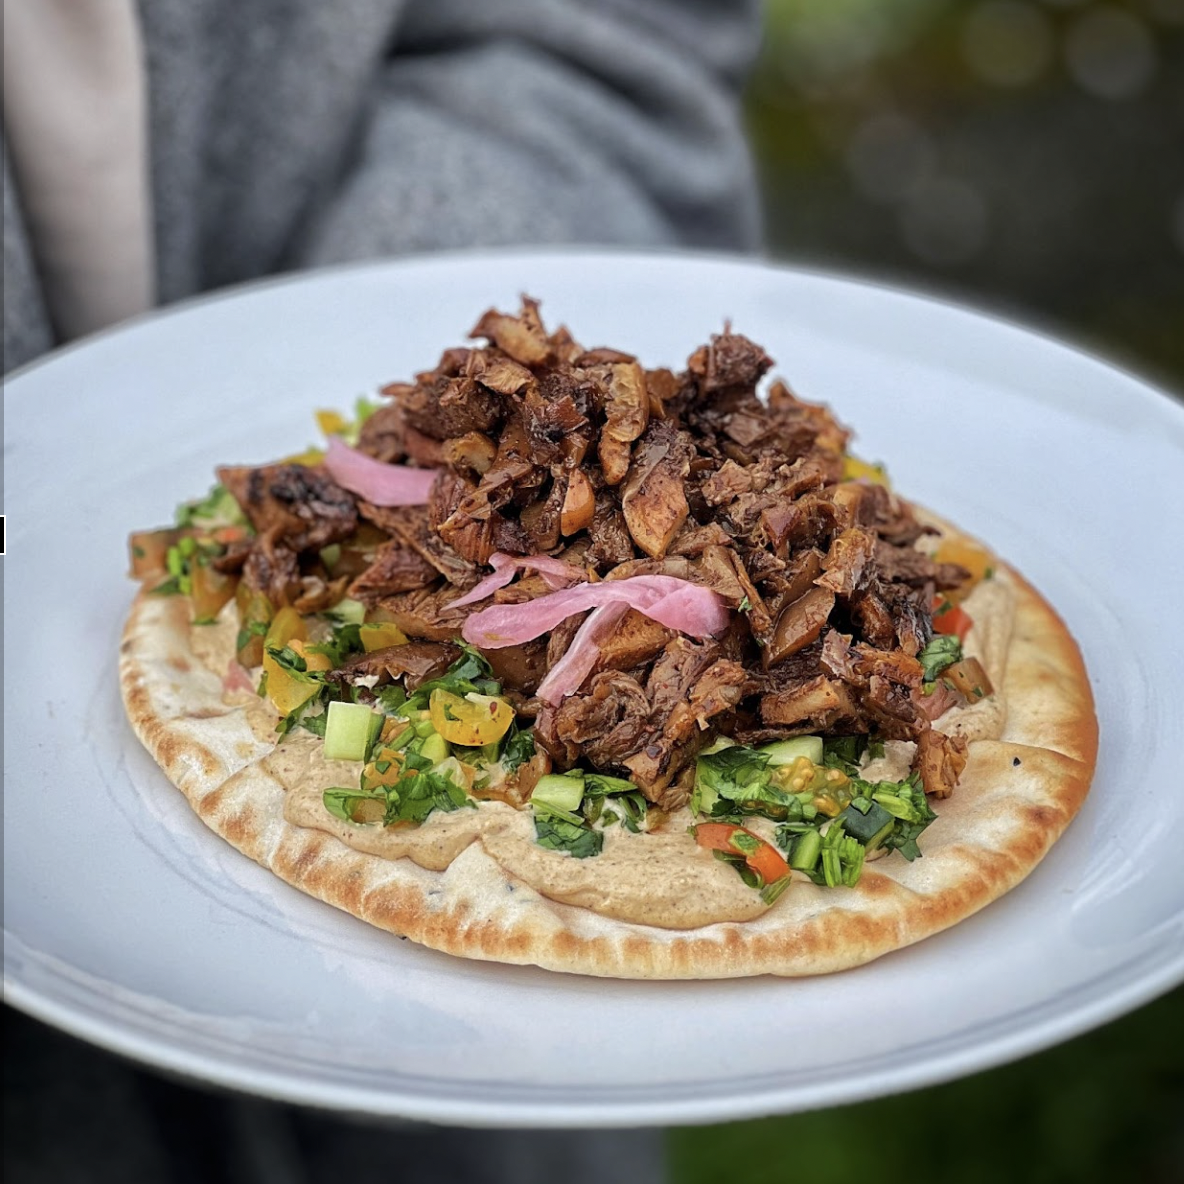
Meaty Mushroom Shawarma
Takes 20 minutes
Serves 2
Ingredients
- 2 flatbreads
- 200 g oyster mushrooms
Seasoning
- 1 tbsp sumac
- 1/2 tsp turmeric
- 1 tbsp smoked paprika
- 1/2 tsp chilli powder
- 1/2 tsp black pepper
- 3 tbsp tamari
- 1.5 tbsp maple syrup
- 2 tbsp oil
Salad
- 10 cherry tomatoes
- 1/3 cucumber
- 15 g fresh coriander
Tahini Sauce
- 50 g tahini
- 100 g natural yoghurt
- 1 clove garlic
- Juice of 1 lemon
- Pinch of salt
Additional
- Pickled red onion
Instructions
- Prepare the mushrooms: Tear the oyster mushrooms into pieces that can be spread wide when pressed.Place them in a bowl, add the seasoning (sumac, turmeric, smoked paprika, chilli powder, black pepper, tamari, maple syrup, and oil), and mix well.
- Cook the mushrooms: Heat a wide non-stick frying pan on high heat and add 1 tbsp of oil. Once hot, spread the mushrooms in a single layer, ensuring there’s enough space for them to char. Using another clean pan, press the mushrooms for about 20 seconds to maximise charring and remove excess moisture for a meatier texture. Cook for 1-2 minutes, turn, and press again until the mushrooms are charred and cooked through. Remove from the pan and roughly chop.
- Make the salad: Finely dice the cucumber, coriander, and cherry tomatoes. Mix them in a bowl with a pinch of salt. Set aside.
- Prepare the tahini sauce: Peel and finely dice the garlic. In a bowl, combine the tahini, yoghurt, lemon juice, garlic, and a pinch of salt.Mix until the sauce emulsifies into a thick cream. Taste and adjust seasoning as necessary.
- Assemble the shawarma: Spread a generous layer of the tahini sauce over each flatbread. Add the coriander, tomato, and cucumber salad, followed by the charred mushrooms. Top with pickled red onions and enjoy!
Nutrition
Menopause Nutrition Advice from a Gynaecologist
General Advice:
- Adopt a predominantly whole food plant based (WFPB) way of eating. Eating a range of whole plant foods helps with much more than just the symptoms of menopause. The same diet that helps with menopausal symptoms, also helps with better aging, reduced dementia and Alzheimer’s risk, reduced heart disease and diabetes and reduced breast, prostate, bowel, womb and ovarian cancer risks, the biggest killers in the modern day.
- Eating a whole food plant based diet means you will eat calorie light, nutrient dense, gut microbiome promoting fibre rich colourful foods.
- Focus on eating a plant strong diet full of colourful micronutrient and antioxidant rich vegetables, fruits, legumes, nuts and seeds and intact minimally processed whole grains. To this way of eating, one should add plenty of herbs and spices as these increase the antioxidant power of any dish by as much as 200%. Make water the drink of choice.
- As this way of eating is rich in fibre, it helps promote healthy gut bacteria (healthy gut microbiome) and reduces the incidence of common but serious life threatening diseases such as heart disease and cancer as well as dementia through complex mechanisms. Learn how to improve gut health.
- Avoid a diet high in trans fats found in junk and ultra processed foods (biscuits/cakes/chocolates/ready meals) as they promote inflammation.
- Avoid saturated fats found almost exclusively in animal products (eggs, dairy, fish, chicken and red meat which along with the growth hormone, insulin growth factor, hormones, chemicals, pesticides and antibiotics promote oxidative stress and inflammation in the body, the latter being the base from where most lifestyle diseases arise.
- The less processed a food is, the better it is for you. That is why it is best to avoid highly refined foods and stick to fibre rich whole plant foods.
- Avoid oils and fruit juices as they tend to be devoid of fibre and as a result do not have the same amount or variety of micronutrients that are so good for our health.
To help reduce hot flushes and night sweats:
- Breakfast: 250 ml of soya milk with steel cut porridge oats. Add 1-2 tbsp of flaxseed powder and 1 tsp of chia seeds to the oats and soak in hot water. Cook with a cup of soya milk (organic, unsweetened or homemade if possible). Add nuts and fresh and dried fruit. This gives you a good start with the fibre rich, plant oestrogen rich, omega-3 rich plant-based breakfast or brunch.
- Mid-morning snack: handful of edamame beans or soya nuts or berries or hummus with crudités.
- Lunch: Large rainbow coloured salad with beans or chickpeas or hummus or vegetable bean soups, minestrone soups or dals.
- Dinner: Hearty Lentil Stew , pan fried tofu with steamed greens and tofu,
- Avoid alcohol and smoking as both these can make hot flushes much worse.
- Caffeine containing drinks can worsen hot flushes.
- Avoid a diet high in trans fats and processed foods (biscuits/cakes/chocolates/ready meals/fried foods/sugary foods) as they promote inflammation through a variety of mechanisms.
- Avoid saturated fats found almost exclusively in animal products (eggs, dairy, fish, chicken and red meat which along with the growth hormone, insulin growth factor, hormones, chemicals, pesticides and antibiotics promote oxidative stress and inflammation in the body, the latter being the base from where most lifestyle diseases arise.
By Dr. Nitu Bejekal, Snr Consultant Gynaecologist

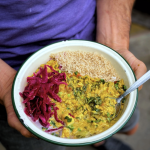
Understanding the Menopause: Navigating the Physical and Emotional Changes with Our Expert Course
The menopause starts when a woman has no period for a full 12 months. The typical age a women starts the menopause is age 51. The period before menopause when some menopause symptoms might begin or when their might be some inconsistency in the regularity of your period is called the perimenopause. The menopause can be a challenging time in a women’s life but it does not need to be the case. As hormone levels drop, primarily oestrogen, women may experience symptoms such as hot flushes, night sweats, weight gain, difficulty sleeping and mood swings. These symptoms, along with the increased risk of certain health conditions such as heart disease and dementia, can make the menopause a difficult time. However, with the right support and facts, women can navigate this period with ease and emerge stronger and healthier.
Overview of the Menopause
Menopause is a natural biological process that marks the end of a woman’s reproductive years. It typically occurs between the ages of 45 and 55 with the average being somewhere around 51, although it can occur earlier or later. During this time, the ovaries stop producing eggs and the production of oestrogen and other hormones decreases.
What There is to Learn about the Menopause
The menopause is a complex process that involves many factors, including hormonal changes, genetics, lifestyle, and environmental factors. Women who understand the menopause and how it affects their bodies can better manage its symptoms and improve their overall health and well-being and even thrive during this period of their live. This can include learning about lifestyle changes such as exercise and diet, as well as effective treatments for specific symptoms such as hot flushes, sleep disturbances, and mood swings.
There are also important health considerations related to the menopause, such as the increased risk of certain conditions such as heart disease, osteoporosis, and type 2 diabetes. Understanding these risks and taking steps to mitigate them, such as getting regular check-ups and adopting healthy lifestyle practices can help women maintain good health as they age.
Why Our Course Can Help
The Happy Menopause course is a 4 week course fronted up by Dr. Nitu Bajekal, Senior Consultant Gynaecologist and other medical professionals. It is designed to help women understand the menopause and empower them to make lifestyle changes to help them to thrive during this period of transition. It includes the learnings from real experts to help you to better deal with the often negative symptoms.
The course will give you the facts about menopause and debunk many of the myths. It gives you meal plans to start to cook and eat as well as hundreds of delcious recipes. There are daily live classes for you to join as well as so much more. Whether you are experiencing symptoms of the menopause or are simply looking for information and support, our course has something to offer.
We understand that the menopause can be a confusing and overwhelming time, but with the right support and education, women can come through it feeling stronger and more confident. The Happy Menopause Course is here to help you to thrive during this period and to make the most of it. We look forward to helping you on your journey.
7 Natural Menopause Treatments That Work
As women go through menopause, they often experience various physical and emotional changes due to the decline in hormones in their body, primarily oestrogen. Some common symptoms include hot flushes, night sweats, weight gain, mood swings, poor quality sleep and brain fog or loss of confidence. While HRT (hormonal replacement therapy) is a popular treatment for some women, many women would prefer to use natural approaches to mitigate these negative symptoms for a more gentle and holistic approach.
Here are 7 natural menopause treatments that have been shown to work for many women:
- Phytoestrogens: These are plant-based compounds found in foods like soybeans, lentils, chickpeas, flaxseeds, and almonds. Eating these foods can help relieve menopause symptoms by mimicking the effects of estrogen in the body. A great way to do this is to add a tin/can of cooked beans or chickpeas to your dinner or to eat hummus, which is made of chickpeas. Beans are also high in fibre and low in calories so will aid in weight loss.
- Herbs: Certain herbs have been used for centuries to treat menopause symptoms. Black cohosh is well-known for relieving hot flushes, while red clover can help regulate mood swings. Other helpful herbs include dong quai, ginseng, and evening primrose oil. The above are rare medicinal herbs, however all herbs are high micro nutrients and contain compounds that will help regulate your bodies systems. Choose herbs such as coriander, mint, basil, parsley or whatever fresh herbs you like. All will have beneficial properties.
- Acupuncture: This is a traditional Chinese medicine practice that involves inserting fine needles into specific points on your body. Acupuncture has been found to be effective in reducing hot flushes and helping with de-stressing as well as helping to improve sleep quality for menopausal women.
- Mind-body practices: Practices such as meditation, yoga, mindfulness and tai chi can help relieve stress and anxiety, which are common symptoms of menopause. They help reduce stress and bring you back to the present moment.
- Eating anti-inflammatory foods. Some of the side effects of menopause are rooted in inflammation. Much of the modern western diet of animal based foods and processed foods cause an inflammatory response to our bodies. By eating more whole plant foods that are naturally anti-inflammatory, these foods will help to ease symptoms by reducing inflammation.
- Hormonal balancing whole plant foods: Whole plant foods support hormone production and help balance many systems in your body. Whole plant foods include fresh fruits, vegetables, beans & legumes, wholegrains and nuts and seeds.
- Exercise: Regular exercise can reduce the severity of hot flushes, improve mood, reduce stress, boost energy levels and improve sleep quality. Sometimes motivation for exercise can wain during menopause so it is a matter of picking something that you think you will enjoy and getting started. Ideally you have a friend join you or someone to help hold you accountable and to support you who is on the same journey. Scheduling it into you week is also really important to make sure that it happens.
Remember, every woman’s experience of menopause is unique. However there are over arching lifestyle changes that will give you a really solid foundation in terms of your health and the menopausal phase of your life. We created The Happy Menopause Course, it is fronted up by Senior Consultant Gynaecologist Dr. Nitu Bejekal and other medical professionals. It gets great results and debunks a lot of myths and false facts about menopause.
Sample Lesson: Cognitive Health
Oestrogen levels can affect word recall, memory and so called ‘brain fog’ symptoms, and having levels that are both too low or indeed too high in some people can mean the sweet spot is hard to find. For some, HRT helps. Regular physical activity and spending time in nature helps, as well as prioritising sleep, trying out breathwork and meditation and avoiding alcohol. Learning new skills and managing stress are also useful.
Sample Lesson: Menopause 101 – also includes Perimenopause
Women are usually born with two ovaries (egg containing baskets or organs) although one can go through life with no repercussions if there is only one functioning ovary. Each ovary contains a huge number of eggs, in fact thousands which reduce in number over time through a process of natural loss every month. There is no way to increase or reduce this natural loss of eggs. Only a few hundred eggs are used in a woman’s lifetime. After the onset of puberty, the ovary releases an egg most months, a process known as ovulation.
Sample Lesson: What about Calcium?
Calcium is an important mineral for human survival. It is needed, as you probably already know, to keep our bones and teeth strong and healthy. Small amounts of calcium are also required for nerve function, to relax our muscles and for blood clotting.
Before the domestication of dairy cows was commonplace, many human populations evolved without dairy in their diet, consuming all the calcium they required from plants. Due to the artificial selection of sweetness, rather than nutritional content, many of the plant foods we consume today have lower levels of calcium than that of their ancestors.
Sample Lesson: Benefits of Soya in Menopause
A randomised controlled trial showed fantastic results showed Just 1/2 cup or 86 g of mature soya beans providing 55 to 60 g of isoflavones was associated with reduced frequency and severity of hot flushes by 84% and improved quality of life in vasomotor, psychosocial, physical, and sexual symptoms in postmenopausal women when followed for just 12 weeks. The women involved in this study were following a completely plant based diet during this time.
The Happy Pear Podcast
Today we have a special guest joining us, the one and only George Monbiot. George is an award-winning journalist, author, and environmental activist, and we’re so excited to have him here to chat with us.

Episode 112
In this episode, we dive deep into some really interesting topics with George, such as the importance of rewilding and how it can help combat climate change. He shares some amazing insights on how rewilding can not only benefit the environment, but also our mental health and well-being. It’s fascinating stuff!
We also discuss some of the challenges we face in creating a more sustainable future, and how we can work together to overcome them. George has such a positive and hopeful outlook, and it’s really inspiring to hear his thoughts on this.
Throughout the conversation, we all share stories and anecdotes from our own lives, and it really feels like a friendly chat between old friends. Dave is so impressed with George’s ideas that he even asks him out to lunch the following week!
So if you’re interested in hearing some great insights on environmental activism and sustainability, this is definitely the episode for you. George is such an amazing guest, and this conversation is packed full of insightful nuggets.
Lots of love,
Dave & Steve
Available now from all good podcast providers:
To find out more about George, check out his latest book: “Regenisis: Feeding the World without devouring the Planet”.
This episode is sponsored by Vivobarefoot Footwear. Vivobarefoot Footwear have given our listeners an exclusive 15% discount when you enter the code HAPPYPEAR15
Genuinely these are the only shoes you will see Dave & Steve wearing!
Produced by Sean Cahill and Sara Fawsitt
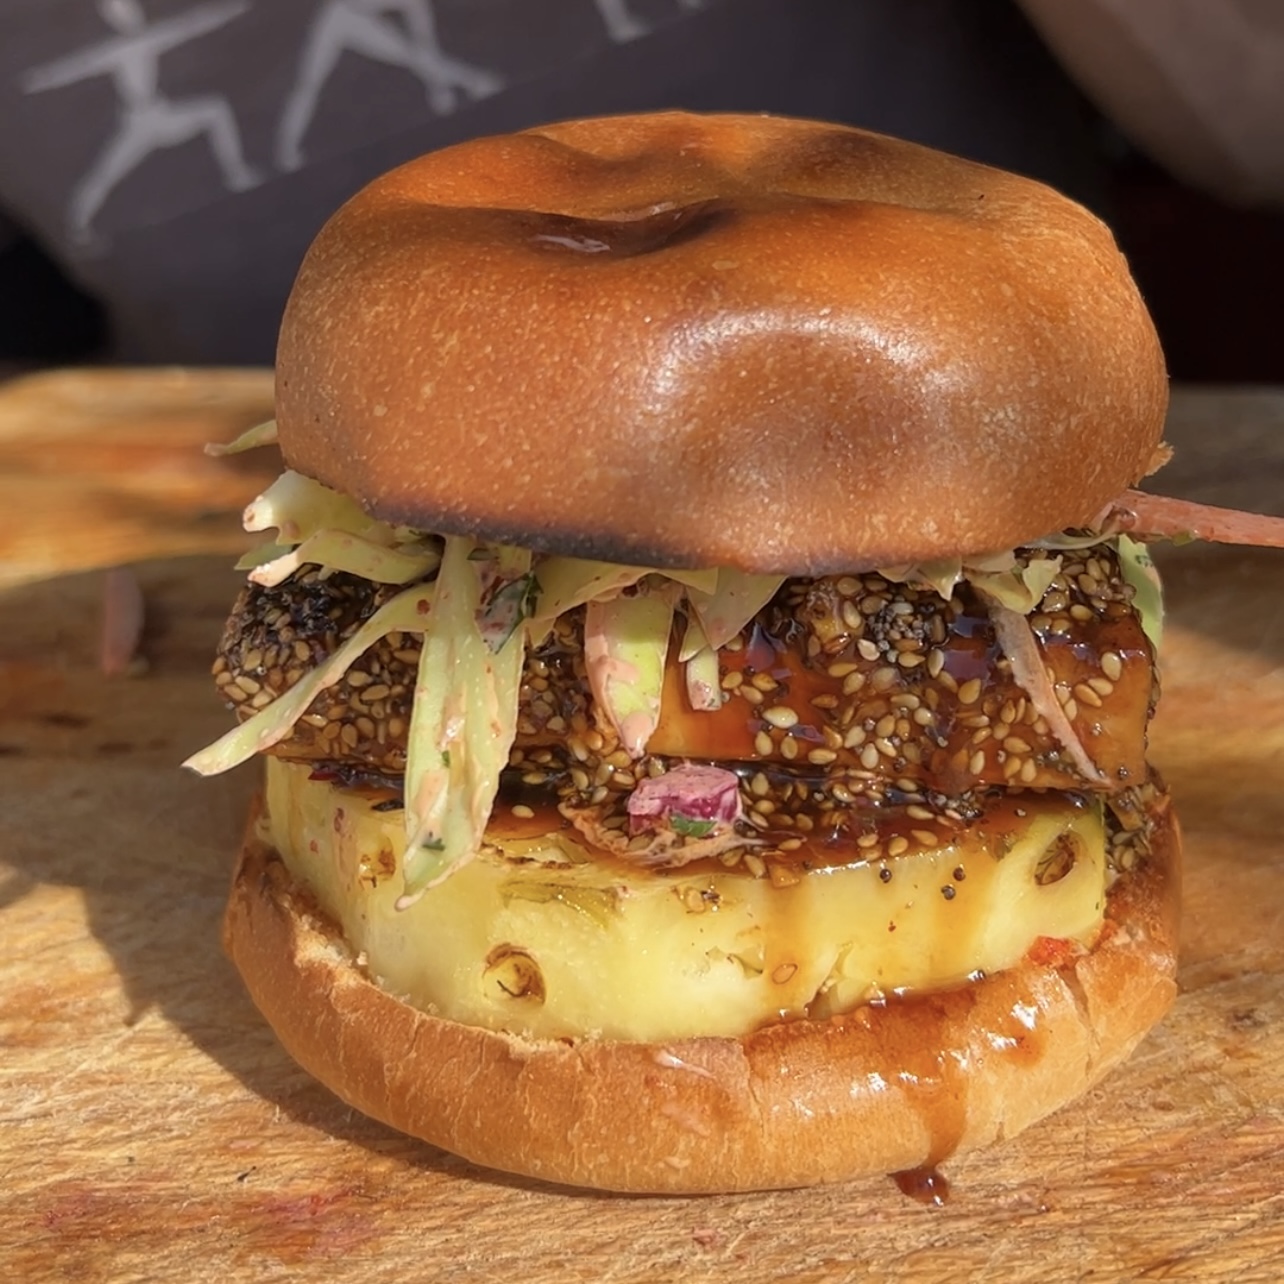
Sticky Sesame Tofu Burger with Charred Pineapple and Kimchi Mayo
Takes 27 minutes
Serves 2
Ingredients
For the Slaw:
- 1/4 white cabbage (finely sliced)
- 1/2 carrot (grated)
- Handful of fresh coriander (diced)
- 1/4 red cabbage (finely sliced)
- 50 ml vegan mayonnaise
- 1 tsp chilli powder (Korean chilli powder like gochugaru works best)
- 1 tbsp kimchi juice (or sauerkraut juice)
For the Tofu:
- 200 g firm tofu (sliced into 1 cm thick slices)
- 4 tbsp white flour (or cornflour)
- 4 tbsp sesame seeds
For the Teriyaki Sauce:
- 5 tbsp tamari
- 3 tbsp maple syrup
- 1 tbsp vinegar (of choice)
- 1 clove garlic (finely chopped)
- 1/2 thumb-sized piece ginger (peeled and finely chopped)
- 1/4 red chilli (finely chopped)
Extras:
- 2 burger buns
- 1/3 fresh pineapple charred (sliced into 2 x 1 cm slices, core removed)
- Spicy red pesto or ketchup
Instructions
- Make the Slaw:Finely slice the cabbages, grate the carrot, and dice the fresh coriander. In a separate bowl, mix together the vegan mayonnaise, chilli powder, and kimchi juice until well combined. Add the mayo mixture to the cabbage, carrot, and coriander. Mix well to form your kimchi slaw.
- Char the Pineapple:Carefully remove the skin from the pineapple, slice into two 1 cm thick slices, and remove the core. Heat a non-stick pan and char the pineapple on both sides for 30-40 seconds until evenly browned. Set aside.
- Prepare the Tofu:Slice the tofu into 1 cm thick pieces, slightly larger than the burger buns. Heat a non-stick pan on high and add 1 tbsp of oil. While the pan is heating, finely chop the garlic, ginger, and red chilli. Mix all the teriyaki sauce ingredients in a small bowl.Fry the tofu slices for 1-2 minutes on each side until golden. Add 2 tbsp of the teriyaki sauce to the pan and coat the tofu slices thoroughly. Remove from the pan and set aside. Clean the pan.
- Coat the Tofu:In a shallow dish, coat the cooked tofu in white flour or cornflour, ensuring an even layer. Dip each piece of tofu into the remaining teriyaki sauce, then roll in sesame seeds to fully coat.
- Fry the Coated Tofu:Reheat the pan on high heat with 1 tbsp of oil. Fry the coated tofu for 1 minute on each side until the sesame seeds start to turn golden and pop. Add the remaining teriyaki sauce to the pan, and let it reduce for about 1 minute. Add the tofu back in, spooning the sauce over to stick to the sesame crust.
- Assemble the Burger:Toast the burger buns. Spread a generous dollop of pesto or vegan mayo on the bottom bun. Add the charred pineapple, followed by the sticky sesame tofu. Drizzle any remaining teriyaki sauce over the tofu. Top with the kimchi slaw and close with the top bun. Enjoy!
This Low Fat Tofu and Spinach Dal is so tasty and genuinely only takes 10 mins. It is also low fat so ideal for anyone wanting to lose weight. The first time we made this recipe we shot a video after brekkie and ended up devouring the full lot! This recipe is ideal for anyone going through menopause as its low in fat, high in phytoestrogen coming from the beans and lentils.
Tofu and Spinach Dal
Takes 16 minutes
Serves 4
Ingredients
- 200 g tofu
- 3 tbps tamari
- 1.5 tbsp maple syrup
- 1 clove garlic
- thumbsized piece of ginger
- 1 bunch scallions
- 400 g cooked chickpeas
- 400 g cooked lentils
- 100 g spinach
- 400 g chopped tomatoes
- 200 ml water
- 250 g natural soy yoghurt
- 1/2 juice lime
- 10-15 cherry tomatoes
- 2 tbsp curry powder
- 1 tsp ground tumeric
- 2 tsp ground cumin
- 1 tsp salt
- 1 tbsp tamari
- 1/2 tsp black pepper
Instructions
- Peel and finely chop the garlic and ginger. Finely chop the scallions/ green onions removing any limp outer leaves. Drain the tinned chickpeas and lentils and rinse thoroughly, keeping them separate. Chop the cherry tomatoes in half. Remove the tofu from the pack, drain any water, cut the tofu into 1.5cm squared cubes. In a mug mix the 3 tbsp of tamari with the 1.5 tbsp of maple syrup until well combined.
- Heat a non-stick pan on high heat, once hot add the tofu and cook for 3-4 mins stirring regularly until it starts to sear or golden on each side, add in the tamari and the maple syrup mixture and quickly mix so that each piece of tofu is really well coated with the sauce. Add in the drained beans and lentils to the pan with the tofu along with the chopped tomatoes, water and the sliced scallions or green onions. Add in the spices, the curry powder, turmeric, ground cumin, salt, tamari and ground black pepper and mix well.
- Finally add in the soy yogurt along with the spinach and mix well and cook for 2-3 mins until the spinach starts to wilt.
- Squeeze in juice of ½ lime and mix through, taste and adjust the seasoning to your liking by more salt, pepper, lime or maple syrup
- Leave to simmer for a further 2 mins, then take off the heat.
- Garnish with some pomegranate seeds and fresh coriander (or other fresh herb of your choice), and serve with a cooked grain of choice or toasted pittas chopped into soldiers and some rice. Enjoy!
Nutrition

The Happy Pear Podcast
Dr Nitu Bajekal is back with a special episode for National Women’s Health Day! An expert in women’s health and menopause. This is the second time she’s joined us on the podcast, and we’re thrilled to be launching our online menopause course with her.

Episode 111
Get ready for an informative and lively conversation full of takeaways that both men and women of all ages should listen to.
Key takeaways:
- Menopause is a natural part of aging for women, and it’s essential to recognise and manage its symptoms, including hot flashes, mood swings, and vaginal dryness.
- Hormonal changes during menopause can also lead to an increased risk of heart disease, osteoporosis, and other health conditions, making it vital to take care of overall health and wellbeing.
- Lifestyle factors such as diet, exercise, and stress management can play a significant role in managing menopause symptoms and reducing health risks.
- Dr. Nitu emphasises the importance of self-care and self-compassion during menopause, as it can be a challenging time both physically and emotionally.
- The hosts and Dr. Nitu discuss common misconceptions and stigmas surrounding menopause and encourage open and honest conversations about women’s health.
The most important takeaway of all is let’s start talking more openly and honestly about women’s health!
Lots of love,
Dave & Steve
Available now from all good podcast providers:
Checkout our Happy Menopause course for more information.
This episode is sponsored by Vivobarefoot Footwear. Vivobarefoot Footwear have given our listeners an exclusive 15% discount when you enter the code HAPPYPEAR15
Genuinely these are the only shoes you will see Dave & Steve wearing!
Produced by Sean Cahill and Sara Fawsitt

Super Chewy Chocolate Chip Cookies
Takes
Serves
Ingredients
- 125 g self-raising flour
- 80 g vegan block butter
- 115 g caster sugar
- 35 g brown sugar
- 3 tbsp oat milk
- 1 tbsp ground flax seeds
- 3 tbsp water
- 100 g chocolate chips
Instructions
- Preheat the oven: Set the oven to 170°C (fan). Line a baking tray with parchment paper.
- Prepare the flax egg: Mix the ground flax seeds with 3 tbsp of water and set aside for about 5 minutes to thicken.
- Melt the vegan butter: Melt the vegan block butter over low heat. Once melted, remove from the heat and set aside to cool slightly.
- Mix dry ingredients: In a large bowl, sift the self-raising flour, caster sugar, and brown sugar together.
- Combine wet ingredients: In a separate bowl, mix the melted butter, oat milk, and the thickened flax egg.
- Form the cookie dough: Gradually add the wet ingredients to the dry ingredients, mixing until just combined. Avoid overmixing to prevent developing too much gluten. Stir in 80 g of the chocolate chips, reserving 20 g for decoration.
- Chill the dough: Cover the cookie dough and refrigerate for 30 minutes or freeze for 10 minutes to firm it up slightly.
- Shape the cookies: Remove the dough from the fridge or freezer. Scoop heaped tablespoons (about 45 g per cookie) and roll them into balls. Arrange them on the prepared baking tray, leaving space between each cookie to allow for spreading (around 5 cookies per tray). Gently press each cookie down with the palm of your hand.
- Decorate and bake: Press the remaining 20 g of chocolate chips into the tops of the cookies. Bake in the preheated oven for 6 minutes.
- Create the perfect texture: After 6 minutes, remove the tray from the oven and drop it carefully onto the counter to create a 'bang' that will flatten the cookies slightly. Return to the oven and bake for a further 6-8 minutes, or until golden.
- Finish and serve: Remove from the oven and sprinkle a pinch of sea salt on top of each cookie.Allow the cookies to cool before enjoying (if you can resist!).
Can Coffee Cause Bloating? The Truth About Coffee, Bloating and Your Gut Health
Do you love starting your day with a cup of coffee, but hate the bloating that comes with it? You’re not alone. Many people experience bloating after drinking coffee, and it can be uncomfortable and frustrating. In this article, we’ll explore whether coffee really can cause bloating, and what you can do about it.

Overview of Bloating and Gut Health
Bloating is a common symptom of an unhealthy gut. It occurs when your digestive system has difficulty breaking down food, leading to excess gas and discomfort. The health of your gut plays a crucial role in your overall well being, affecting everything from your immune system to your mental health. That’s why it’s important to take care of your gut and address any issues, like bloating, as soon as possible. Bloating is really a sign or indicator of an unhappy gut.

Can Coffee Cause Bloating?
Now, let’s talk about coffee. You may have noticed that sometimes after drinking your favourite cup of joe, you feel bloated and gassy. So, can coffee really cause bloating? The short answer is yes, it can.
Coffee is a natural laxative that stimulates the muscles in your digestive system, which can lead to an increase in bowel movements. This can cause the production of gas, leading to bloating and discomfort. Additionally, coffee contains caffeine, which can also cause bloating by increasing the production of stomach acid and slowing down digestion.
But, it’s important to note that not everyone experiences bloating after drinking coffee. It can vary depending on your body’s sensitivity to caffeine and other compounds found in coffee. If you do experience bloating after drinking coffee, you may want to consider cutting back or switching to a lower-caffeine option.
So, does cutting out coffee help with bloating? It can, but it’s not necessarily the only solution. It’s important to consider other factors that can contribute to bloating, such as diet, stress, and gut health.
In fact, this is where our Gut Health Revolution course can come in handy. By learning about the connection between gut health and bloating, you can make informed decisions about your diet and lifestyle to alleviate bloating and improve your overall well-being.
And if you do decide to continue drinking coffee, there are ways to minimise the bloating effects. Opting for a low-acid coffee or adding a splash of oat milk can help reduce the amount of acid and stimulate digestion.
So, yes, coffee can cause bloating, but it’s not necessarily a reason to give up your morning cup of joe. By being mindful of your body’s response to coffee and making informed choices, you can enjoy your coffee without the discomfort of bloating.

Does Coffee Make You Gassy and Bloated?
There’s no denying that coffee is a staple for many people. Whether it’s part of your morning routine or an afternoon pick-me-up, a steaming cup of coffee can be a real comfort. However, for some people, coffee may cause an unpleasant side effect: bloating and gas. So, does coffee make you gassy and bloated?
The answer is not a simple one. While coffee itself doesn’t contain gas-causing compounds, it does stimulate the production of stomach acid. This increase in acid production can lead to digestive discomfort, including bloating and gas. Additionally, coffee can be a diuretic, which means it can cause dehydration and constipation, both of which can contribute to bloating.
It’s also important to consider what you’re putting in your coffee. Adding milk or cream to your coffee can make it more difficult to digest, particularly if you’re lactose intolerant. Artificial sweeteners or high amounts of sugar can also cause digestive issues, including bloating. The same goes for adding additional syrups.
If you’re experiencing bloating and gas after drinking coffee, it’s worth examining your overall diet and lifestyle. Are you eating a diet that includes lots of fruit, veg, wholefoods and legumes that naturally contain plenty of fibre? Are you drinking enough water throughout the day? Are you getting enough exercise? How is your sleep? These factors can all impact your digestive health and contribute to bloating.
If you’re still experiencing discomfort, it may be worth cutting back on your coffee intake or trying alternative sources of caffeine, such as tea or cocoa. You may also want to experiment with different brewing methods or types of coffee to see if that makes a difference. A batch brewed coffee or V60 can often be a gentler type of coffee when compared to an espresso based coffee.
Ultimately, the link between coffee and bloating is not straightforward, and what works for one person may not work for another. However, by paying attention to your body and making some small adjustments to your diet and lifestyle, you may be able to find relief from bloating and gas.
And don’t forget, our Gut Health Revolution course can provide valuable insights and strategies for improving your digestive health, including reducing bloating and gas. So, if you’re struggling with digestive issues, consider giving our course a try, it really does get fantastic results in a matter of days.

Does Cutting Out Coffee Help with Bloating?
If you are experiencing bloating after drinking coffee, you may wonder if cutting it out of your diet will help. The answer is not a simple yes or no, as the effects of coffee on the digestive system vary from person to person.
Coffee is a diuretic and a stimulant that increases the production of stomach acid, which can lead to digestive issues such as bloating, gas, and heartburn. However, some people may be able to tolerate coffee without experiencing any negative effects.
If you are one of those people who experiences bloating after drinking coffee, cutting it out of your diet may help alleviate your symptoms. However, it’s important to note that other factors can contribute to bloating, such as eating too quickly, eating gas-producing foods, and being sedentary. So, cutting out coffee alone may not be enough to relieve your bloating.
It’s also worth mentioning that if you are used to consuming high amounts of caffeine on a daily basis, cutting out coffee abruptly can lead to withdrawal symptoms such as headaches, irritability, and fatigue. It may be better to gradually decrease your coffee intake to avoid these symptoms.
Instead of cutting out coffee completely, you can try reducing your intake or switching to decaf to see if it helps with your bloating. Alternatively, you can try adding some gut-friendly foods and drinks to your diet to promote healthy digestion and reduce bloating.
Some gut-friendly foods include fermented foods such as kefir, kimchi, and sauerkraut, which are rich in probiotics that can help regulate digestion. Fibre-rich foods like fruits, vegetables, whole grains and beans/legumes are naturally high in prebiotic fibre and can also promote healthy digestion and reduce bloating.
Additionally, drinking herbal teas like ginger or peppermint tea can soothe the digestive tract and reduce bloating. And, of course, taking our Gut Health Revolution course can help you understand the causes of bloating and provide you with the tools and resources you need to improve your gut health and reduce your symptoms.
In summary, cutting out coffee may help alleviate bloating for some people, but it’s not a guaranteed solution. Other factors such as diet, exercise, and stress management also play a role in digestive health. Experimenting with reducing your coffee intake, adding gut-friendly foods, and taking our Gut Health Revolution course can all be effective strategies to alleviate bloating and improve overall gut health.

Can Black Coffee Cause Bloating?
Black coffee is simply coffee without any added milk, cream, or sugar. While black coffee is generally considered to be a low-calorie and healthy beverage, some people may experience bloating and digestive discomfort after consuming it.
The main reason black coffee can cause bloating is due to its high acidity. When coffee is consumed, the acid in the coffee can irritate the lining of the stomach and small intestine, which can cause gas, bloating, and abdominal discomfort. Additionally, caffeine can also stimulate the production of stomach acid, which can further aggravate digestive symptoms.
It’s also worth noting that some people may be more sensitive to the effects of coffee than others. For example, people with certain digestive conditions, such as irritable bowel syndrome (IBS), may be more prone to experiencing bloating and other digestive symptoms after consuming coffee. Here is an article we wrote on how to improve gut health which covers IBS.
That being said, it’s important to remember that not everyone will experience bloating after drinking black coffee. It ultimately comes down to your unique digestive system and tolerance for coffee.
If you are someone who experiences bloating after drinking black coffee, there are a few things you can try to reduce the likelihood of digestive discomfort. One option is to switch to a lower-acid coffee blend, such as one that is specifically marketed as “low-acid” or “stomach-friendly”. Another option is to simply reduce the amount of coffee you consume or avoid drinking it altogether.
Finally, if you are experiencing chronic bloating or other digestive symptoms, it may be worth considering enrolling in our 4 week Gut Health Revolution course. We created it with a consultant gastroenterologist, a dietician, a mindfulness expert and ourselves best chefs. The course gets fantastic results and has helped more than 20,000 people improve their gut health.
Does Coffee Bloat or Debloat?
While coffee is known to cause bloating in some individuals, it is also believed to have a de-bloating effect on the gut. This is due to the caffeine content in coffee, which has been shown to stimulate the digestive system and promote bowel movements.
However, it’s important to note that this effect may not be the same for everyone. Some people may find that coffee worsens their bloating and digestive symptoms, while others may experience relief.
In general, the de-bloating effect of coffee is more likely to be observed in individuals who have a regular coffee habit and are not consuming excessive amounts. Drinking too much coffee can actually have the opposite effect and lead to increased bloating and discomfort.
As I mentioned further up this article, the way you consume your coffee can impact its de-bloating effect. For example, adding sugar, milk, or cream to your coffee may negate the potential benefits and even exacerbate bloating.
So, does coffee bloat or debloat? The answer is, it depends. While it may have a de-bloating effect on some individuals, it can also worsen bloating in others. It’s important to listen to your body and pay attention to how you feel after consuming coffee.
If you’re experiencing persistent bloating or digestive discomfort, it may be worth considering reducing your coffee intake or cutting it out altogether to see if it makes a difference.
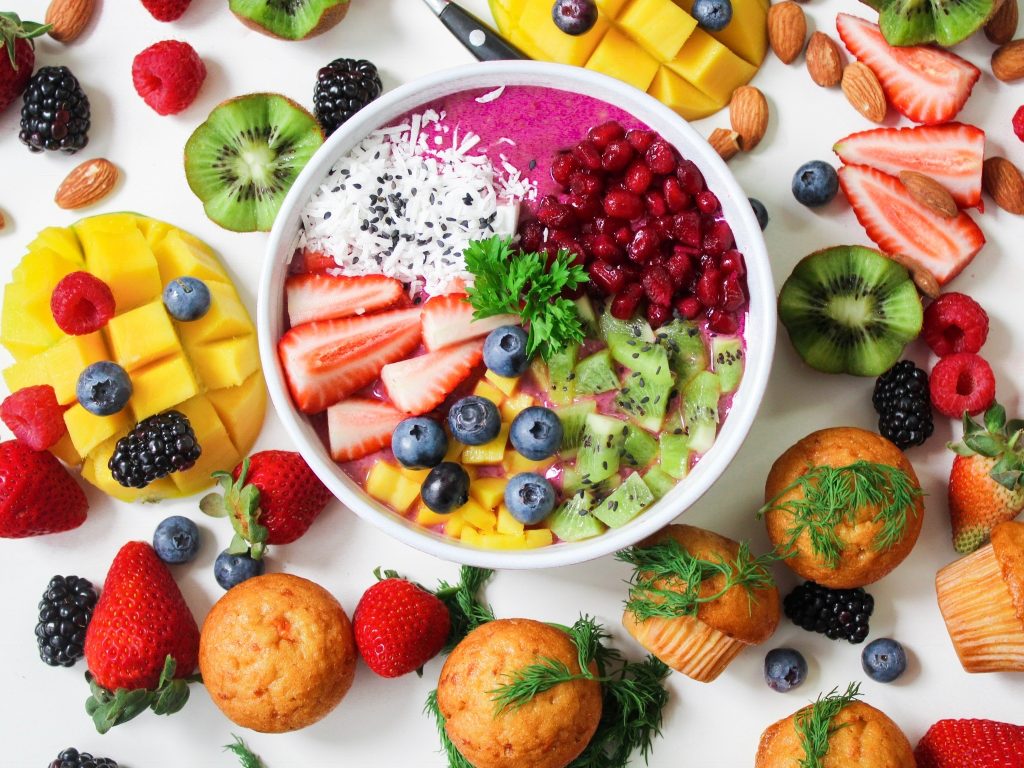
What Relieves Bloating Fast?
There are several things you can do to relieve bloating fast:
- Drink water: Staying hydrated can help flush out excess gas and relieve bloating.
- Move your body: Gentle exercise like walking or yoga can help stimulate your digestive system and ease bloating.
- Try ginger: Ginger has anti-inflammatory properties that can help relieve bloating and other digestive issues. Ginger tea is an easy way to take it.
- Eat probiotic foods: Fermented foods such as kim chi and sauerkraut are natural protiobcs. They are widely available and easy to eat alongside any of your meals. Probiotic foods can help balance the bacteria in your gut and alleviate bloating and other digestive issues. Here is a link to a simple sauerkraut fermentation recipe that is easy to make and full of natural probiotics.
How Gut Health Revolution Course Can Help
Our Gut Health Revolution course is designed to help you achieve a healthy, happy gut. You will literally learn to eat delicious foods that will heal and super charge your gut health and therefore every aspect of your health. Through our expert guidance and comprehensive resources, you’ll learn how to address bloating and other gut issues, and create sustainable habits for better gut health. With our personalised approach, you’ll receive the support and guidance you need to achieve your health goals.
Conclusion
Bloating is a common symptom of an unhealthy gut, and coffee can exacerbate it for some people. While cutting out coffee can help with bloating, it’s not the only solution
More Gut Health Recipes


The Happy Pear Podcast
“No fungi no forest no future. Fungi are as important as oxygen and yet we only think of them as icky things”

Episode 110
The mycelium network, is vast, diverse, intelligent and everywhere! In this episode, we’re thrilled to have Fungi Guy, the popular YouTuber, as our special guest.
Fungi Guy, also known as Ali, is a passionate forager and mushroom enthusiast with a wealth of knowledge and experience. He has been foraging for over a decade and has a deep appreciation for the incredible diversity, importance and beauty of mushrooms.
In this episode, Fungi Guy shares his vast knowledge on mushrooms, his approach to foraging, from identifying different species to selecting the best specimens for cooking. He also shares some of his favorite mushrooms and explains why they’re so special to him.
One of the things we love about Fungi Guy is his infectious enthusiasm for mushrooms and his commitment to sustainable foraging practices. He truly embodies the spirit of The Happy Pear, and we’re honored to have him as our guest.
So, if you’re a mushroom lover or just curious about the world of foraging, this episode is not to be missed! Tune in to hear from Fungi Guy and learn more about the fascinating world of mushrooms.
Lots of love,
Dave & Steve
Available now from all good podcast providers:
This episode is sponsored by Vivobarefoot Footwear. Vivobarefoot Footwear have given our listeners an exclusive 15% discount when you enter the code HAPPYPEAR15
Genuinely these are the only shoes you will see Dave & Steve wearing!
Produced by Sean Cahill and Sara Fawsitt
The Happy Pear Podcast
Slow aging and improve your health with water!
This week we speak to holistic doctor and author of Quench, Dr Dana Cohen.
For over two decades, Dr. Dana Cohen has been on the leading edge of integrative and functional medicine, guiding thousands of patients through protocols that initiate cellular repair and restore balance to the body.

Episode 109
Her unyielding devotion to her patients has helped countless patients on the brink of giving up hope to finally improve, recover, or completely heal from a variety of severe and chronic health issues.
We jump striaght into her recent research and book Quench and discuss in detail the magical healing power of water.
“Proper hydration is the key to unlocking optimal health. But we need to start looking at hydration for what it is: the very essence of your health.”
The benefits of proper hydration can have a dramatic effect on your health, your vitality, and your overall quality of life, according to Dr Dana. Quench will help you determine how to hydrate the right way (hint: it doesn’t involve chugging a gallon of water every day), and then how to get the water you do drink deep into your muscles, cells, and fascia (the connective tissue of your body), where it’s needed most.
A brilliant episode, that will leave you stuffing your face with fruit, veg and lemon infused water!
Lots of love,
Dave & Steve
Available now from all good podcast providers:
This episode is sponsored by Vivobarefoot Footwear. Vivobarefoot Footwear have given our listeners an exclusive 15% discount when you enter the code HAPPYPEAR15
Genuinely these are the only shoes you will see Dave & Steve wearing!
Produced by Sean Cahill and Sara Fawsitt
Sample Lesson: Why your gut microbiome loves fibre
Our powerful jaw muscles, the hydrochloric acid in our stomach, the digestive enzyme cocktails produced by our pancreas – these are all powerless when it comes to digesting the structural carbohydrates found only in plants that we call fibre.
We have outsourced this job to our gut microbes, and they do it incredibly efficiently. When we serve our microbes a steady supply of fibre rich foods – fruits, vegetables, wholegrains, beans, and unprocessed plants – we immediately boost the production of Short Chain Fatty Acids (SCFA), substances that we can only get from our gut microbes and have so many health benefits that it is difficult to keep up with the research!
Sample Lesson: Knife Skills
There are many variations of knives you can use in the kitchen. We decided that rather than getting lost in the world of different knives, we would instead tell you about our favourite 3. These are the most useful knives that will help to get you started and cooking up some magic!
- Chef’s knife
- Paring knife/ utility knife
- Bread knife
Sample Lesson: Do you need a probiotic supplement?
The human gut microbiome consists of a vast diversity of microscopic organisms and is a crucial player in our overall health. The bacteria, yeasts, viruses, and archaea of the gut microbiome first appeared on Earth between 2 and 4 billion years ago. They’ve been with humans on every single step of our own 7-million-year evolutionary journey. So, it shouldn’t surprise you to learn that you don’t need probiotic supplements to optimise or ‘balance’ your gut microbiome. Despite a thriving probiotic industry – one that is worth a massive $70 billion a year – there is surprisingly little evidence to support the health claims often made by probiotic companies.
Sample Lesson: Why FODMAPs are good for you
FODMAPS stands for fermentable oligosaccharides, disaccharides, monosaccharides, and polyols. These are small carbohydrates found in a variety of plant foods. These carbohydrates can be quite difficult for some people to break down and digest. If we don’t absorb them in our small intestine, they carry on down into our large intestine, where our gut microbiota lives (the bacteria that breaks down our fibres). Once the FODMAPS arrive here, they are broken down by our microbiome and this can cause bloating and gas, diarrhoea and sometimes constipation.
The Truth About Probiotics: Do You Really Need Them for Better Gut Health in Ireland?
When it comes to gut health, we often hear about probiotics and how they can help keep our gut bacteria in check. But with so many products on the market and conflicting information, it can be hard to know if we really need them. So, let’s get down to the truth about probiotics and whether they’re necessary for better gut health in Ireland.
Our gut microbiome is made up of a vast array of microscopic organisms, including bacteria, yeasts, viruses, and archaea. These tiny creatures have been with us on every step of our evolutionary journey, and they play a crucial role in our overall health. While probiotics have gained popularity in recent years, the truth is that you don’t necessarily need them to optimise or ‘balance’ your gut microbiome. Despite the huge market for probiotic products – valued at a whopping $70 billion annually – there’s surprisingly little scientific evidence to support the health claims made by the industry. So, let’s take a closer look at the truth about probiotics and what you really need for better gut health in Ireland.
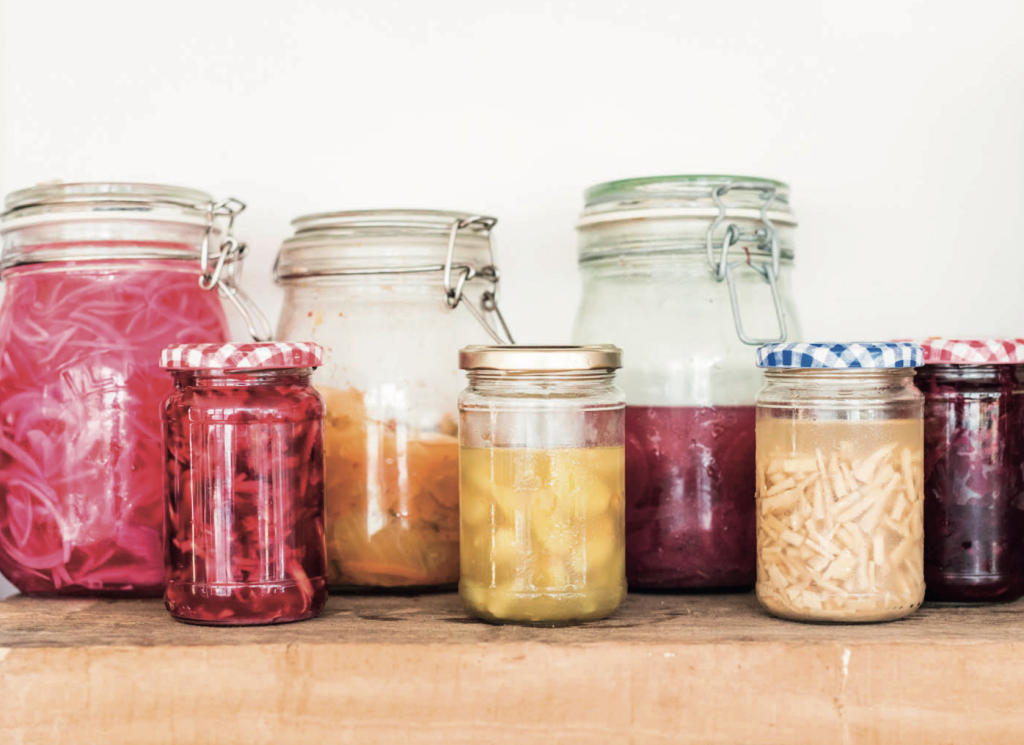
Section 1: Understanding Probiotics
If you’ve heard anything about gut health, you’ve likely heard about probiotics. These tiny organisms, found in foods and supplements, are said to have a host of benefits for our health. But what are they, exactly?
Think of probiotics as the good bacteria that live in your gut. They work to keep your digestive system healthy and happy, aiding in the breakdown and absorption of nutrients. And they’re not just in our gut – probiotics are found in fermented foods like kimchi, kombucha and sauerkraut.
Now, while it may sound counterintuitive to add more bacteria to your gut, the idea is that by increasing the amount of good bacteria, you can crowd out the bad. And that can lead to all sorts of benefits, from better digestion to a stronger immune system to even better mental health.
So, if you’re interested in improving your gut health, probiotics are definitely something to consider. Whether you get them from food or supplements, they can help keep your gut in top shape. But, as we’ll see in the next section, there are some potential downsides to consider as well.

Section 2: The Pros of Probiotics
Probiotics are like superheroes for your gut! These beneficial bacteria are great for maintaining and improving gut health. There are many reasons why you should consider incorporating probiotics into your diet. Here are just a few of the amazing benefits:
- Improved Digestion: Probiotics can help to break down food, making it easier for your body to absorb nutrients. They also help to balance the pH level in your gut, which can reduce bloating and other digestive discomforts.
- Boosted Immune System: Your gut is closely linked to your immune system with over 70% of your immune system cells being based in your gut. By eating probiotics, you can help to strengthen your immune system and reduce your risk of infections.
- Reduced Inflammation: Inflammation in the body can lead to a variety of health issues. Probiotics can help to reduce inflammation in the gut and throughout the body.
- Aids in Weight Loss: Research has shown that probiotics may help to reduce body weight and body fat percentage. By improving gut health, probiotics can help to regulate your metabolism and improve your body’s ability to burn calories.
Incorporating probiotics into your diet is an easy way to improve your overall health and wellbeing. And if you live in Ireland, it’s easy to find probiotic-rich foods and supplements to help you achieve optimal gut health. However Dr. Alan Desmond, consultant gastroenterologist who we created our Gut Health Revolution Course with says ‘Despite a thriving probiotic industry – one that is worth a massive $70 billion a year – there is surprisingly little evidence to support the health claims often made by probiotic companies. ‘
It’s important to remember that probiotics are just one piece of the puzzle. A healthy diet, regular exercise, and stress management are all important factors in maintaining gut health. And if you need additional support, be sure to check out the Gut Health Revolution Course – it’s a great solution to help you achieve optimal gut health.

Section 3: The Cons of Probiotics:
As much as probiotics have benefits, they are not perfect. One of the biggest downsides is that they may cause unwanted side effects, especially when taken in high doses. The most common side effects of probiotics include gas, bloating, and stomach upset. Some people may also experience allergic reactions, particularly if they have a history of food allergies or sensitivities.
Another issue with probiotics supplements is that not all strains are created equal. Some may be more effective than others, and some may not have any benefits at all. It can be challenging to know which strains are best for specific health issues, and there is a lot of variability in the quality of the supplements on the market.
Additionally, probiotics may interact with other medications, including antibiotics. In some cases, they may reduce the effectiveness of antibiotics or even cause harmful interactions.
Finally, there is limited research on the long-term effects of probiotic supplements use. While they have been shown to be safe for short-term use, there is still much to learn about the potential risks and benefits of prolonged probiotic supplementation.
It’s essential to consult with your healthcare provider before taking any new supplements, including probiotics. They can help you navigate the potential risks and benefits and determine if probiotics are right for you. And remember, there are plenty of other ways to support gut health, such as through a healthy diet and lifestyle habits.
Conclusion and Gut Health Revolution
In conclusion, while probiotics can be beneficial for some people, they are not a one-size-fits-all solution for gut health. It’s important to consider the potential cons and alternatives before deciding to take probiotics. And remember, a healthy gut can be achieved through a variety of lifestyle factors, such as eating a diverse diet, getting enough sleep, and exercising regularly.
If you’re looking for a comprehensive solution to improve your gut health, we highly recommend checking out the Gut Health Revolution course. This course is designed to provide you with the knowledge and tools you need to optimise your gut health and achieve better overall health and well-being. With a focus on natural and sustainable solutions, the Gut Health Revolution course offers a practical and effective approach to gut health that is tailored to your unique needs and preferences.
By following the tips and strategies outlined in the course, you can improve your gut health and experience the many benefits that come with it, such as improved digestion, stronger immunity, and better mental health. So, if you’re ready to take the next step in your gut health journey, consider enrolling in the Gut Health Revolution course today.
More Gut Health Recipes

High Protein Gut Balls
Takes 14 minutes
Serves 8
Ingredients
Inside filling
- 100 g medjool dates
- 1 tbsp cocoa powder
- 1 tbsp maple syrup
- 2 tbsp plant milk
- 2 tsbp peanut butter
Outer layer
- 300 g medjool dates
- 300 g almonds
- ¼ tsp salt
- 2 tsp vanilla extract
- 100 g cocoa nibs
Instructions
- Prepare the Inside Filling:Remove the pits from the dates and add them to a food processor along with the cocoa powder, maple syrup, plant milk, and peanut butter. Blend until smooth, forming a consistency like a healthy chocolate spread.
- Shape the Inside Filling:Using 2 teaspoons, carefully shape the mixture into 8-10 small balls, approximately 2 cm in diameter. Set aside.
- Prepare the Outer Layer:Wash the food processor. Remove the pits from the dates for the outer layer and add them to the food processor along with the almonds, salt, and vanilla extract. Blend until the mixture is well combined.
- Shape the Outer Layer:Carefully shape and flatten portions of the outer layer into small rectangles, approximately 4 cm square. Place the inside filling ball in the centre of each rectangle, then fold the outer layer over, ensuring the inside filling is completely covered. Roll gently to form a smooth ball.
- Coat with Cocoa Nibs:Roll each ball in the cocoa nibs, ensuring they are well coated. Repeat with the remaining mixture.Enjoy!
Boost Your Gut Health with Probiotics and Prebiotics: A Beginner’s Guide
What are probiotics and prebiotics?
Okay, so let’s start with the basics. Probiotics are live bacteria and yeasts that are good for your gut health. They’re naturally found in your body, and you can also get them from food and supplements. On the other hand, prebiotics are non-digestible fibres that feed the good bacteria in your gut, promoting their growth.
Benefits of probiotics and prebiotics
Now, let’s talk about the good stuff. Adding probiotics and prebiotics to your diet has a ton of benefits, like improving your digestion, boosting your immune system, reducing inflammation, and aiding in weight loss. And you don’t just have to take our word for it – there’s plenty of scientific evidence to back it up!
How to incorporate probiotics and prebiotics into your diet
Adding probiotics and prebiotics to your diet is easier than you think. You can find them in a variety of foods, like yogurt (lots of plant based versions out there, our fav is coconut), kefir, sauerkraut, and kimchi. You can also take supplements if you’re not getting enough from your diet. However Dr. Alan Desmond who we created our Gut Health Revolution Course with says ‘Despite a thriving probiotic industry – one that is worth a massive $70 billion a year – there is surprisingly little evidence to support the health claims often made by probiotic companies‘ And the best part? You can enjoy probiotic fermented foods in so many delicious ways, like adding sauerkraut to your sandwich or drinking a refreshing glass of kombucha.
Vegan sources of probiotics and prebiotics
If you’re following a plant based or vegan diet, don’t worry most probiotic foods are plant based! Fermented foods like tempeh and miso are great options, as well as plant-based yogurts and Kombucha. You can also try making your own fermented foods at home – it’s easier than you think!
Precautions when consuming probiotics and prebiotics
While adding probiotics and prebiotics to your diet is generally safe, there are a few things to keep in mind. Be aware of possible allergic reactions, and don’t overconsume – too much of a good thing can have negative effects. If you’re unsure, talk to your doctor or a registered dietitian.
Conclusion
Incorporating probiotics and prebiotics into your diet is an easy and delicious way to improve your gut health and overall well-being. By following the tips in this article and consuming a variety of foods rich in these beneficial bacteria, you can achieve optimal gut health and lead a happier, healthier life. And if you want to take it to the next level, check out our Gut Health Revolution Course – it’s a game-changer!
More Gut Health Recipes
The Happy Pear Podcast
“A life not reflected is a life not worth living.”
This is the second time we have had our friend and very own life coach, Gerry Hussey on the podcast.

Episode 108
Gerry is a performance psychologist and also in more recent times been coined ‘The Soul Coach’. He has been in the human health and performance Field for almost 20 years.
Gerry has been at the forefront of building high performance teams and individuals in Olympic and Professional, sport and corporate organisations. His vast experience has seen him prepare and lead teams for success at Olympic Games, Heineken cups, World cups, and World and European championships.
He has worked and currently works with some of the world’s leading sport and business teams as well as coaching for high performing individuals.
Gerry is a leading voice that is challenging us to rethink health and performance in a whole new way and his integrated approach is one of honesty, simplicity and authenticity.
Another brilliant episode with Gerry, he really is the modern day sage!
Enjoy!
Lots of Love,
Dave & Steve x
Available now from all good podcast providers:
This episode is sponsored by Vivobarefoot Footwear. Vivobarefoot Footwear have given our listeners an exclusive 15% discount when you enter the code HAPPYPEAR15
Genuinely these are the only shoes you will see Dave & Steve wearing!
Produced by Sean Cahill and Sara Fawsitt
This Easy Mexican Chilli for gut health is packed with fibre so ideal for amping up your gut health where 70% of your immune system is.
Your gut is home to hundreds of trillions of microorganisms, bacteria, fungi, yeast, archaea. This collection of microorganisms are also known as your microbiome. Your microbiome exists In your large intestine and it works symbiotically with every system in your body.
Your gut health directly impacts every aspect of your health. Hippocrates, the father of modern medicine, back more than 2000 years ago said that ‘all disease starts in the gut’.
If you are looking for more recipes that are great for gut health, we have some very tasty gut health recipes here.
We also have compiled a great article on gut health, IBS, bloating and other foods to eat for gut health which you can check out here.
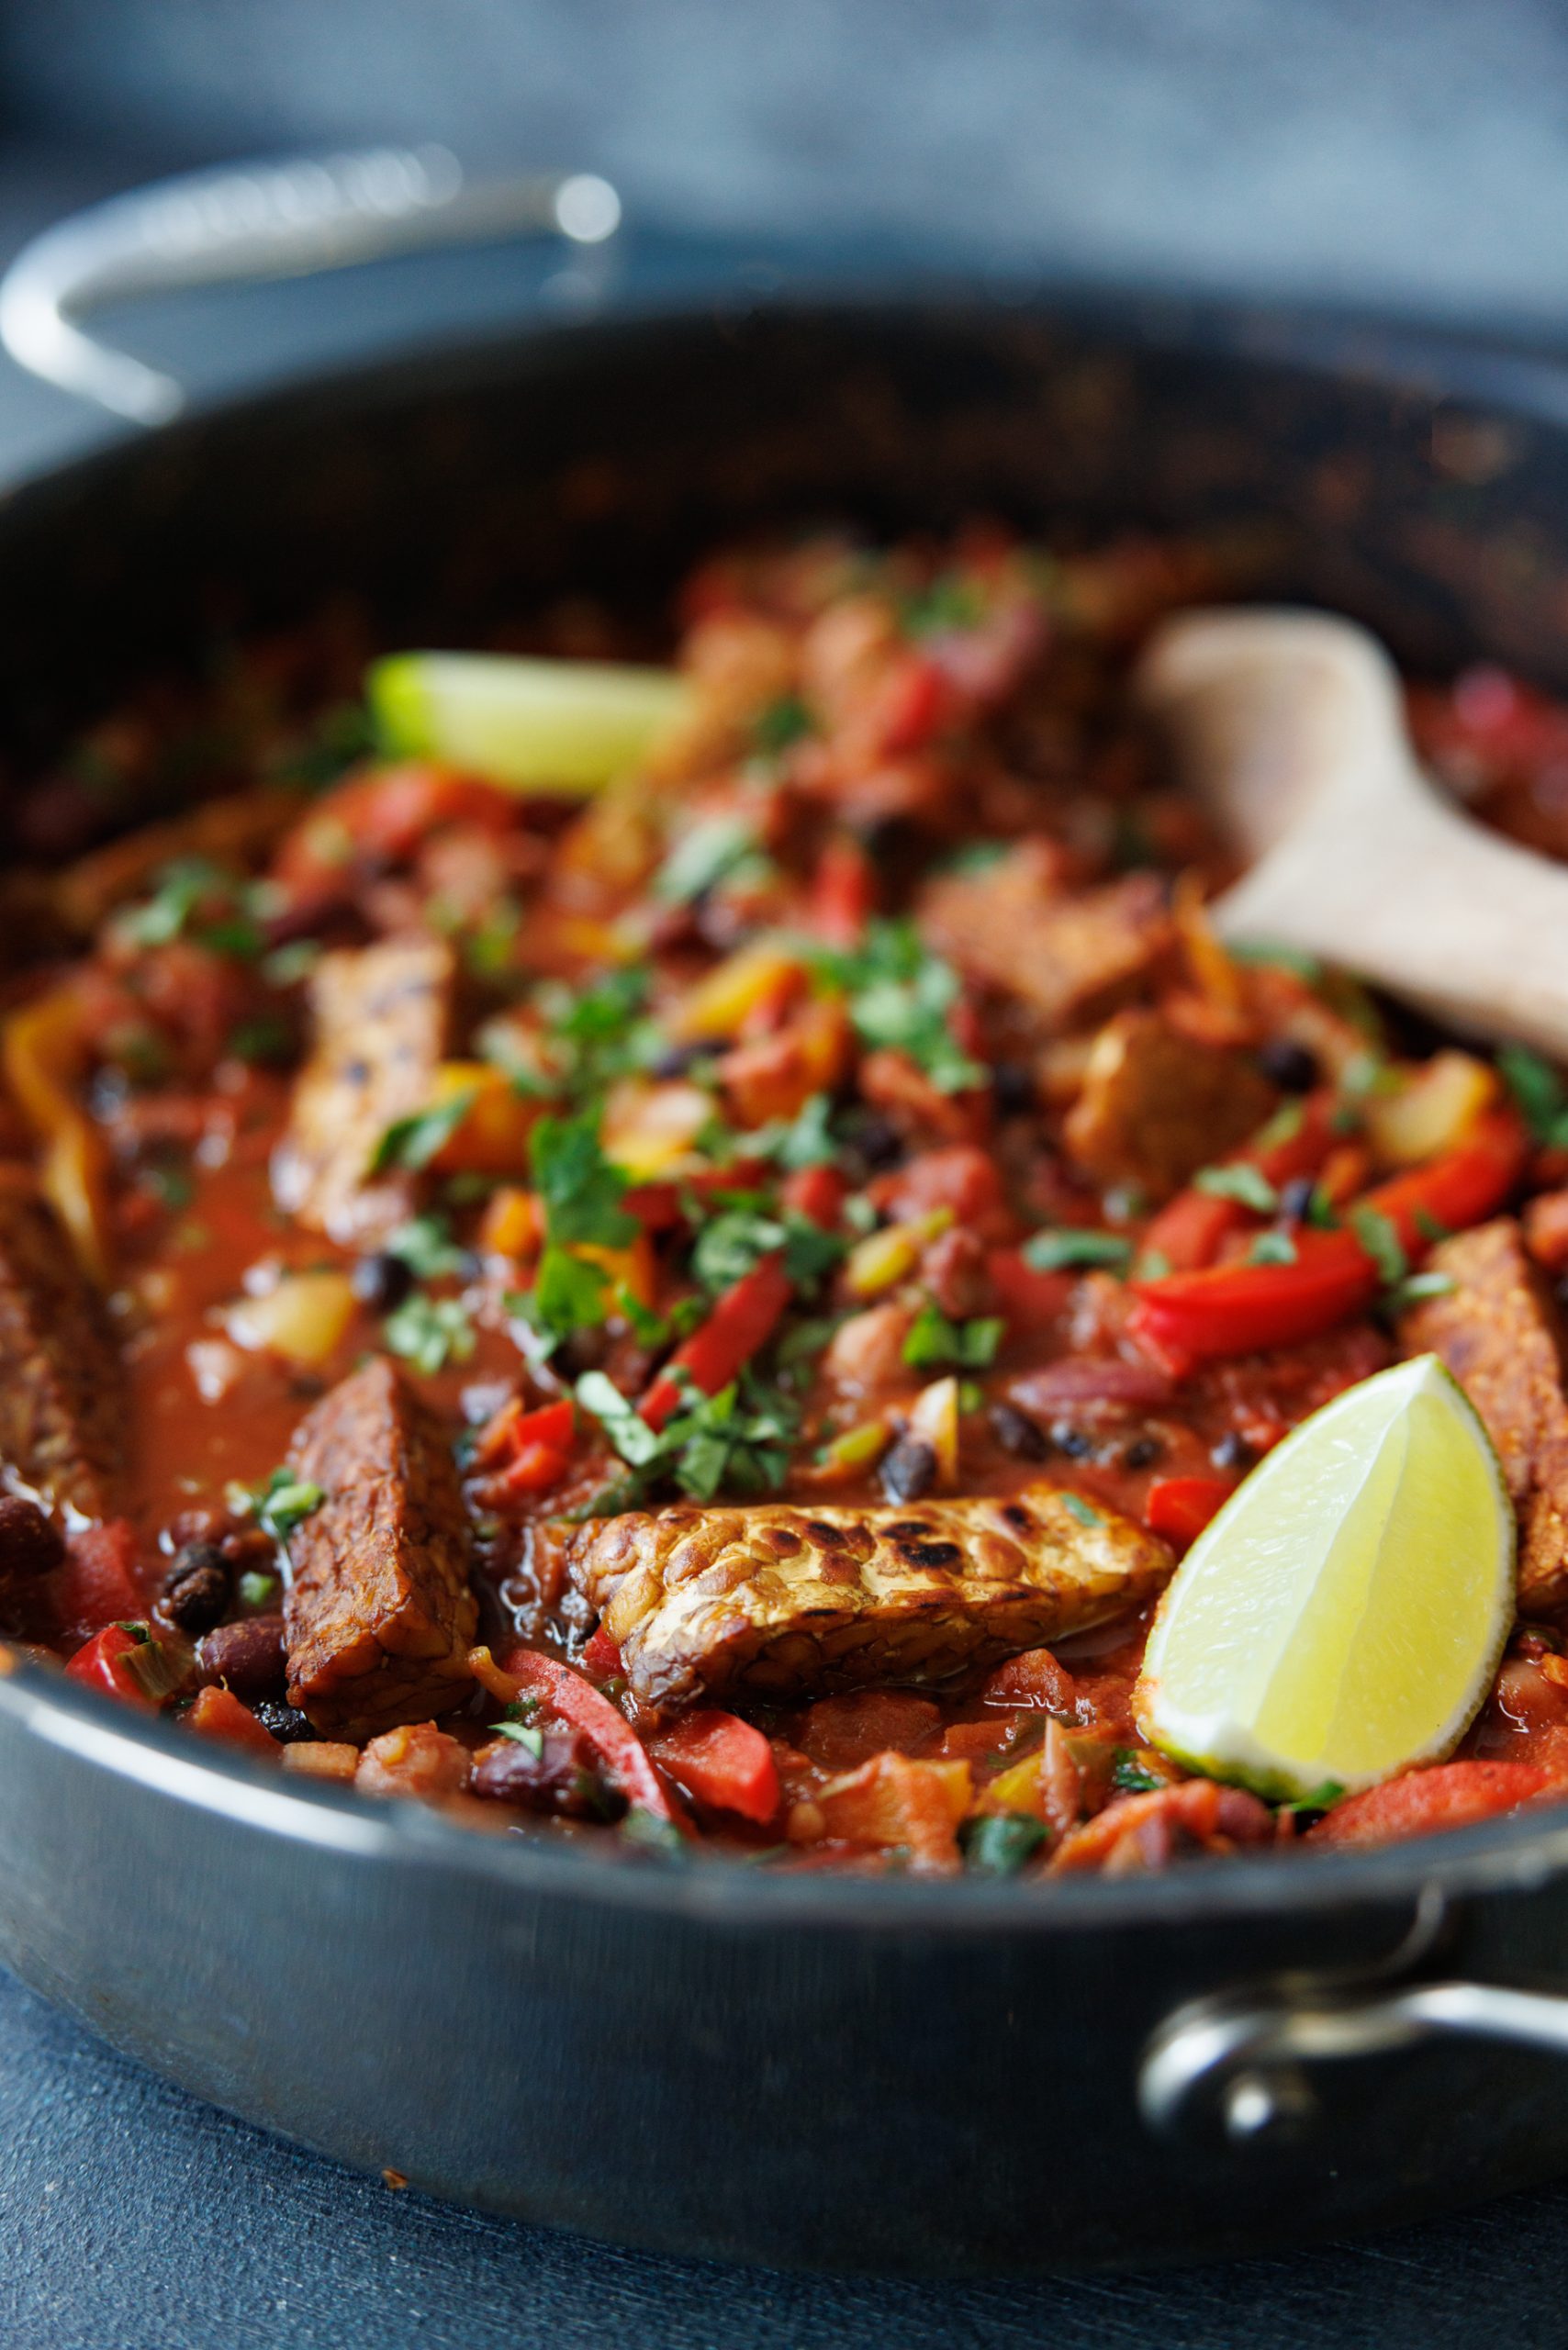
Easy Mexican Chilli for Gut Health
Takes 18 minutes
Serves 4
Ingredients
- 150 g tempeh/ tofu
- 6 spring onions/ scallions
- 1 carrot
- 1 red chilli
- 800 g mixed beans
- 400 g black beans
- 800 g chopped tomatoes
- 50 g dark chocolate (70%-80%)
- 1 tbsp smoked paprika
- 3 tbps Tamari
- 1 bunch coriander
- 1 red pepper
- 1 yellow pepper
Instructions
- Finely chop the spring onions/scallions. Grate the carrot. Chop the tempeh/tofu into small pieces. Finely chop the chilli. Drain and rinse the beans. Finely chop the red and yellow peppers.
- Put a small non-stick pan on a high heat and add the tempeh blocks with no oil. Cook on both sides till they golden and sear. This will take approx 3 mins on each side. Add 2 tablespoons of tamari and mix well and turn off the heat.
- Put the large non stick pan on a high heat. Once hot add the chopped spring onions and the carrot. Cook for 1 minute while stirring regularly. If anything starts to stick add 2 tablespoon of water and ‘deglaze’ the pan.
- Add the chopped red chilli and peppers to the pan along with a tsp of salt. Mix well and leave to cook for 3-4 minutes.
- Add the drained beans, the 2 tins of chopped tomatoes and the chocolate, the smoked paprika and the remaining 1 tablespoon of tamari. Cook for a further 2 minutes.
- Finely chop the coriander and add and mix through. Serve with the tempeh on top.
Notes
Nutrition
Video

One Pan 20 minute epic pizza
Takes
Serves 1
Ingredients
Dough
- 250 g self raising flour
- 125 ml water
- Small pinch salt
Toppings
- 1 Tbsp oil
- 2 vegan sausages
- 1 small red onion
- 1 small leek
- 1 small red pepper or half large
- 1 small courgette (approx 120g)
- ½ red chiili
- ½ tsp salt
Sauce
- 2 tbsp tomato paste/ tomato puree
- 2 tbsp pesto of choice
Instructions
- Preheat oven to 250 C
- If using frozen vegan sausages defrost before using.
- For the toppings, chop up the vegan sausage into roughly 7 slices per sausage. Peel and slice the red onion into half moons, cut the leek in half lengthwise and into half moons (rinse to remove any sediment) chop the courgette and pepper into small bite size pieces, dice half a red chilli (remove the seeds if you like it less spicy).
- Put a large ovenproof frying pan (approx 30cm) on high heat, once hot add the oil and all the prepared veg and generous pinch of salt and sliced vegan sausages. Cook for 7-10 minutes stirring regularly until the onion and leek are nicely softened and the sausages are nicely charred. Remove the toppings from the pan to a bowl and wipe the frying pan clean.
- In a separate bowl mix the sauce ingredients together.
- To make your dough mix the ingredients together in another bowl and then knead dough on a lightly floured surface for 5-10 minutes until it forms a nice smooth elastic dough that is smooth to the touch. Alternatively you can mix it in a stand mixer with a dough hook for 4-5 minutes.
- By hand, flatten, stretch and shape your dough to roughly the size of the frying pan (ensure the pan is oven proof – no plastic) ensuring the dough is nice and thin in the middle. Heat the empty pan over a medium heat and add 1 tsp of oil, then carefully add the dough to the pan, pushing the dough to the edges to cover the bottom of the pan. Working quickly, spread the sauce in an even layer over the dough, then scatter your topping over the sauce. Cook over the heat for 4 – 5 minutes just until the base is nicely lightly browned. Then transfer to the preheated oven at 250 degrees C for 10 minutes.
- Carefully remove from the oven, the handle will be very hot.
- Slide your pizza onto a cutting board slice and enjoy!
Video
The Happy Pear Podcast
Do you feel optimistic about the future?
When a class of 200 graduates were asked to raise their hand if they felt optimistic about the future – No one did. Are you surprised?

Episode 107
This week we speak to Matthijs Schouten, the biologist, ecologist, lecturer and author of Nature’s mirror; the image of nature in a cultural-historical perspective
Matthijs G.C. Schouten B.Sc., M.Sc. D.Sc. studied biology and comparative religion at the University of Nijmegen and Celtic studies at the University of Amsterdam (the Netherlands).
He has worked as a lecturer at the University of Nijmegen and as an ecological project leader for the Wildlife Service (Dublin). He was the leader of the international campaign for the conservation of Irish bogs. Since 1992 he is senior ecological officer at the National Forest Service of the Netherlands; since 1995 he also is a visiting professor of nature and landscape conservation at University College Cork and University College Galway (Ireland); in 1999 he furthermore accepted the chair of restoration ecology at Wageningen University (the Netherlands).
In 1990 he was awarded the International Award for Conservation Merit by the World wide Fund for Nature and in 1992 the National University of Ireland granted him a honorary doctorate.
He has published widely in the fields of ecology and nature philosophy. His latest book Spiegel van de natuur; het natuurbeeld in cultuurhistorisch perspectief (Nature’s mirror; the image of nature in a cultural-historical perspective) has formed the basis for the exhibition World Nature Art in the Nieuwe Kerk in Amsterdam.
In this episode we explore the meaning of nature, how we have become detached and obsessed with the individual, driven by ego, how we need to reinstate rituals of contemplation, the power we all posses to make change, the importance of enchantment, connection and falling in love.
“Unless we accept how destructive we can be we can’t move ahead constructively.”
We loved this episode so much, Dave has already booked a trip to have lunch with Matthijs!
Enjoy!
Lots of Love,
Dave & Steve x
Available now from all good podcast providers:
This episode is sponsored by Vivobarefoot Footwear. Vivobarefoot Footwear have given our listeners an exclusive 15% discount when you enter the code HAPPYPEAR15
Genuinely these are the only shoes you will see Dave & Steve wearing!
Produced by Sean Cahill and Sara Fawsitt
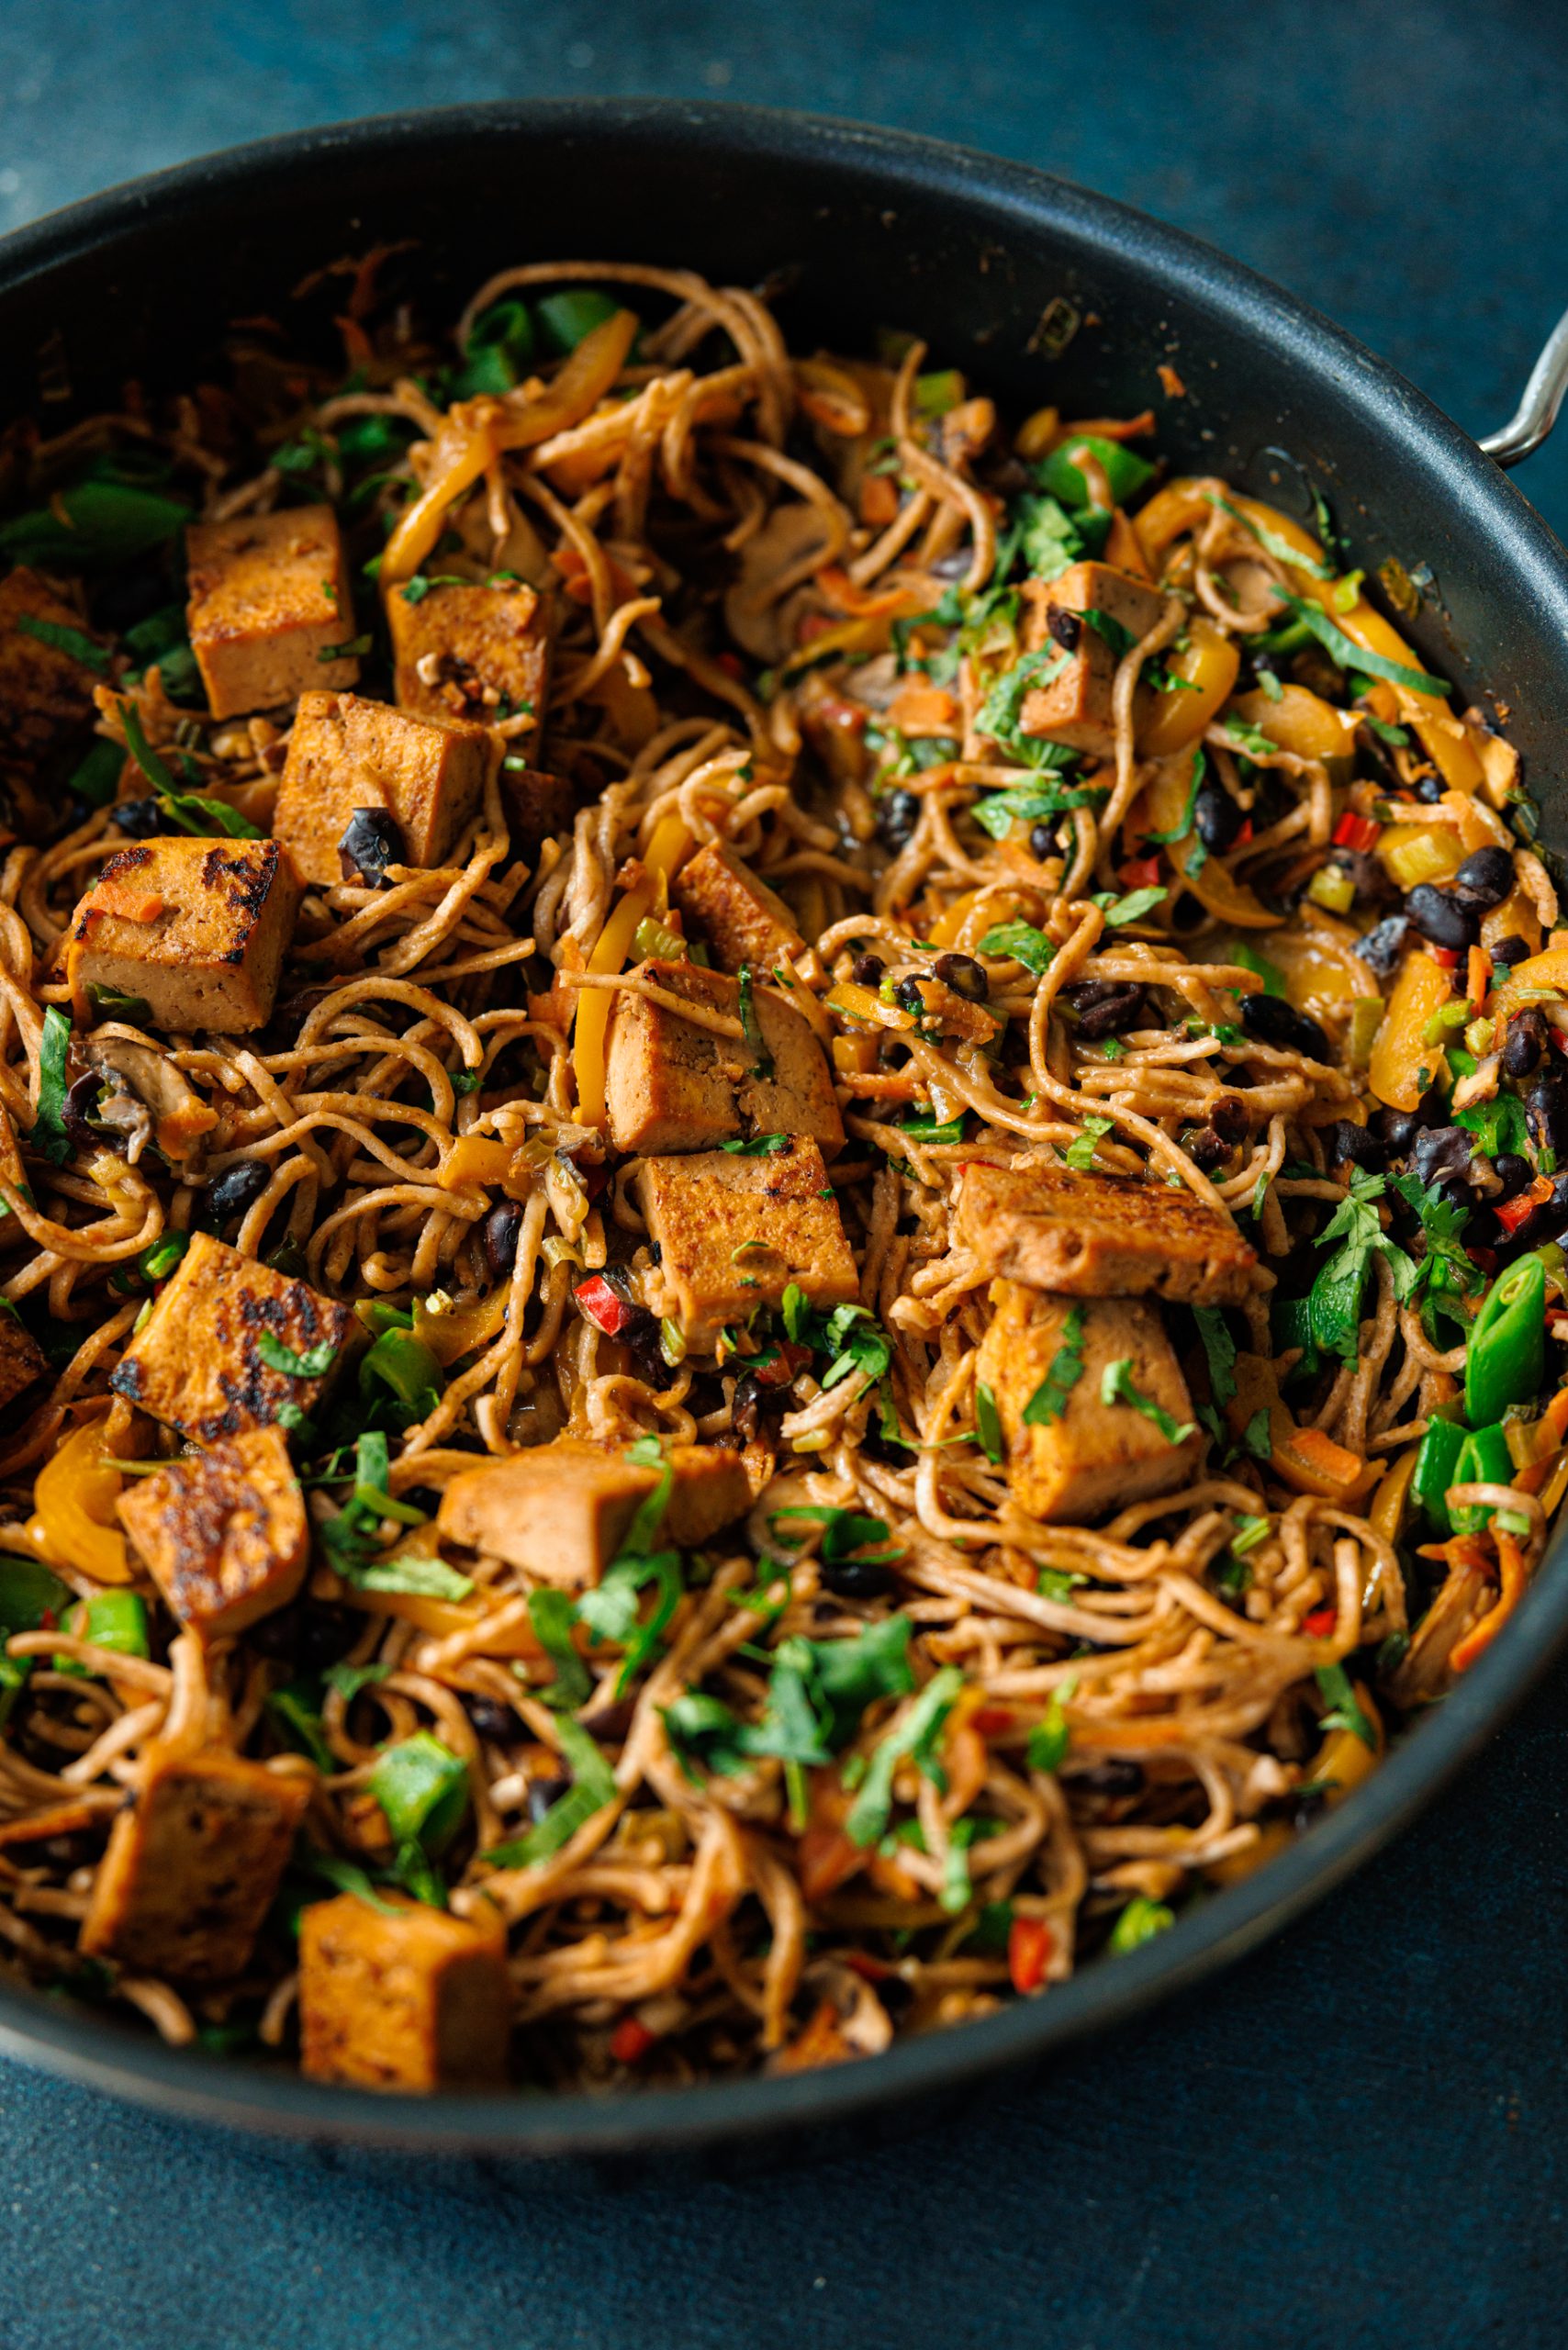
Easy Pad Thai in 10 Mins for Gut Health
Takes 10 minutes
Serves 4
Ingredients
- 200 g firm tofu
- 200 g whole wheat noodles
- 3 tbsp tamari
- 1 tbsp maple syrup
- 1 bunch scallions (green onions)
- 3 cloves garlic
- 1 thumb-sized piece of ginger
- 1 red chilli
- 150 g mushrooms
- 1 yellow pepper
- 1 grated carrot
- 400 g black beans (drained and rinsed)
- 400 ml coconut milk (use half the can)
- 50 g sugar snap peas
- Bunch of coriander
- Juice of ½ a lime
Instructions
- Boil the kettle, then fill a medium pot with the boiled water. Add the noodles and cook according to the instructions on the packet. Once cooked, drain and rinse them.
- Chop the firm tofu into medium-sized cubes. Peel and finely chop the garlic and ginger. Finely chop the scallions (green parts only), mushrooms, and yellow pepper. Drain and rinse the tin of black beans.
- Heat a wide-bottomed, non-stick pan on high heat. Once the pan is hot, reduce the heat to medium. Add the cubed tofu and cook until it starts to brown, turning to sear both sides. Add half of the garlic and ginger, and cook for 2 minutes, stirring regularly. When the tofu is seared, add 2 tablespoons of tamari and 1 tablespoon of maple syrup. If anything starts to stick, add 2-3 tablespoons of water and deglaze the pan. Remove the tofu from the pan and set aside.
- In the same pan, add the chopped yellow pepper, scallions, mushrooms, the remaining ginger, chilli, and grated carrot. Cook for 3 minutes. If anything starts to stick, add 2-3 tablespoons of water and deglaze the pan. Add the black beans, half the can of coconut milk, and the cooked noodles.
- Cook for a further minute or two, stirring to incorporate everything. Turn off the heat. Taste and season with salt. Start with 1 teaspoon of salt and adjust to taste if necessary. Squeeze over the juice of ½ a lime.
- Finely chop the coriander and sugar snap peas and add them to the dish before serving.
Notes
Video
How your gut affects your moods and mental health

The Gut Brain Axis
The gut and brain are connected through the gut-brain axis, which means that our gut health can have a significant impact on our mental health. A healthy gut microbiome (the population of microorganisms living in the gut) can help regulate mood, reduce inflammation, and improve brain function. On the other hand, an imbalanced gut microbiome has been linked to several mental health conditions, such as depression, anxiety, and stress. Furthermore, certain types of gut bacteria can produce neurotransmitters that influence mood, while others can influence the production of hormones such as cortisol, which plays a role in stress. To maintain good gut and mental health, it is important to eat a diet high in fibre, reduce stress, and avoid antibiotics and processed foods whenever possible.
In regards to mental health, butyrate is a short chain fatty acid that is made by the healthy fibre loving microbes in our gut. It has been suggested to have a positive impact in terms of moods and mental health as it can cross the blood-brain barrier and has been shown to have effects on neurotransmitter production, inflammation and oxidative stress, which are all involved in various mental health disorders.
The role of Vagus Nerve
The connection between the gut and the brain via the vagus nerve is referred to as the gut-brain axis.
Studies have shown that the vagus nerve plays a crucial role in the communication between the gut and the brain, and influences various functions including digestion, immunity, and mood. The vagus nerve transmits information from the gut to the brain and vice versa, allowing the brain to respond to changes in the gut and modulate gut function.
In regards to mental health, research suggests that an overactive or underactive vagus nerve can contribute to depression, anxiety and other mental health disorders. The vagus nerve has been shown to regulate the release of neurotransmitters, such as serotonin, that play a role in mood regulation, and can also modulate the body’s stress response.
Therefore, the vagus nerve is considered a key factor linking the gut and brain, and can have a significant impact on both gut and mental health.
The role of diet in terms of gut health and its influence on mental health
Diet has a significant impact on gut health, and therefore can also influence mental health. Some of the foods that are beneficial for gut health can positively impact mental health. These include:
- Fibre-rich foods: Foods high in fibre, such as fruits, vegetables, beans and whole grains, can promote the growth of beneficial gut bacteria and improve gut motility.
- Fermented foods: Fermented foods, such as kim chi and sauerkraut, are rich in probiotics that can help maintain a healthy gut microbiome.
- Polyphenol-rich foods: Foods rich in polyphenols, such as berries, nuts, and green tea, have anti-inflammatory effects and can support gut health.
- Omega-3 fatty acids: Omega-3 fatty acids all have anti-inflammatory effects and can support gut barrier function. Plant-based sources include walnuts, ground flax seeds, chia seeds
- Prebiotic foods: Prebiotic foods, such as onions, garlic, and asparagus, provide fuel for beneficial gut bacteria to thrive.
It’s important to note that everyone’s gut is unique and what works for one person may not work for another. A diverse plant based or plant predominant diet that includes a variety of nutrient-dense foods can help maintain a healthy gut and positive mental health.
If you want to learn more about the role of diet and what foods you can eat to super charge your gut, check out this in depth article we wrote on the gut along with Dr. Alan Desmond, Consultant gastroenterolist.
If you are looking for some gut health recipes – here is a link to lots of our gut health recipes
The Happy Pear Podcast
How do we get you to keep scrolling?
This is the aim of the applications on your phone. The more they can steal your focus and attention the more profitable they are.
So how can you take advantage of the benefits of technology whilst not letting it take advantage of you?

Episode 106
This week we speak to Johann Hari, the author of the New York Times bestseller: Stolen Focus: Why You Can’t Pay Attention.
Johann is an author, executive producer and Tedtalk speaker. His books have been translated into 40 languages, and been praised by a broad range of people, from Oprah to Noam Chomsky, from Elton John to Naomi Klein.
Johann’s first book, ‘Chasing the Scream: the First and Last Days of the War on Drugs’, was adapted into the Oscar-nominated film ‘The United States Vs Billie Holiday’. His second book, ‘Lost Connections: Uncovering The Real Causes of Depression – and the Unexpected Solutions’ was described by the British Journal of General Practice as “one of the most important texts of recent years”, and shortlisted for an award by the British Medical Association.
Johann’s TED talks have been viewed more than 93 million times. He has written over the past decade for some of the world’s leading newspapers and magazines, including the New York Times, the Los Angeles Times, the Guardian, the Spectator, Le Monde Diplomatique, the Sydney Morning Herald, and Politico. He has appeared on NPR’s All Thing Considered, HBO’s Realtime With Bill Maher, The Joe Rogan Podcast, the BBC’s Question Time, and many other popular shows.
Johann was twice named ‘National Newspaper Journalist of the Year’ by Amnesty International. He has also been named ‘Cultural Commentator of the Year’ and ‘Environmental Commentator of the Year’ at the Comment Awards.
A fascinating person who lives half the year in London, and spends the other half of the year traveling to research his books. We caught up with Johann one sunny afternoon and delved deep into what it means to loose focus, the effects it has on the brain, how our children are being affected by technology, and how we can regain focus and become more present.
A great episode!
Enjoy!
Lots of Love,
Dave & Steve x
Available now from all good podcast providers:
This episode is sponsored by Vivobarefoot Footwear. Vivobarefoot Footwear have given our listeners an exclusive 15% discount when you enter the code HAPPYPEAR15
Genuinely these are the only shoes you will see Dave & Steve wearing!
Produced by Sean Cahill and Sara Fawsitt
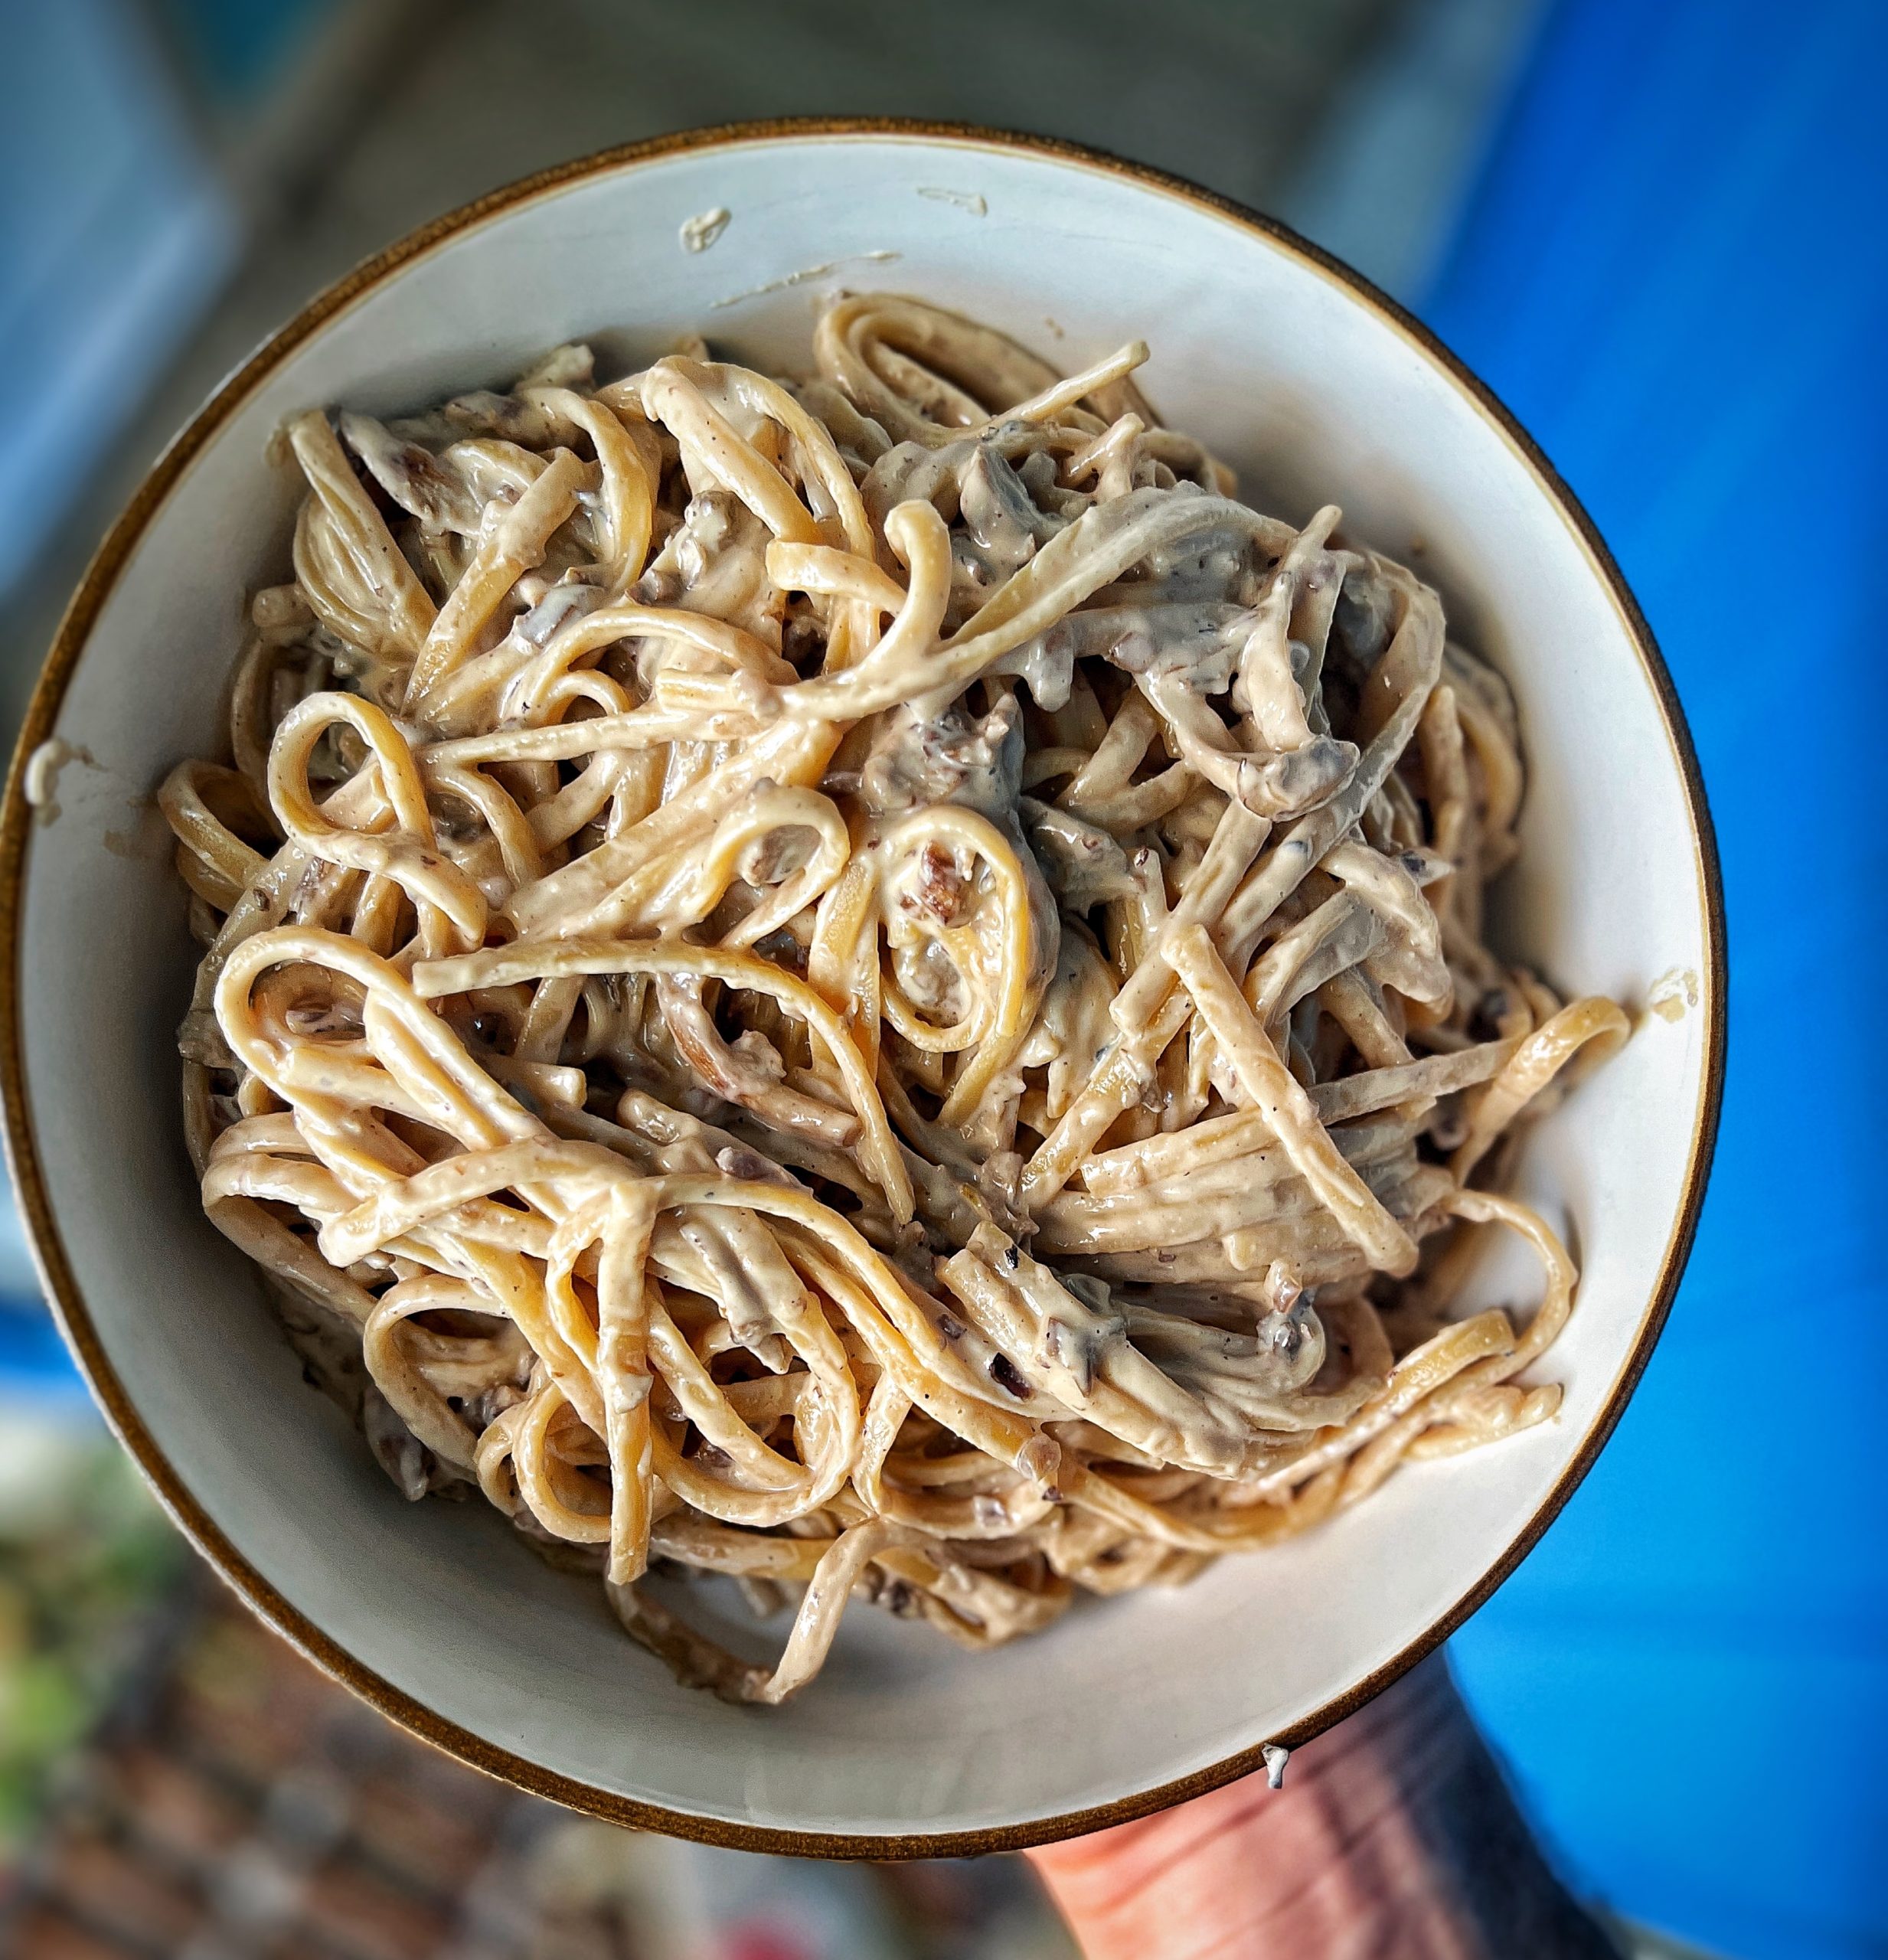
Creamy Mushroom Linguine
Takes 20 minutes
Serves 4
Ingredients
Linguine
- 250 g linguine
- 250 g Oyster Mushroom
- 1 onion
- 1/2 tsp garlic powder
- 2 tbsp tamari
Creamy Cashew Sauce
- 100 g cashew nuts
- 500 ml oat milk
- juice of half a lemon
- 1 tsp garlic powder
Instructions
- Prepare the Cashews: Place the cashew nuts in a small pot and cover with boiling water. Simmer gently for 5-10 minutes, then drain and rinse.
- Cook the Pasta: Fill a large saucepan with boiling water and add 1 tbsp of salt. Add your pasta and cook according to package instructions.
- Prepare the Vegetables: Peel and finely slice the onion and garlic. Finely chop the mushrooms.
- Cook the Onion and Mushrooms: Heat a large wide bottom pan over high heat. Add 1 tbsp of oil (or a few sprays of oil), followed by the onions and ½ tsp of salt. Reduce the heat to medium and cook for 4-5 minutes stirring until the onions brown slightly. Stir occasionally. Add the chopped mushrooms and garlic and cook for another 4-5 minutes. Stir in the tamari, cook for an additional minute, then turn off the heat.
- Prepare the Cashew Sauce: While the mushrooms are cooking, make the cashew sauce. Add the drained and rinsed cashew nuts and the rest of the sauce ingredients to a blender or food processor. Blend at high speed until smooth. Add the creamy cashew sauce to the pan, then turn the heat to medium. Cook for 1-2 minutes, stirring continuously, to allow the sauce to thicken.
- Combine the Pasta, Sauce & Mushrooms: Drain the cooked pasta, reserving some pasta water. Mix the pasta into the sauce, making sure the pasta is well coated. If the sauce is too thick, add reserved pasta water until you reach your desired creamy texture. If it is too watery, cook for a few minutes stirring constantly to avoid sticking. Taste and adjust seasoning with salt and black pepper as needed. Add the mushrooms and mix through.
- Garnish and Serve: Optionally, garnish with finely sliced fresh red chilli and/or fresh oregano or thyme. Serve hot and enjoy your creamy, comforting pasta!
Nutrition
We love this recipe, really quick to make, super tasty and everyone will be
looking for more, we are aware that is quite a promise but these burgers will
deliver!! Really worth seeking out the nutritional yeast as it gives a nice
distinct flavour to it and a couple of slices of vegan cheese is not essential
but really takes it to the next level. We like to serve them with vegan mayo,
lettuce, gherkins, ketchup, red onion and tomato. We fried ours up in the
pan for two minutes, but these are lovely cooked in the grill.
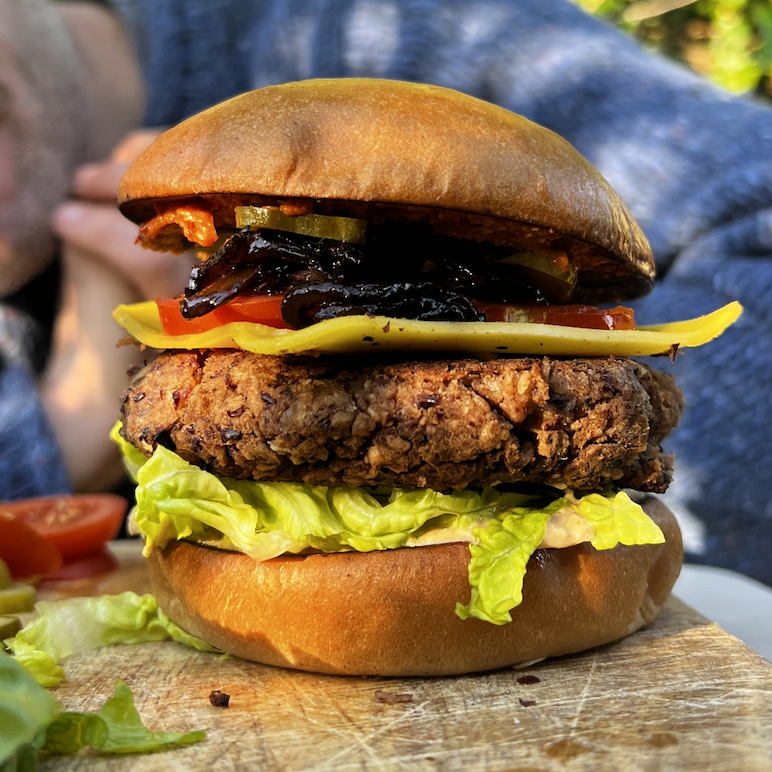
Epic Veg Burger
Takes 15 minutes
Serves 3
Ingredients
- 400 g kidney beans
- 1 onion
- 2 cloves garlic
- 150 g Oyster mushroom any kind of mushrooms will work!
- 4 tbsp Tamari
- 100 g breadcrumbs
- 3 tbsp nutritional yeast
Serving suggestions
- Favourite buns
- Vegan Mayonnaise
- Spicy Pepper Pesto
- Ketchup
- Lettuce Leaves
- Tomatoes
- Vegan Cheese
- Lettuce shredded, for extra naughtiness!
- Tomato
- Caramelised Onion
- Gherkins
- Avocado slices
Instructions
- Drain and rinse the beans. Peel and finely chop the onion and garlic. Roughly chop the mushrooms.
- Put 3 tablespoons of water into a frying pan on a high heat. Once hot, add the onion and garlic and cook for 1-2 minute, stirring regularly. Add the mushrooms into the pan and cook for a further minute. Now add the tamari, and stir fry for 2 minutes. Remove from the heat.
- In a mixing bowl, add the breadcrumbs, beans and the nutritional yeast and mix well.
- When the mushrooms are done, add them into the bowl and mix. Leave to cool for a minute. Using your hands or a wooden spoon mash and mix so that well mixed. Form this mixture into patties, making sure to really compress them so as to remove as much moisture as possible.
- The patties are now ready to cook. You can either fry them in the pan for 2 minutes on each side till they go golden or grill them in the oven at 180C/F/gas mark and they are also great grilled on the barbecue!
- Serve in your favourite bun bun with whatever tickles your fancy! We went a bit of everything…pesto, cheese, lettuce, tomatoes, gherkins and for real indulgence…caramelised onions. ENJOY, this one is epic!!
Nutrition
The Happy Pear Podcast
What does it mean to be an explorer?
What are the sacrifices one must take?
What are the benefits of putting yourself through such hard physical challenges?

Episode 105
This week we speak to Damian Browne, an extreme adventurer, peak performance athlete and International keynote speaker from Galway, Ireland.
For the last 25 years Damian has pursued his human potential, relentlessly pushing his body & mind to their perceived limits; forging himself & his character in what he deems “a crucible life”.
During a 16-year career as a professional rugby player, Damian donned the colours of some of rugby’s European elite, including Northampton Saints & Leinster; where he won club rugby’s biggest prize, The Heineken Cup.
Since retirement from professional rugby, Damian has become one of the World’s foremost extreme adventurers; undertaking some of the most demanding physical and mental challenges on the planet, including the 257km Sahara Desert ultra marathon, The Marathon des Sables, climbed 5 of the 7 Summits, a renowned mountaineering feat & most recently created history by becoming the first person ever to row from New York City to Galway, taking 112 days and in the process become one of only a handful of people to have rowed the Atlantic in both directions.
Damian’s drive to explore his physical & mental limits is not exclusive to ultra endurance events and he is a multi-time Irish indoor rowing champion, holding all-time, all-category records for the 500m and 1000m distance.
We were lucky to have had Damian in the studio with us for this episode, a brilliant and deep character, we hope you enjoy this episode as much as we did.
Enjoy!
Lots of Love,
Dave & Steve x
Available now from all good podcast providers:
This episode is sponsored by Vivobarefoot Footwear. Vivobarefoot Footwear have given our listeners an exclusive 15% discount when you enter the code HAPPYPEAR15
Genuinely these are the only shoes you will see Dave & Steve wearing!
Produced by Sean Cahill and Sara Fawsitt
The Happy Pear Podcast
Let’s lean into the discomfort by plunging into cold water or sweating through a hot sauna with metabolic scientist and author of Winter Swimming, Susanna Søberg.

Episode 104
We have been jumping into the sea for the last 8 years, we knew it was good for us, simply by how it made us feel: Elevated, alive, new, refreshed, giddy, more connected to those around us and overall a feeling of happiness. Now after so much research we are aware of how truly beneficial cold water and heat exposure is for us, from the serotonin, dopamine and oxytocin hits, to the longevity benefits and the effect it has on our metabolism. We discuss it all with Susanna and even take things a step further into the community benefits.
Susanna Søberg, PhD., earned her doctorate researching metabolism and has worked for many years designing and conducting clinical studies. Her most recent research and the background for this book have been on fat reduction through winter swimming at the Tryg Foundation’s Center for Physical Activity, Denmark. Winter Swimming, now published in thirteen languages, is her first book.
Founder and CEO of www.soeberginstitute.com . Susanna has also created a course, The Thermalist Cure, all about how and why to get started with cold, heat, and breathwork for better health. The course launches on 24th January and she has kindly offered our listeners a 10% discount with the code THEHAPPYPEAR
A brilliant episode that is on a topic close to our hearts.
Enjoy!
Lots of Love,
Dave & Steve x
Available now from all good podcast providers:
This episode is sponsored by Vivobarefoot Footwear. Vivobarefoot Footwear have given our listeners an exclusive 15% discount when you enter the code HAPPYPEAR15
Genuinely these are the only shoes you will see Dave & Steve wearing!
Produced by Sean Cahill and Sara Fawsitt
This is so genuinely tasting and easy to make – you will be surprised how good this is in even just 5 mins. Even if this ends up taking you 10 mins to make you will still have a super tasty quick dinner that will be faster to make than ordering a take away!
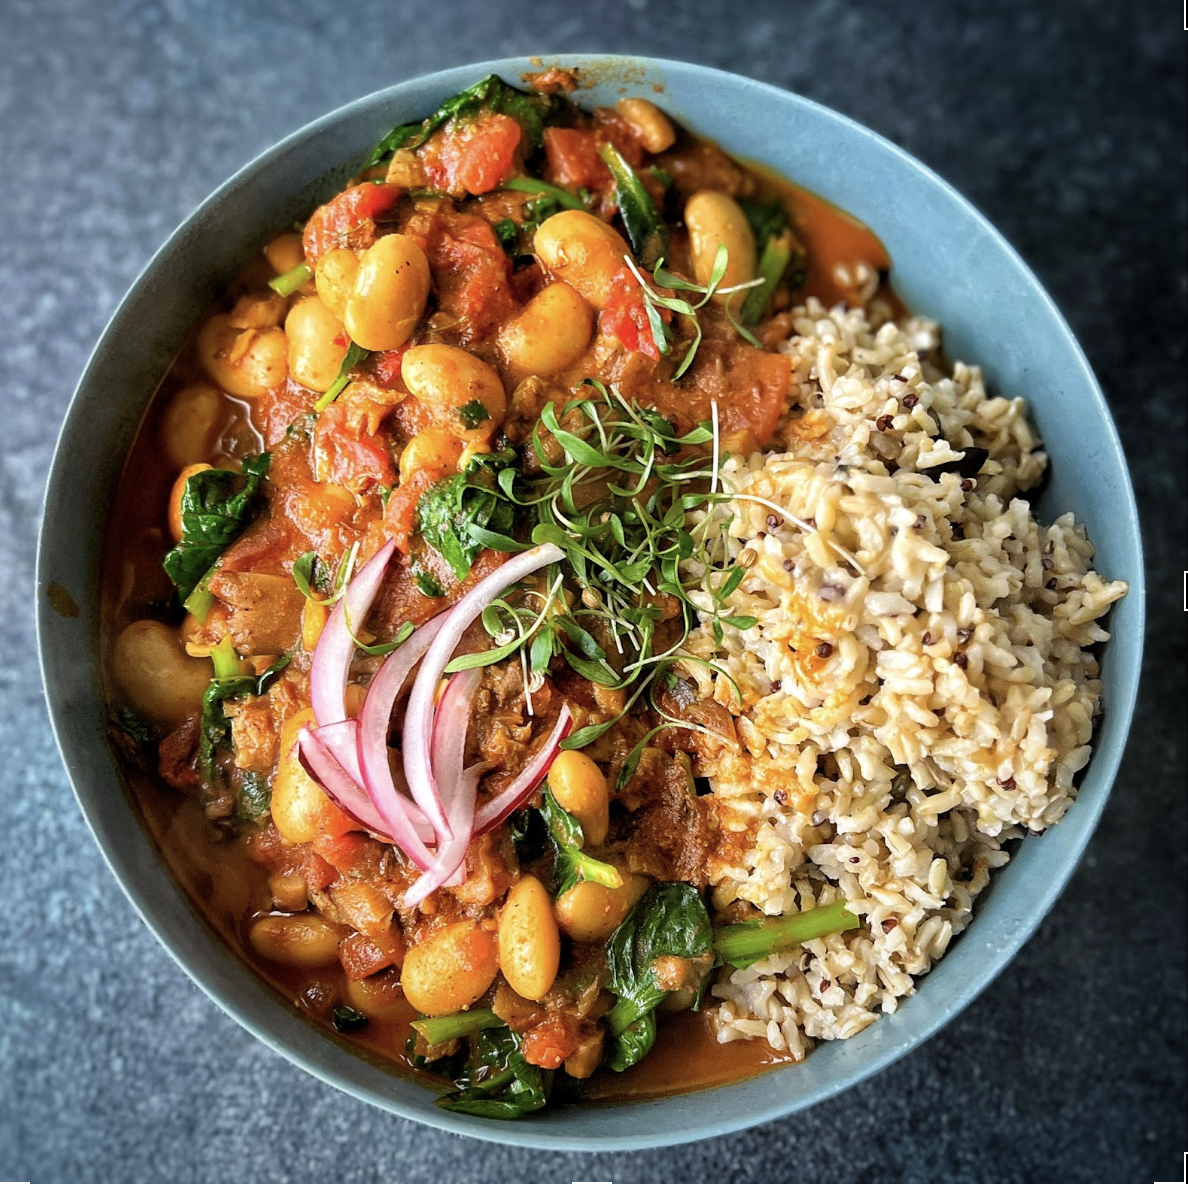
5 Mins Spinach, Mushroom and Butterbean curry
Takes 10 minutes
Serves 2
Ingredients
- 1 tbsp oil
- 1/2 thumsized ginger
- 2 cloves garlic
- 1/2 red chilli
- 200 g mushrooms (ideally oyster mushrooms)
- 2 tbsp tamari
- 1 tbsp cumin seeds
- 2 tbsp curry powder
- 1/4 ground pepper
- 400 g butter beans
- 400 g chopped tomatoes
- 200 g coconut milk
- 50 g baby spinach
To serve
- Pickled red onion
- Coriander shoots Serve with your favourite grain of choice, we used a pre cooked brown rice and served this beautiful curry with some pickled red onions and some coriander shoots. Enjoy!
Instructions
- Heat a wide bottomed non-stick pan on high heat. Chop the mushrooms into bite sized pieces. Peel and finely dice the ginger and garlic, finely dice the ½ red chilli, leaving the seeds in if you prefer it hot or removing the seeds for a milder spiced curry.
- Drain and rinse the butter beans. Once the pan is hot add the oil along with the mushrooms, diced ginger and cumin seeds and cook for 2 mins.
- Next add the garlic and chilli and mix through, stirring occasionally. Add in the tamari or soy sauce and thoroughly mix through ensuring to coat each mushroom in the sauce. Add in the butter beans, followed by the chopped tomatoes, coconut milk, curry powder and ground black pepper and cook for a minute bringing the temperature up, while stirring occasionally.
- Taste and adjust the seasoning to your liking by adding more salt, black pepper or lime juice.To finish add in the baby spinach and allow it to wilt down for 1 minute.
- Serve with your favourite grain of choice, we used a pre cooked brown rice and served this beautiful curry with some pickled red onions and some coriander shoots. Enjoy!
Nutrition
The Happy Pear Podcast
Dating, partying, socialising, special occasions, holidays… without alcohol does this sound difficult to you?
Could you imagine going sober at the age of 26 without using the excuse “I am on antibiotics” or “I am working tomorrow”?

Episode 103
This week we spoke to the founder of the Sober Girl Society and one of the leading voices on the sobriety movement, Millie Gooch.
At the age of 26 Millie decided to make a big lifestyle change, she quit drinking. After too many binge drinking nights that left her feeling anxious, and insecure. She realised she needed a change.
Millie has written for a range of publications, and her campaigning work has been featured everywhere from ELLE and Stylist to the BBC and Evening Standard.
In this episode, Millie gives us practical advice for how to date, party and socialise sober. We debunk the myths surrounding sobriety and how having a healthier relationship with alcohol can massively improve your confidence, relationships, productivity and your relationship with yourself.
We loved chatting to Millie, she is a brilliant voice for the movement.
Enjoy!
Lots of Love,
Dave & Steve x
Available now from all good podcast providers:
This episode is sponsored by Vivobarefoot Footwear. Vivobarefoot Footwear have given our listeners an exclusive 15% discount when you enter the code HAPPYPEAR15
Genuinely these are the only shoes you will see Dave & Steve wearing!
Produced by Sean Cahill and Sara Fawsitt
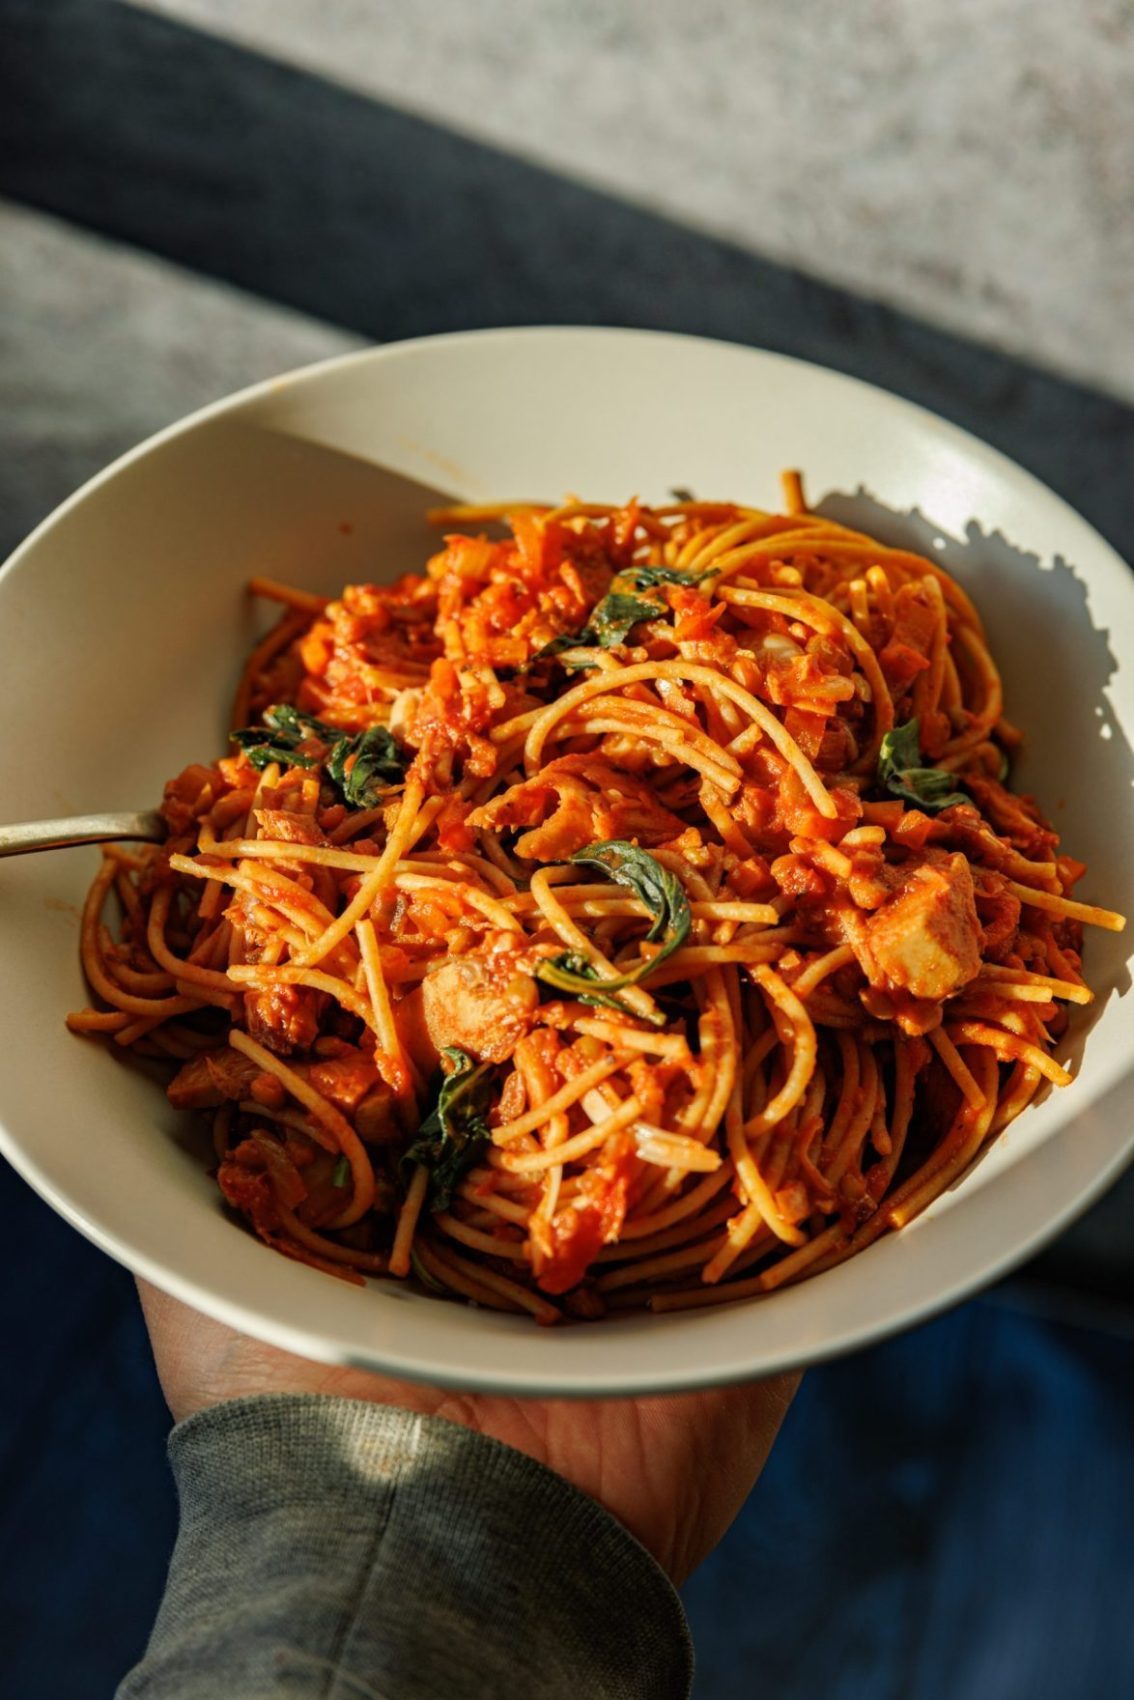
Meaty Spag Bol
Takes 7 minutes
Serves 2
Ingredients
- 200 g spaghetti (whole wheat is great for fibre)
- 2 cloves garlic
- 2 onions (medium)
- 1 carrot
- 400 g jackfruit
- 2 tbsp tamari
- 150 g oyster mushroom
- 400 g cooked lentils
- 800 g chopped tomatoes
- 200 g jar of tomato puree
- 1 tsp salt
- ¼ tsp black pepper
- small bunch of basil
Instructions
- Cook the pasta: Fill a pot with 3L of water and bring it to the boil (using a kettle will speed things up). Once boiling, reduce to medium heat and add 1 tbsp of salt. Add the dried pasta and cook according to the pack instructions.
- Prepare the vegetables: Drain and rinse the lentils and jackfruit. Peel and finely dice the onions and garlic. Finely dice the carrot. Chop the mushrooms into small, bite-sized pieces. Slice the jackfruit into thin, bite-sized strips.
- Cook the aromatics: Heat a wide-bottomed non-stick pan on high heat. When hot, add the chopped onion and fry for 3-4 minutes until it starts to brown. Add the garlic, diced carrots, and a pinch of salt. Reduce the heat to medium and cook for 3-4 minutes, stirring regularly. If the mixture starts to stick, add a couple of tablespoons of water to deglaze the pan using a wooden spoon.
- Cook the mushrooms and jackfruit: Add the mushrooms and jackfruit to the pan and cook for 3-4 minutes, stirring occasionally, until they start to char. Add tamari and mix well so that the mushrooms and jackfruit absorb the umami flavour.
- Drain the pasta: Once the pasta is cooked, drain it but reserve 50ml of pasta water to dilute the sauce later if needed.
- Finish the Bolognese: Add the drained lentils, chopped tomatoes, tomato purée, and the remaining salt and pepper to the pan. Bring the mixture to a boil, then lower to a simmer. Cook for 5 minutes, stirring occasionally to allow the flavours to meld.
- Combine pasta and sauce: Add about 50ml of the reserved pasta water to the sauce, then stir in the cooked pasta. Mix well to combine.
- Add basil: Remove the basil leaves from the stalks. Finely chop the stalks and add them to the sauce. Taste and adjust the seasoning as needed.
- Serve: Garnish with fresh basil leaves and enjoy your meaty spaghetti Bolognese!
Nutrition
Video
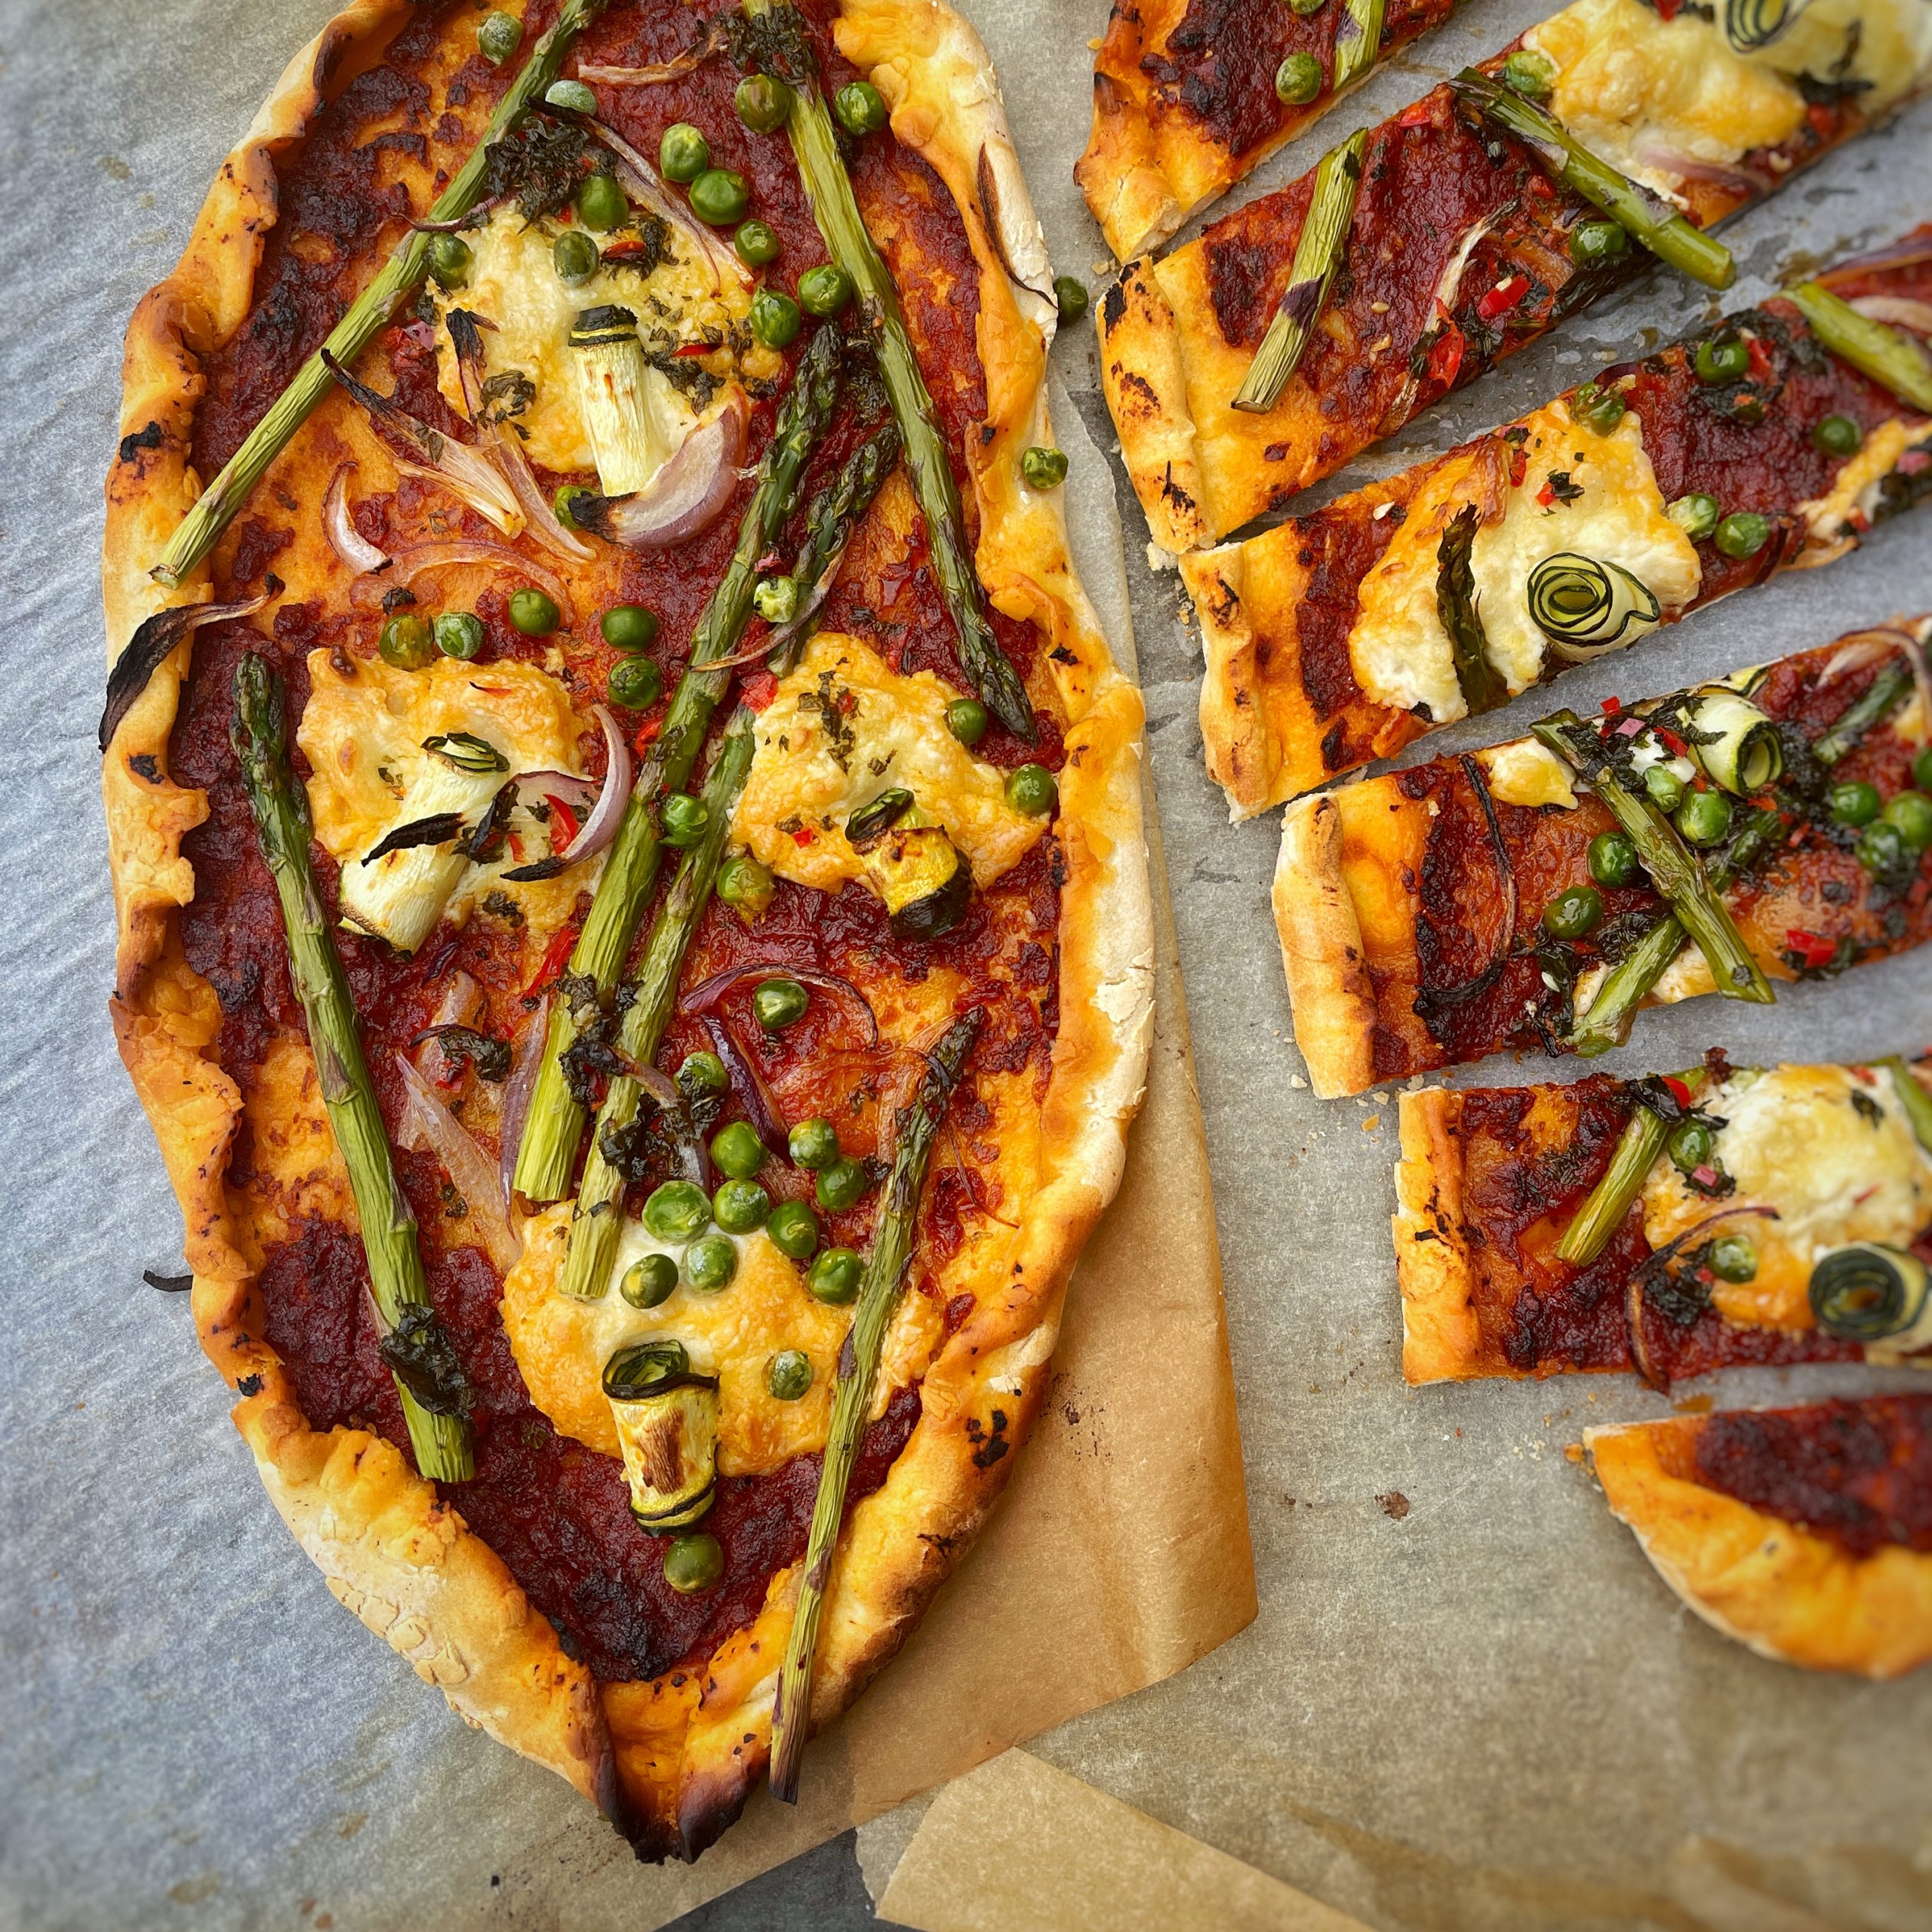
Quick Turkish pizza/ Pide with summer veg & feta
Takes 25 minutes
Serves 2
Ingredients
- Dough;
- 250 g self raising flour
- Small pinch salt
- 125 ml water
- Base;
- 4 tbsp Pesto of choice – we used our Happy Pear Sun-Dried Tomato pesto
- 4 tbsp Tomato puree
- Toppings;
- Quick fire cashew feta;
- 100 g cashew nuts
- 3 tbsp lemon juice juice of 1 small lemon
- 4 tbsp non dairy milk
- Good Pinch of salt and black pepper
- 100 g Asparagus
- 1 small Courgette -150g
- 50 g Peas
- Mint & chilli oil;
- 12 g mint
- 1 small fresh chilli
- 8 tbsp Olive oil
- Pinch of salt
Instructions
- Method;
- Preheat oven to 250 C Fan assisted
- Boil the cashews for 10 mins. Drain and rinse well and set aside.
- While the cashews are boiling make your dough; into a mixing bowl add the flour and water along with a small pinch of salt. Mix the flour, water and the salt together in a bowl and bring together to a rough dough. Transfer it to a lightly floured surface and knead for 5-10 minutes until it forms a nice smooth elastic dough, smooth to the touch. You could alternatively use a stand mixer with a dough hook for 4-5 minutes.
- Peel the courgette into long thin ribbons using a wide peeler ; approx 16 – 20 slices. Leave asparagus whole, trimming stalk so they are about 10cm
- Mix the pesto and tomato paste together
- To make the cashew feta; add the cashews to a high speed blender along with the milk, lemon juice and ⅓ tsp of salt and blend till smooth, remove and set aside. rinse the blender, then make the mint and chili oil.
- Divide the dough into 2 balls. Roll each dough into approx 30 x 20cm oval shape and transfer to two lightly oiled baking trays.
- To assemble the pide;
- Spread approx 4 Tbsp or half of the pesto tomato mixture over each dough, leaving 3cm uncovered all the way around.
- Add 4-5 tsp of feta dotted over the pesto.
- Toss the asparagus and courgette ribbons in 1 tbsp of oil and pinch of salt. Roll up 2 ribbons of courgette each,into little swirls.
- Add the courgette rolls and asparagus over the feta covering the pesto and feta, keeping the asparagus lined up at an angle, making a nice pattern.
- Fold back the uncovered dough all the way around, making a canoe shape, leaving the filling mostly uncovered. Pinch the pastry at both ends to keep it sealed during baking. Bake for 10 -12 mins until the dough is nice and golden. Rotate the trays once during cooking so it cooks evenly.
- Serve with your favourite summer salad. Enjoy!
Video
This is to show that super tasty dinners can be quick and easy to make, this is an easier version of a korma recipe a wonderful Indian chef, Santana who worked with us used to make. The first time we made this in the studio we all ended up eating it for a second breakfast! Serve with your favourite grain of choice.

5 mins creamy korma
Takes 3 minutes
Serves 4
Ingredients
- 400 g chickpeas
- 400 g butter beans
- 200 g mushrooms (we love Oyster mushrooms)
- 2 tbsp tamari
- 2 cloves garlic
- thumbsized piece of ginger
- 50 g cashew nuts
- 400 ml coconut milk
- 400 g chopped tomatoes
- 150 g roasted red peppers from a jar, drained
- 2 tbsp curry powder
- 1 tbsp garam masala
- 1 tsp salt and pepper
Instructions
- Heat a non-stick pan on high heat. As it heats up, roughly chop the mushrooms, and finely dice the ginger.Drain and rinse the chickpeas and butterbeans.
- Add 1 tbsp of oil to the pan along with the chopped mushrooms and ginger and leave to fry.Into the blender jug add the garlic, chopped tomatoes, coconut milk, cashew nuts, roasted red pepper, curry powder, garam masala, salt and blend till super smooth.
- Give it the time to get a super smooth sauce.Stir the mushrooms and add the tamari/ soy sauce and mix well so that each mushroom is well infused with the umami flavour.
- Add the drained chickpeas and butter beans along with the sauce and mix well.Taste and adjust the seasoning to your liking by adding some salt, ground black pepper or lime juice.
- Serve with some quick cooked brown rice and some chopped coriander or basil for a delicious quick dinner.
Nutrition
Video
The Happy Pear Podcast
This week we bring you, New York Times bestselling author and internationally recognized professional speaker on a number of important public health issues, Dr Michael Greger, M.D. FACLM.

Episode 101
He wrote the book on How Not To Die & also How Not To Diet! A legend in the nutirtion world, Dr. Greger and his team set up Nutritionfacts.org, a science-based nonprofit organisation. That provides free updates on the latest in nutrition research via bite-sized videos. A strictly non-commercial public service health charity.
Dr. Greger has lectured at the Conference on World Affairs, the National Institutes of Health, and the International Bird Flu Summit, among countless other symposia and institutions; testified before Congress; has appeared on shows such as The Colbert Report; and was invited as an expert witness in defense of Oprah Winfrey at the infamous “meat defamation” trial. In 2017, he was honored with the American College of Lifestyle Medicine with its Lifestyle Medicine Trailblazer Award.
In this episode we debunk the myths around diet culture, and break down how to sustain a healthy weight and lifestyle.
Enjoy!
Lots of Love,
Dave & Steve x
Available now from all good podcast providers:
This episode is sponsored by Vivobarefoot Footwear. Vivobarefoot Footwear have given our listeners an exclusive 15% discount when you enter the code HAPPYPEAR15
Genuinely these are the only shoes you will see Dave & Steve wearing!
Produced by Sean Cahill and Sara Fawsitt
The Happy Pear Podcast
To mark 100 episodes of chatting to experts, trailblazers, doctors, entrepreneurs, celebrities, and psychologists we thought we would do something different.

Episode 100
We (Dave & Steve) and our two producers, Sara & Sean, get together and chat through our highlights, lowlights and learnings from speaking to such extraordinary people and experts in their field.
We hope you enjoy the episode and getting to know a little better the people behind The Happy Pear Podcast.
Enjoy!
Lots of Love,
Dave & Steve x
Available now from all good podcast providers:
This episode was sponsored by Wolfgangreforest.ie – how about going GREEN this Christmas by giving the gift of a tree instead of possessions people probably don’t need! With Wolfgang re-forest.
Produced by Sean Cahill and Sara Fawsitt
This make the most wonderful celebration dinner and the red currant jus is phenomenal and so worth the effort!
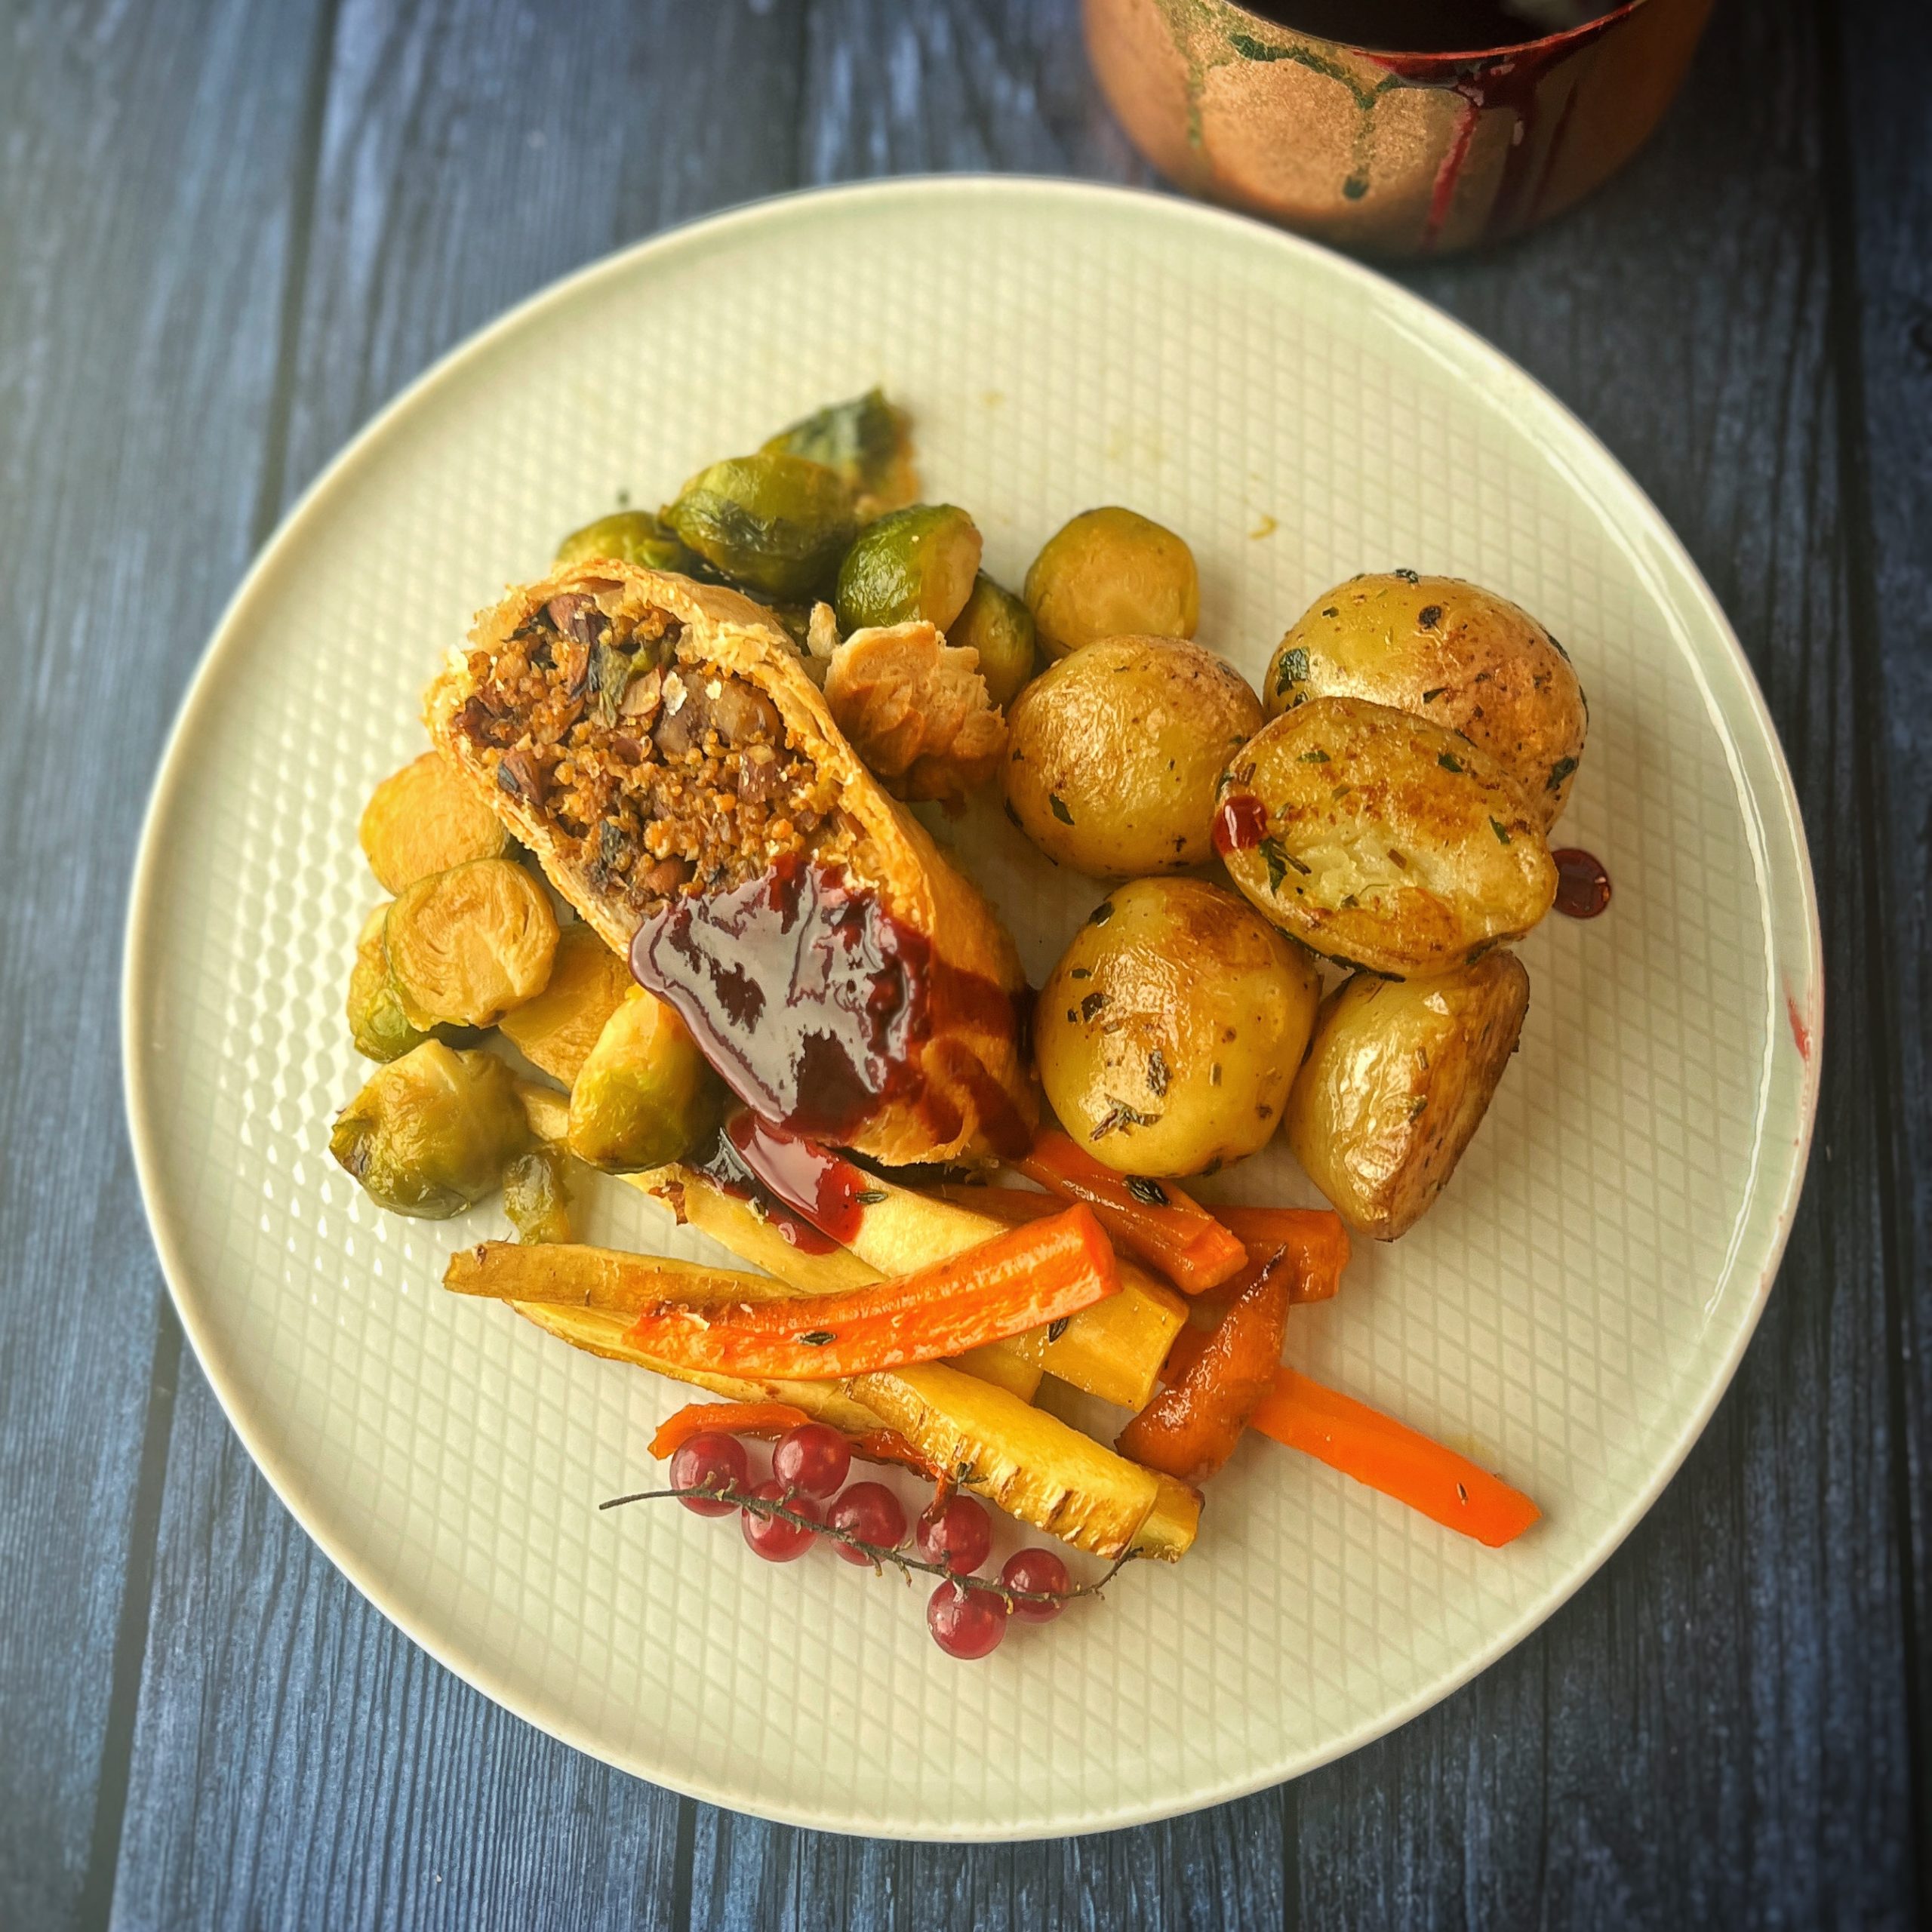
Christmas mushroom and pumpkin Wellington with red currant jus
Takes 1 hour
Serves 6
Ingredients
- 200 g almonds
- 2 tbsp tamari
- 2 tbsp maple syrup
- 1 leek or 3 small leeks/ 1 red onion
- 2 cloves garlic
- 200 g mushrooms ideally oyster
- 200 g pumpkin/ squash
- 200 g cooked chestnuts
- 150 g cooked couscous or quinoa or grain of choice buy a pack of precooked grain to save time (approx 75g of couscous dried gives 150g when cooked)
- 3 tbsp tamari
- 10 sprigs of fresh thyme
- 10 medium leaves of fresh sage
- 1 tsp salt
- ½ tsp black pepper
- 2 sheets of puff pastry 2x320g
- 2 tbsp of oat milk or plant milk of choice
- Red currant jus
- 100 g of fresh Red currants
- 4 tbsp of maple syrup
- 200 g of red wine
- 1 tbsp balsamic vinegar
- 500 ml veg stock
Instructions
- Preheat the oven to 200 degrees c
- Roughly chop the almonds or pulse in the food processor or put in a zip lock bag and bash with the bottom of a mug until coarse and put on a baking tray and coat with 2 tbsp of tamari and 2 tbsp of maple syrup, roast in the preheated oven for 10 mins.
- Slice the leek and give the green part a good wash as often sediment hides here, (if using onions peel and finely dice them) and peel and dice the garlic. Roughly slice the mushrooms, remove the sage leaves and thyme leaves from their stalks, finely chop the sage leaves and set aside.
- Grate the flesh of the pumpkin or squash (discard the skin or keep for a stock)
- Roughly chop the cooked chestnuts
- Place a large non-stick pan on high heat. Once warm add 1 tbsp of oil and add the chopped leek and fry for 3-4 mins stirring occasionally, add the garlic and mushrooms and grated squash/pumpkin and pinch of salt- cook for 7-10 mins stirring regularly.
- Add the cooked chestnuts and tamari, the thyme and sage leaves, and salt and black pepper and cook for a further 3-4 mins. Remove from the heat and add the cooked couscous and almonds and mix through. Make sure to taste and adjust the season to your liking.
- To roll the wellington:
- Roll out one of the sheets of puff pastry, keeping it on the parchment paper and carefully add half the filling into the centre of the pastry lengthwise,leaving ⅓ at either side empty and leaving approx 3-4 cm at either end to wrap. Using either your clean hands or 2 spoons compact the filling so that it is firm and holds its shape firmly. This is very important so that once the wellington is cooked it holds its shape. Wash your hands and fold the pastry over on one side and fold the other side over ensuring to cut off any excess pastry so that it cooks fully. Imagine you are wrapping a present however you have to be careful as the more you handle the pastry the softer and harder to work with it gets. Once the wellington is wrapped, carefully roll it over so that the seam is at the bottom. Lift the parchment paper with the wellington and place on a baking tray. You can cut decorations with any leftover pastry cuts. Gently score the pastry in a criss cross pattern and place any pastry decorations on top. Brush with some oat milk or plant milk of choice to help it golden in the oven.
- Baking in the oven for 30-45 mins until nicely golden all over.
- While the wellington is in the oven let’s make the red currant jus.
- Put a medium saucepan on high heat and add in all the ingredients, bring to a boil and using a whisk try to break down the red currants so they release their pectin which will help thicken the sauce as it reduces. Leave to reduce until it reaches a thick sauce and reduces by about ⅔’s. This should take about 20 mins – you can simply stir it occasionally.
- NOTE: if you can’t find fresh red currants, simply leave out the red currants and the maple syrup and replace with 2 tbsp of red currant jelly and repeat the process.
- Remove the wellington from the oven when it is golden brown. Easiest way to slice is to use a serrated knife. Each willington should give 6 slices. Serve with the red currant jus, and some roasted potatoes, brussel sprouts and cranberry sauce – enjoy!
Video
These make a wonderful edible gift and great last minute present which everyone likes! Literally takes 10 mins and they can look very professional! If you have a nice box and a ribbon, it can really make them look like a fancy homemade gift!
Ganache Chocolate Truffles
Takes 20 minutes
Serves 15
Ingredients
- 100 g dark chocolate
- 100 g cream plant based or coconut cream
- 1 orange zest
For Decoration
- Pistachios
- Freeze-dried raspberries
- Desiccated coconut
- Cacao powder
Instructions
- Break up the dark chocolate into small pieces and place them in a bowl.
- In a saucepan, add the cream and the orange zest, being careful to avoid the white pith, which can be bitter. Heat on medium until it reaches a gentle boil.
- Pour the heated cream over the chocolate and leave it for 2 minutes. Then stir until the mixture is well combined and richly chocolatey.
- Chill the mixture in the fridge for about 20 minutes, or until it’s firm enough to roll.
- Roll the chilled mixture into small balls, handling them as little as possible to prevent them from melting. Return the balls to the fridge to harden while you prepare the toppings.
- Peel and finely chop the pistachios. Place the chopped pistachios, desiccated coconut, cacao powder, and freeze-dried raspberries into separate bowls.
- Roll the hardened truffles in the prepared toppings for a decorative and varied finish.
- Package your truffles in a small box or clear bag, add a label, and they're ready to enjoy!
Nutrition
This is an indulgent sandwich guaranteed to please! It takes about 15 mins to make and is so worth it!
If you can oyster mushrooms are our favourite and if you compress them with a clean pan it encourages more evaporation and browning for a total flavour bomb of a sandwich!
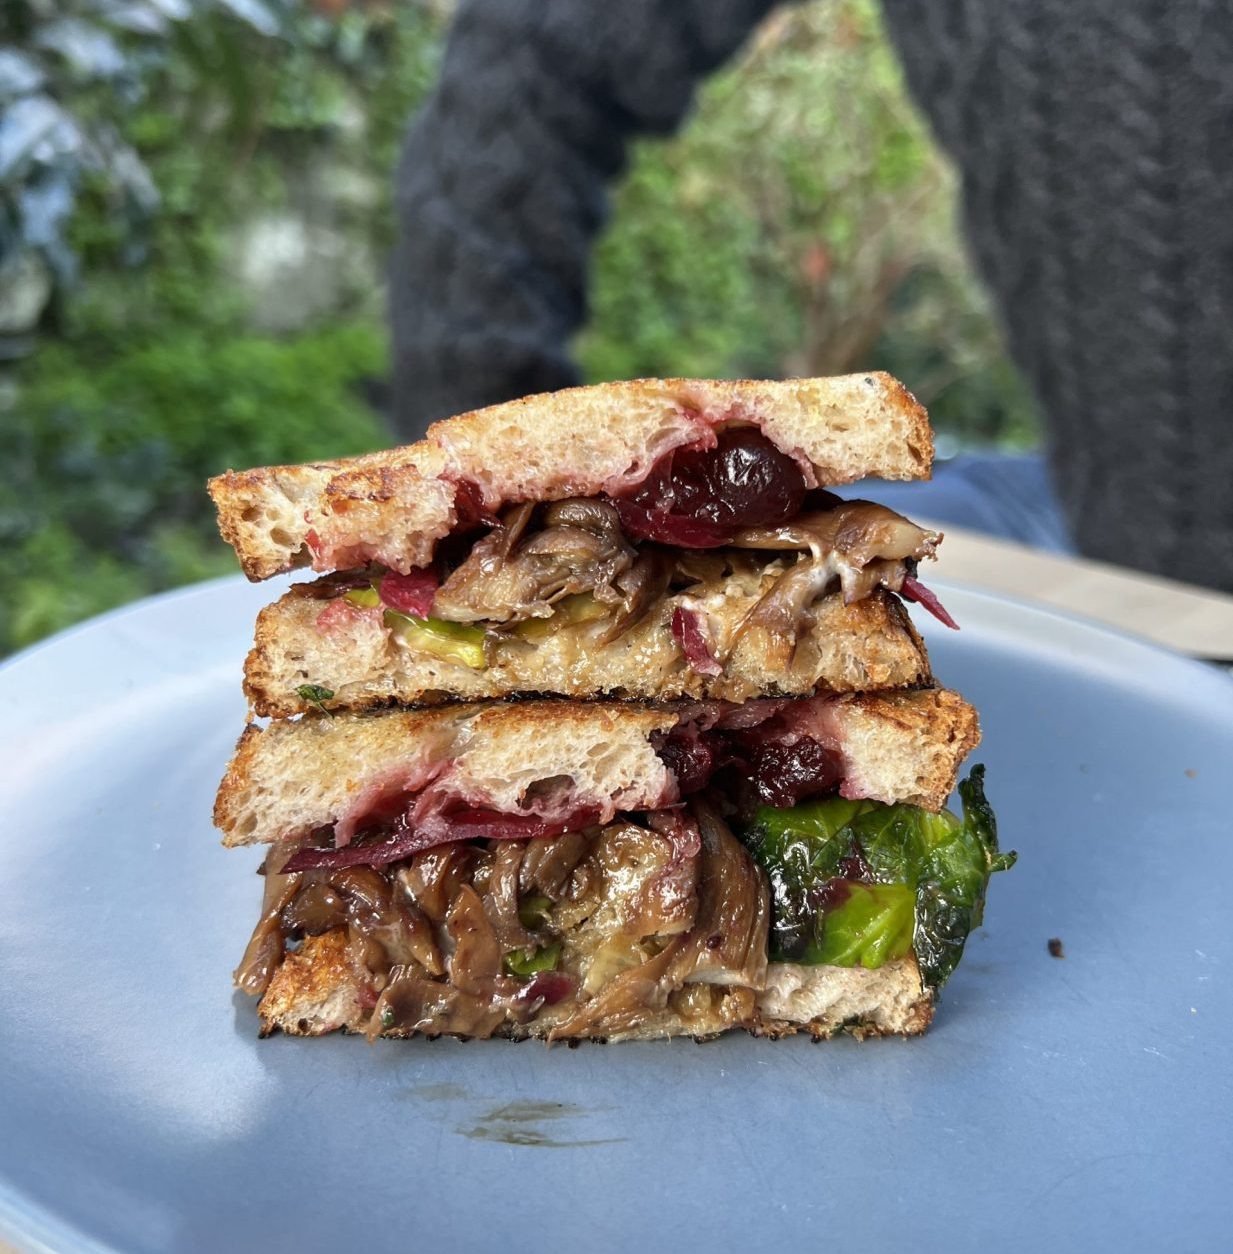
Epic Christmas Sandwich
Takes 12 minutes
Serves 2
Ingredients
- 100 g brussel sprouts
- 150 g Oyster mushrooms
- 4 tbsp gravy
- 2 tbsp tamari
- 1 tbsp oil
- 3 tbsp vegan mayo
- 3 tbsp cranberry sauce
- 100 g sauerkraut
- 100 g stuffing
- 4 slices bread
- 30 g plant-based butter
Instructions
- Wash and quarter the brussel sprout and put in a sauce pan with salted water and boil for 10 mins.
- Heat a non-stick frying pan on high heat and rip the mushrooms into thin strips. Once the pan is hot add 1/2 tbsp of oil and cook the mushrooms for 5 mins. Using a clean smaller pan, compress the mushrooms to encourage more evaporation and browning – this will result in more flavour. Turn the mushrooms until they are brown on both sides, add in the gravy and tamari and ensure each mushroom is popping with flavour. Remove the mushrooms. Drain and rinse the brussel sprouts and put the frying pan back on high heat. Add ½ tbsp of oil, once hot and add the brussel sprouts and fry until they start to brown on both sides, to add more flavour. Remove and set aside.
- Layout the 4 slices of bread, spread mayo on 2 sides and cranberry sauce on the other sides. Divide the brussel sprouts between the 2 sandwiches ensuring there is a thin layer. Layer on the stuffing, followed by the mushrooms, and top with the sauerkraut.
- Put the top on the sandwich and butter the outside layer of the top of the sandwich with a thin layer of plant based butter. Heat the frying pan on medium heat and put the butter side down on the pan and fry for 2-3 mins until golden. Butter the top side of the sandwich and turn and repeat until both sides are perfectly golden!Slice and enjoy!
Nutrition
The Happy Pear Podcast
Can diabetes both type 1 and type 2 be reversed by food and lifestyle choices?

Episode 99 – Mastering Diabetes
This week we speak to Cyrus Khambatta, PhD, and Robby Barbaro, MPH the co-authors of the New York Times bestselling book Mastering Diabetes and the cofounders of Mastering Diabetes, a coaching program that teaches people how to reverse insulin resistance via low-fat, plant-based, whole-food nutrition.
Cyrus has been living with type 1 diabetes since 2002, and has an undergraduate degree from Stanford University and a PhD in Nutritional Biochemistry from UC Berkeley. Robby was diagnosed with type 1 diabetes in 2000, and has been living a plant-based lifestyle since 2006. He worked at Forks Over Knives for 6 years, and earned a Master’s in Public Health in 2019.
A brilliant episode that will leave you stocking up on your fruit!
Enjoy!
Lots of Love,
Dave & Steve x
Available now from all good podcast providers:
This episode was sponsored byWolfgangreforest.ie – how about going GREEN this Christmas by giving the gift of a tree instead of possessions people probably don’t need! With Wolfgang re-forest.
Produced by Sean Cahill and Sara Fawsitt
This might sound like a crazy idea, but trust us, this is a wonderful way to use any leftover Christmas veg. We make an easy nacho cheese based on root veg and layer on Christmas veg to create an epic quesadilla. It started as a bit of a joke, but once everyone tasted it, we all adored it, and we even filmed a video on how to make it!
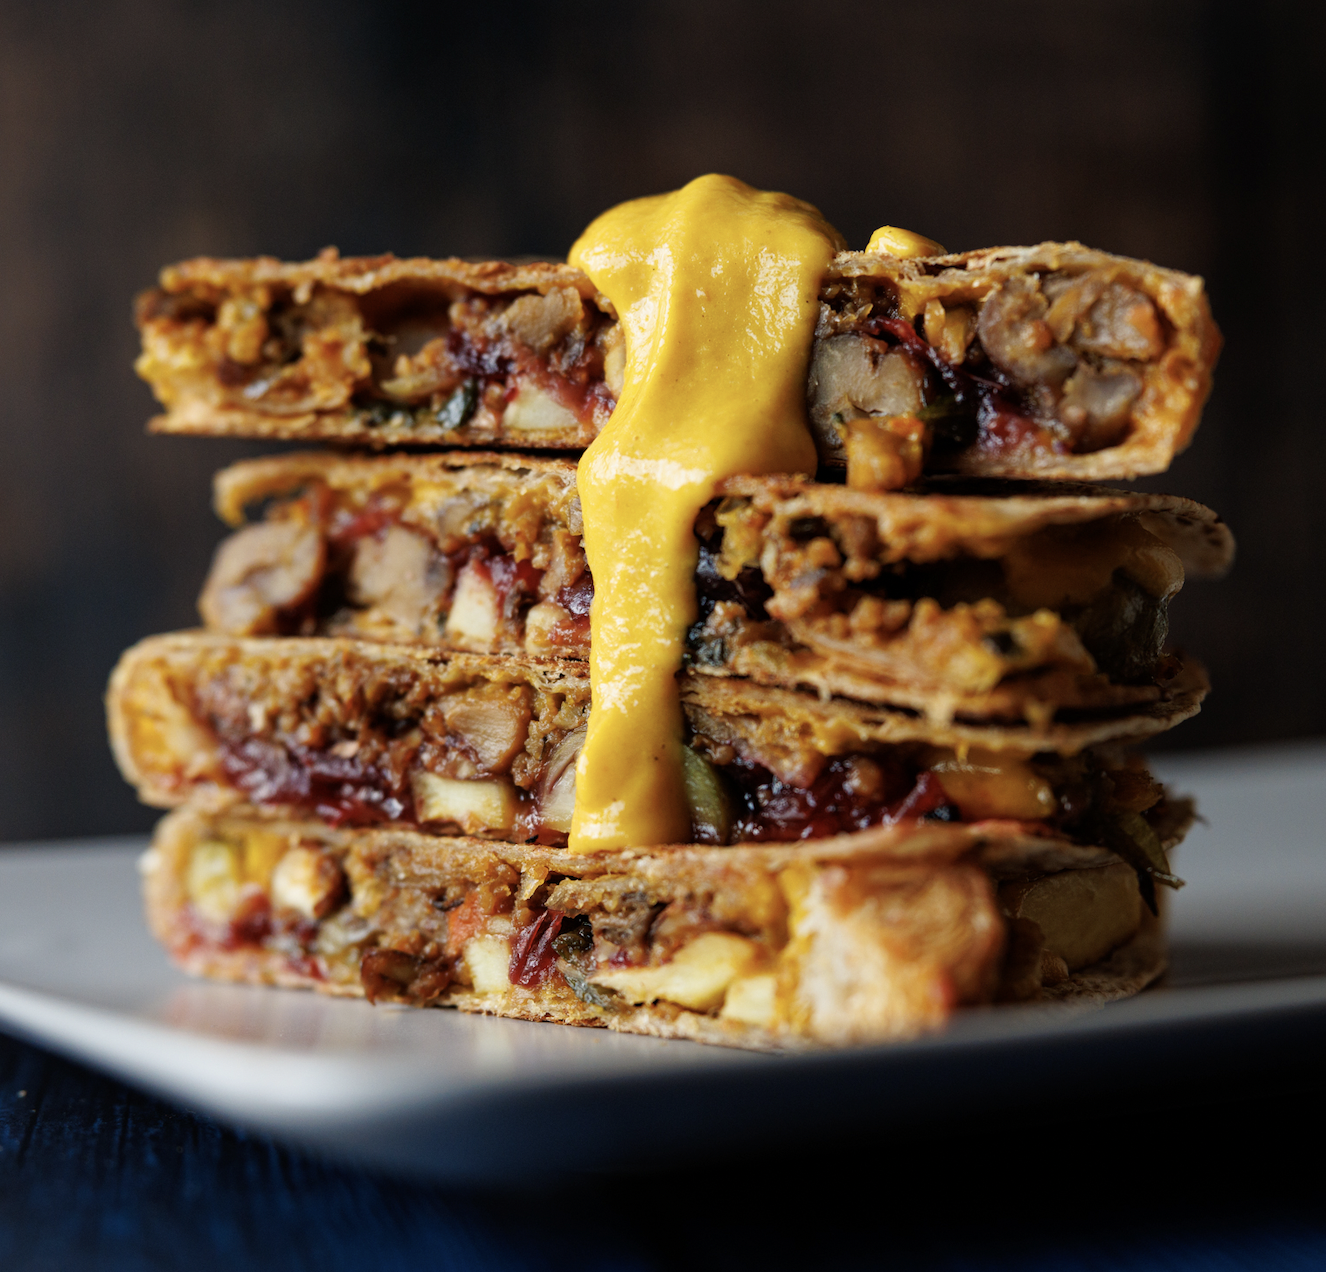
Christmas Quesadilla
Takes 12 minutes
Serves 1
Ingredients
Nacho cheese
- 140 g roasted veg such as parsnips and carrots (perfect for the nacho cheese colour)
- 60 ml vegetable oil
- 60 ml oat milk
- 1 tbsp garlic powder
- 3/4 tsp salt
- 1/2 tsp ground black pepper
Fillings
- 200 g stuffing
- 100 g cranberry sauce
- 400 g leftover veg
- 4 tortilla wraps
Instructions
- Into a blender, add all the ingredients for the cheese and blend until super smooth. Taste and adjust the seasoning to your liking.
- If the mixture is too thick, add more plant milk or water until you achieve a lovely texture. If it’s too thin, add a little more root veg and blend until smooth. Make sure to season to your liking.
- Heat a non-stick pan over medium heat. Add a tortilla and spread a generous amount of the cheese across the entire surface.
- Layer the Christmas veg, stuffing, and cranberry sauce on top of the cheese. Fold the tortilla over and ensure both sides are browned and crispy.
- Transfer to a chopping board, cut in half, and enjoy!
Nutrition
Video
Kombucha
Takes
Serves 1
Ingredients
- 60 g white cane sugar
- 2 teabags (we love rooibos or green tea)
- 1 scoby
- 180 g kombucha (previously brewed or store-bought)
- 1 litre water
Instructions
- Pour 1 litre of water into a kettle and boil. Once boiled, add your teabags of choice along with the sugar.
- Stir until the sugar dissolves and the teabags infuse their flavour—this should take about 5 minutes. Remove the teabags and discard them.
- Leave the tea to cool, ensuring it’s below 37°C (body temperature). If it’s hotter, it could kill the scoby.
- Add the scoby and the previously brewed kombucha into a jar. Cover with a clean tea towel and leave to ferment for 10-15 days, away from direct sunlight, at room temperature.
- After 10-15 days, remove the scoby, and your kombucha is ready to drink!
Notes
Kombucha Q&A
How long should I ferment kombucha?
Ideally, if your SCOBY is healthy and the room temperature is around 20°C, it should take about 10-14 days. However, if the temperature is hotter, it will take less time, and if colder, it will take longer. Additionally, if your SCOBY is small, it will also take longer. The easiest way to tell if your kombucha is ready is by checking if it’s naturally bubbly and not too sweet when you taste it (this indicates that the SCOBY has consumed the sugar and converted it into probiotic bacteria and carbon dioxide, better known as bubbles!). Taste the kombucha, and once it’s to your liking and bubbly, it’s ready to go! The longer you ferment it, the more acidic or vinegar-like it becomes. We’ve often left it to ferment for over a month, resulting in a lovely vinegar to use in salads!What is the best container for fermenting kombucha?
Ideally, use glass jars, but if you can’t find any, plastic works fine (preferably BPA-free). Avoid using metal containers and cutlery, as they can damage the SCOBY.Where can I get a SCOBY?
You can easily buy a SCOBY online for very little cost. A better option, however, is to get one from a friend who brews their own kombucha, as each time you brew a batch, the SCOBY grows and can be divided and shared. This means that if you continue making your own kombucha, you’ll have an extra SCOBY after each fermentation that you can share with others!How do I grow a SCOBY from scratch?
It’s easy, but it takes a little more time. Start with a store-bought bottle of kombucha (500ml) that is unpasteurized and labeled as “living” or “raw” (pasteurisation kills the bacteria needed to grow a SCOBY).- Boil the kettle and brew a small cup of tea with 2 tbsp of sugar, ensuring that you use the same tea type as in the store-bought kombucha (usually black, green, or rooibos). Let the tea cool to below 37°C (body temperature).
- Add the cooled sweet tea to the bottle of ready-made kombucha. This provides extra food for the yeast and bacteria to grow a new culture.
- Pour the mixture into a larger jar or glass bottle. Cover with a clean, dry cloth so air can reach it, but flies cannot.
- Ferment at room temperature, ideally around 20°C, out of direct sunlight for about 2-4 weeks, and a SCOBY should naturally develop.
Nutrition
The Happy Pear Podcast
“Walking is the only way proven to stave off cognitive decline – it works. Exercise, from a public health perspective, is an unmitigated failure. The world’s longest-lived people live in environments that nudge them into more movement.”

Episode 98 – Dan Buettner
We are huge fans! This is our second episode with the amazing Dan Buettner, who’s new book on the lost American diet, The Blue Zones American Diet, is out today.
Dan’s extensive research on the healthiest and happiest living people on the planet is fascinating, we have personally taken a lot from it and if you are familiar with any of our online health and lifestyle courses (available on our app, Healthy Living) you will hear us quote him a lot!
Dan is an explorer, National Geographic Fellow, award-winning journalist and producer, and New York Times bestselling author. He discovered the five places in the world – dubbed blue zones hotspots – where people live the longest, healthiest lives. His articles about these places in The New York Times Magazine and National Geographic are two of the most popular for both publications.
Buettner now works in partnership with municipal governments, large employers, and health insurance companies to implement Blue Zones Projects in communities, workplaces, and universities. Blue Zones Projects are well-being initiatives that apply lessons from the Blue Zones to entire communities by focusing on changes to the local environment, public policy, and social networks. The program has dramatically improved the health of more than 5 million Americans to date.
His books, The Blue Zones: Lessons for Living Longer from the People Who’ve Lived the Longest, Thrive: Finding Happiness the Blue Zones Way, The Blue Zones Solution: Eating and Living Like the World’s Healthiest People, and The Blue Zones of Happiness were all national bestsellers. His new book The Blue Zones Kitchen: 100 recipes for living to 100 is a New York Times Best Seller and fuses scientific reporting, National Geographic photography and 100 recipes that may help you live to 100.
Buettner has appeared on The Today Show, Oprah, NBC Nightly News, and Good Morning America, and has keynoted speeches at TEDMED, Bill Clinton’s Health Matters Initiative, and Google Zeitgeist. His speech in January 2018 at the World Economic Forum in Davos was chosen as “one of the best of Davos.”
Another brilliant episode! Enjoy!
Lots of Love,
Dave & Steve x
Available now from all good podcast providers:
To find out more about Dan and his work, check out: https://www.bluezones.com/
This episode is sponsored by Vivobarefoot Footwear. Vivobarefoot Footwear has given our listeners an exclusive 20% discount when you enter the code HAPPYPEAR20 – Genuinely these are the only shoes you will see Dave & Steve wearing!
Produced by Sean Cahill and Sara Fawsitt

€1 Pasta Bake
Takes 42 minutes
Serves 6
Ingredients
- 500 g wholemeal penne
- 400 g tin chopped tomatoes
- 1 courgette
- 2 red onions
- 1 red pepper
- 2 carrots
Simple Cashew Cream
- 100 g cashew nuts
- 400 ml water
- tsp vinegar
- 1 garlic clove
Instructions
- Preheat the oven to 190°C. Boil the kettle and pour the boiled water over the cashews, ensuring they are fully submerged. Leave them to soak for 10 minutes.
- Prepare the vegetables:Fill a large saucepan with water, add a good pinch of salt, and bring it to a boil. Meanwhile, peel and slice the onions into long strips. Slice the pepper, courgette, and carrots into small bite-sized pieces. Cut the top off the head of garlic.
- Roast the vegetables:Divide the vegetables between two baking trays, toss with 2 tablespoons of oil and a pinch of salt, and roast for 25 minutes at 190°C.
- Cook the pasta:Add the wholemeal pasta to the boiling water in the saucepan and cook according to the package instructions.
- Make the cashew cream:While the pasta is cooking, drain and rinse the soaked cashews. Add them to a blender or food processor along with the remaining cashew cream ingredients (water and vinegar) and blend until smooth.
- Prepare the sauce:Drain and rinse the cooked pasta, then set it aside. Remove the roasted vegetables from the oven. Squeeze the baked garlic cloves out of their skins and add them to the cashew cream along with the tin of chopped tomatoes, 1 tsp of salt, and a pinch of black pepper. Blend until smooth.
- Assemble and bake:Add the roasted vegetables to the cooked pasta and mix them together with the sauce. Transfer the mixture to a baking dish and bake in the oven for a further 10 minutes.
- Serve:Serve the pasta bake with bread and salad for a delicious lunch, dinner, or even breakfast!
Nutrition
Video
The Happy Pear Podcast
When you speak to Manchán you feel that magic is real!

Episode 97 – Manchán Magan
Manchán Magan is a writer and documentary-maker. He writes for The Irish Times on culture & travel, presents the RTÉ podcast The Almanac of Ireland, and is author of the award-winning, best-selling Thirty-Two Words For Field, and Tree Dogs, Banshees Fingers and other Irish Words for Nature. He has made dozens of documentaries on issues of world culture for TG4, RTÉ & Travel Channel.
His recently published book, Listen to the Land Speak, was the main topic of our conversation, although we found ourselves diving into all sorts of weird and wonderful topics, from magic, the lost female voice to philosophy and how language is shaped by the land.
A true Irish gem, Manchán lives in an oak wood, with bees and hens, in a grass-roofed house near Lough Lene, Co Westmeath.
We hope you enjoyed this episode as much as we did, it is always a pleasure when we can do them in person.
Lots of Love,
Dave & Steve x
Available now from all good podcast providers:
To find out more about Manchán and his work visit: www.manchan.com
This episode was sponsored by wolfgangreforest.ie – how about going GREEN this Christmas by giving the gift of a tree instead of possessions people probably don’t need! With Wolfgang re-forest.
Produced by Sean Cahill and Sara Fawsitt
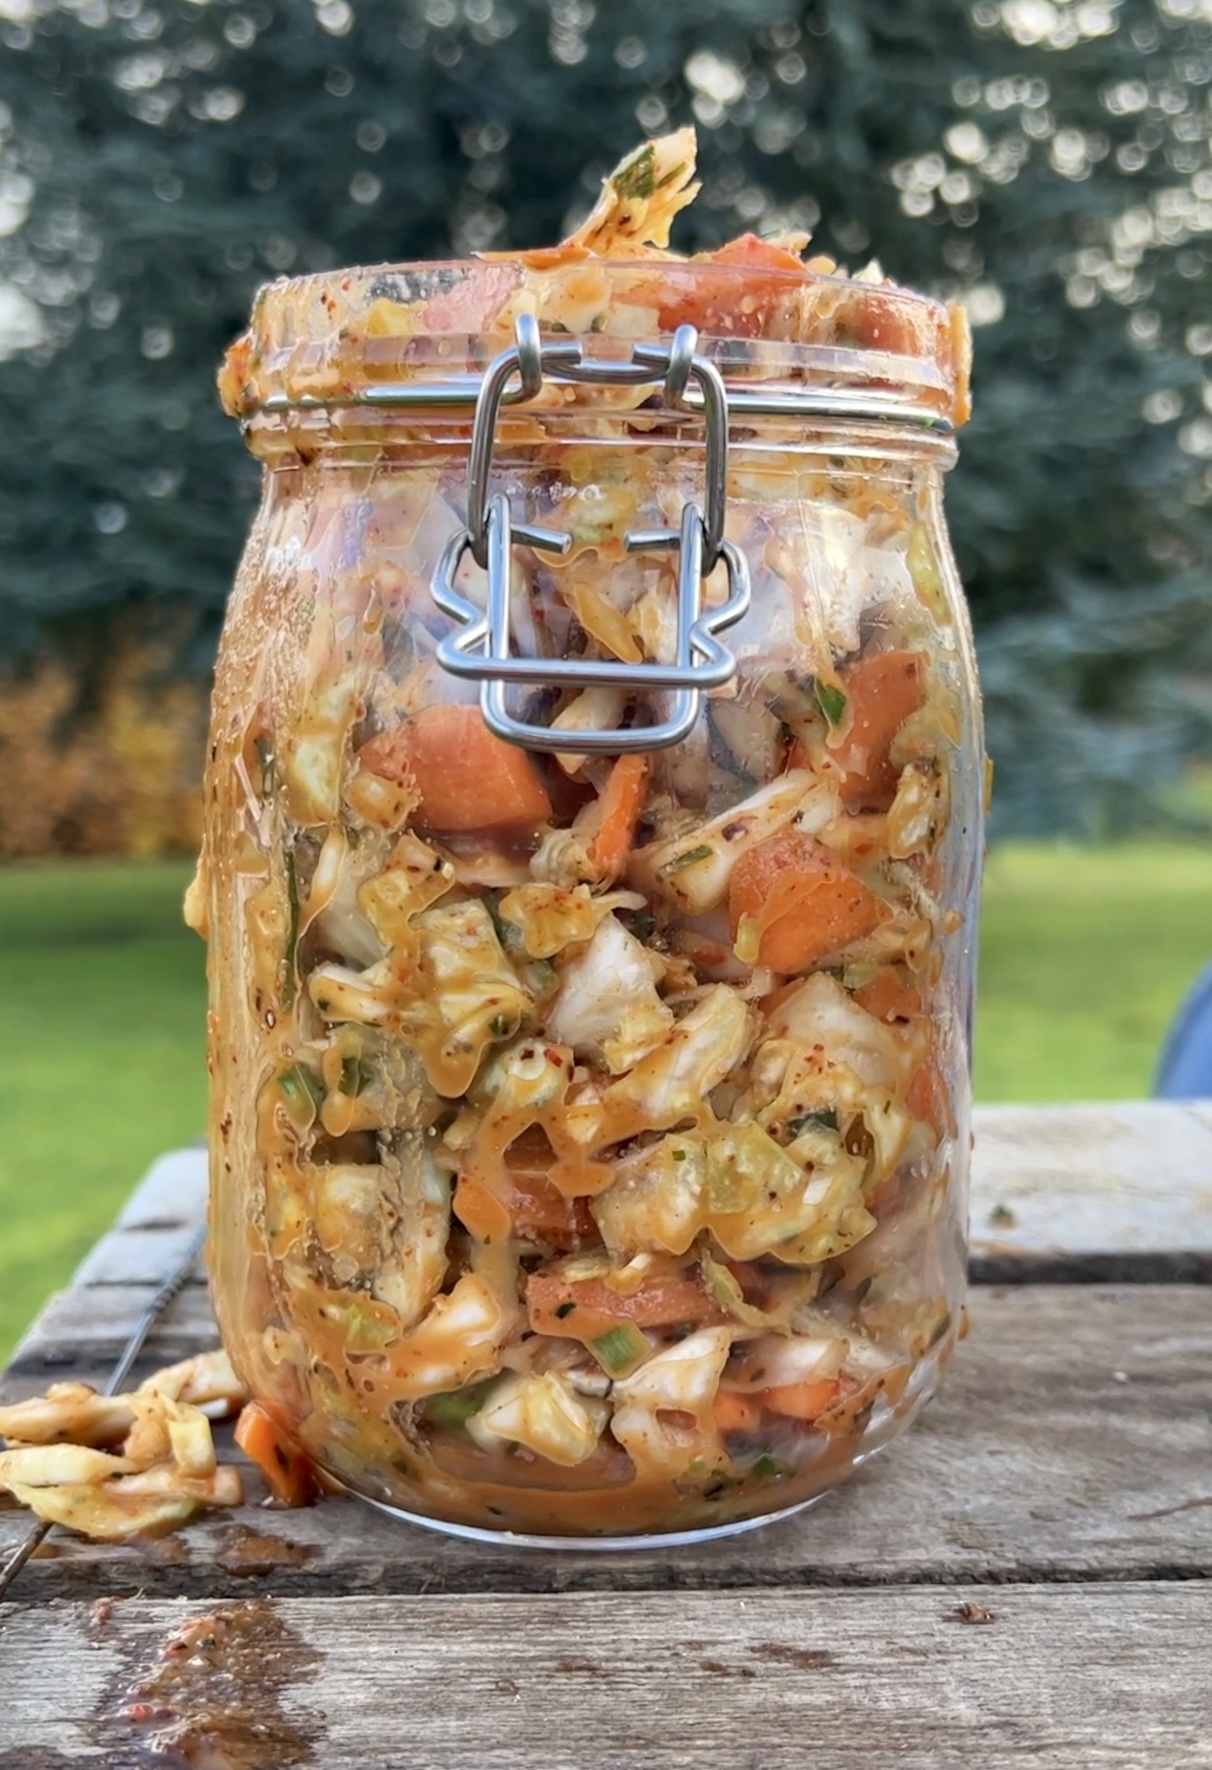
Easy Kimchi
Takes 10 minutes
Serves 1
Ingredients
- 1 kg mixed veg (such as carrot, pak choi, Chinese cabbage, radish, leek, beet)
- 20 g salt
Sauce
- 4 tbsp tamari
- 1 tsp maple syrup
- 25 g rice flour
- 200 ml water
- 5 cloves garlic
- 1/2 onion
- 1/2 tsp kelp powder
- 2.5 tbsp gochugaru (or 1 tbsp sweet paprika & 1.5 tbsp chilli powder/cayenne powder)
Instructions
- Prepare the veg: Roughly chop the vegetables into bite-sized pieces. Place them in a large bowl or saucepan, add the salt, and mix well. Bash the veg with a saucer for about 2 minutes, then let it sit for 1-2 hours (or even overnight). Afterward, rinse the salt away and place the veg back in the bowl or saucepan.
- Make the sauce: Peel the garlic cloves. Combine all the sauce ingredients and blend until smooth.Pour the sauce over the salted vegetables, then add the gochugaru or paprika/chilli mix and mix everything thoroughly.
- Ferment: Transfer the veg mixture into a jar or fermentation vessel, ensuring the veg is fully submerged under the sauce and natural juices. This is crucial as it allows the lactic acid fermentation process to occur. Leave the kimchi to ferment on the counter for 2-3 days until it starts to bubble. Taste it; if you prefer it more acidic, leave it to ferment longer. The longer it ferments at room temperature, the more acidic it becomes. Once satisfied with the flavour, transfer it to the fridge, where it will keep for many months, even years!
Notes:
- Check your kimchi every few days to ensure the vegetables remain submerged in the liquid. If the top layer is exposed to air and starts to spoil, simply scrape it off; the rest should be perfectly fine.
- Time and temperature are the secret ingredients for fermentation. The longer you let it ferment, the more intense and acidic the flavour becomes. Warmer temperatures will speed up the process.
Nutrition
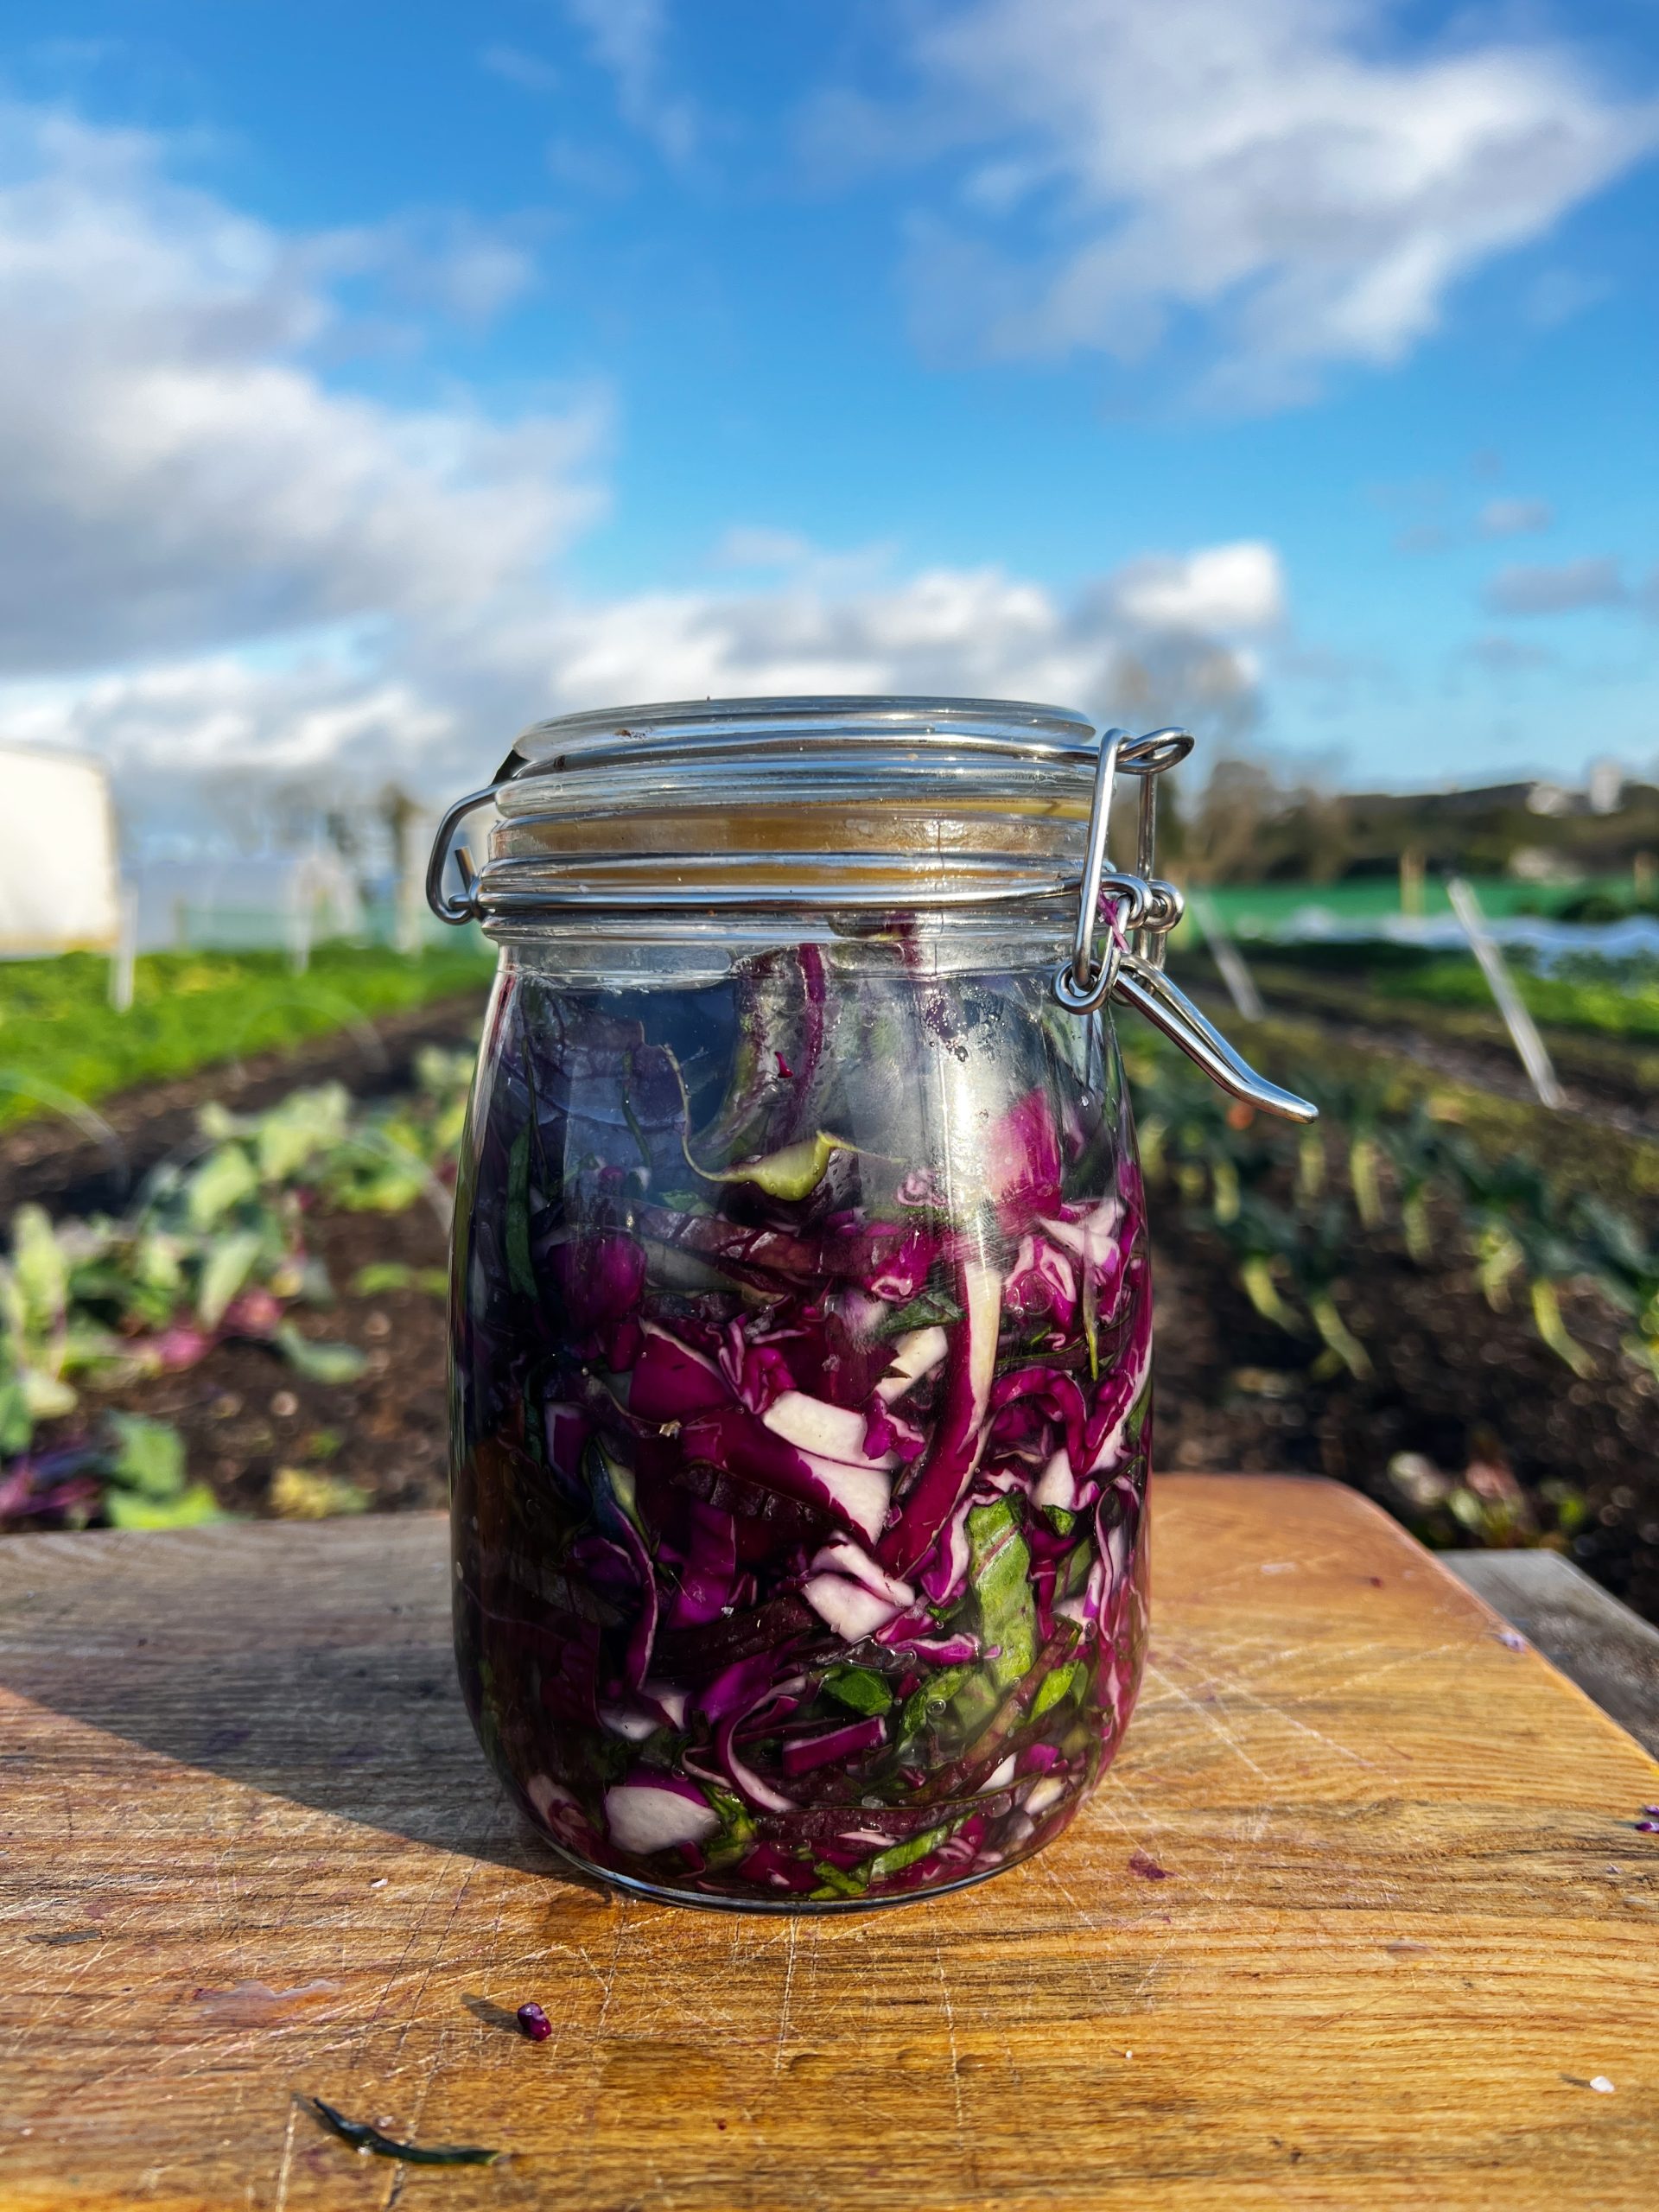
Sauerkraut
Takes 5 minutes
Serves 1
Ingredients
- 400 g Cabbage of your choice
- 8 g table salt
- 1 litre water
Instructions
- Remove the outer leaves of the cabbage if they appear wilted or sad, but save them—they’ll be used later to help keep your ferment submerged in liquid, which is very important.
- Slice and chop the cabbage as finely as possible, into bite-sized pieces. Weigh the cabbage to apply the 2% salt rule. For 400g of cabbage, you’ll need 8g of salt.
- Transfer the chopped cabbage and salt into a large bowl and massage thoroughly. The cabbage should begin releasing its liquid. You can also use the bottom of a mason jar to press down and help release more liquid.
- Carefully pack the salted cabbage into your jar, pressing it down firmly with your fingertips to ensure there’s some room left at the top. Pour water over the cabbage until it is just submerged. Use the reserved cabbage leaves to form a “plug” that keeps all the cabbage below the liquid. Some prefer to close the jar, but we recommend leaving it slightly open. Be sure to date your jar.
- Leave the sauerkraut to ferment for 3-5 days before tasting. Check every few days to ensure the cabbage stays submerged in the liquid. If the top layer, exposed to air, starts to spoil, simply scrape it off—the cabbage below should still be perfectly fine to eat.
Note:
- Time and temperature are key to fermentation. The longer it ferments, the stronger and more acidic the flavour. Warmer temperatures will speed up the fermentation process. Typically, sauerkraut is ready within 1-2 weeks at room temperature.
Nutrition
The Happy Pear Podcast
Our friend, Melissa Hemsley the self-taught chef, food columnist, best-selling cookbook author, real food activist and sustainability champion joined us this week for a chat!

Episode 96 – Melissa Hemsley
She is passionate about spreading the power of feel-good food, and has written five cookbooks including Eat Green, Eat Happy and her latest book Feel Good with 100 quick and easy recipes to bring a bit of comfort and joy into our kitchens and beyond.
We had a wonderful chat with Melissa, she is a great friend who has hosted us many times in her home in London. Having recently been diagnosed with ADHA and been under a long fertility journey, we dove deep into these topics alongside our love of food chats!
A brilliant episode – Enjoy!
Lots of Love,
Dave & Steve x
Available now from all good podcast providers:
To learn more about Melissa check out her site on: https://www.melissahemsley.com/
Produced by Sean Cahill and Sara Fawsitt
The idea of cooking biryani which is typically Indian feast food in 10 mins – might sound like a contradiction and an insult to an indian feast but this serves its purpose as quick easy dinner that is high in fibre, beans which are a good source of phyto-oestrogens which can be beneficial for balancing hormones as well as tasting delicious.

10 Minute Biryani
Takes 27 minutes
Serves 4
Ingredients
- 30 g Desiccated coconut
- 1 tbsp cumin seed
- 500 g precooked brown rice
- 400 g mixed beans
- 1 onion
- 1/2 red chilli
- 3 cloves of garlic
- 1/2 thumb sized ginger
- 1 pak choi
- 1 pomegranate
- 1/2 tbsp all spice
- 1 tbsp curry powder
- 500 ml vegetable stock
- 1/2 lime juice
- 3 tbsp tamari
- 15 g coriander
Lime Mint Riata
- 15 g fresh mint
- 500 g soy yoghurt
- 1/2 lime juiced
- 1 tbsp maple syrup
- 1/2 tsp salt
Instructions
- Peel and finely dice the onions, garlic and ginger, finely dice the chilli removing the seeds and white pit if you prefer it to be less spicy. Drain and rinse the beans.
- Heat a wide bottomed pan with a lid on high heat. Once hot add the desiccated coconut, cumin seeds, onion, garlic, ginger and chilli and fry, stirring regularly until the coconut starts to brown and smell like brown sugar. Add in the precooked rice along with half the veg stock and put a lid on it and allow it to steam for 2-3 mins
- Take the mint leaves off their stalk and finely chop, pour the yoghurt into a bowl and add the chopped mint, juice of ½ a lime, maple syrup, pinch of salt and mix through, taste and adjust the seasoning to your liking. Squeeze juice of half the like on top of the biriyani, taste and mix through, taste and adjust the seasoning to your liking.
- Squeeze juice of half the like on top of the biriyani, taste and mix through, taste and adjust the seasoning to your liking. Finely dice the fresh coriander and shook the pomegranate (remove the seeds from the pomegranate).
- Easiest way to do this is to stand the pomegranate with crown facing the sky, slice across the equator of the pomegranate or the middle, hold the half a pomegranate over a large bowl with the open side facing the bowl, get a wooden spoon and take your anger out and bang the seeds out. Repeat with the other half and remove any white pit as this can be quite bitter.)Decorate with the fresh coriander and the pomegranate seeds – serve with the mint raita
Nutrition
Video

Lemon Meringue Crunch
Takes 42 minutes
Serves 12
Ingredients
For the base:
- 400 g digestive biscuits
- 150 g vegan butter
For the lemon curd:
- Juice of 1 lemon
- Zest of 1 lemon
- 75 g vegan butter
- 300 ml oat milk
- 100 g caster sugar
- 1/8 tsp turmeric
- 3 tbsp white flour
For the meringue topping:
- 170 ml aquafaba (drained chickpea water, from 1 can)
- 120 g caster sugar
- ½ tsp cream of tartar
Instructions
- Prepare the base: Chop the vegan butter into small 2 cm cubes and add to a food processor along with the biscuits. Blend until the mixture comes together, and the biscuits have a breadcrumb-like texture. Line a baking tray approximately 30 cm x 15 cm x 4 cm with baking parchment.Pour the biscuit mixture into the lined tray and spread it out evenly, compressing it well to ensure it holds its shape once set. Place the tray in the fridge or freezer to set while you make the lemon curd.
- Make the lemon curd: Cut the vegan butter into small cubes and add it to a medium saucepan over medium heat. Once melted, add the oat milk and caster sugar, and stir until combined. Sift in the flour and bring the mixture to a gentle simmer, stirring continuously with a whisk. Add the lemon zest and lemon juice, and continue stirring until the curd thickens. Once the curd has reached a glossy consistency and is thick enough to stay on the whisk, remove it from the heat. Pour the curd over the biscuit base and return to the fridge to set while you make the meringue.
- Prepare the meringue: In a stand mixer, add the chickpea water (aquafaba) and whisk with a balloon whisk attachment at high speed until stiff peaks form (this should take about 5 minutes). Gradually add the caster sugar and cream of tartar, and whisk until the mixture becomes thick, stiff, and glossy.Transfer the meringue to a piping bag and pipe it over the lemon curd layer, creating thin, even points until the entire surface is covered.Using a blow torch, caramelise the tips of the meringue until golden and caramelised.Allow the dessert to cool for a few minutes before cutting and serving.
Nutrition
The Happy Pear Podcast
This week we had the pleasure of speaking to Joe De Sena!
Where to start? What a remarkable man! But would you want him as a partner? Or even a friend? Well not if you like lie-ins, tasty treats or taking it easy…
We like to think we are pretty good at facing discomfort with our daily sea swims and active lifestyle, but when Joe challenged us to join him on one of his death races, you can literally hear us squirming in our seats!

Episode 95 – Joe De Sena
Joe De Sena is the founder and CEO of Spartan, the world’s leading endurance sports brand. Growing up in working-class Queens, De Sena has demonstrated an entrepreneurial spirit since his preteens. He built a multimillion-dollar pool cleaning business before moving to Wall Street, where he started his own trading firm.
In 2001, De Sena fled Wall Street for Riverside Farm in rural Vermont. It was during this time that he discovered his passion for adventure races and endurance events, and Spartan Race was born.
De Sena has built Spartan into a global fitness and wellness brand, with a 10 million+ community of athletes across the globe. Under his leadership, Spartan’s portfolio of brands has grown to include Spartan Trail, DEKA, La Ruta, Tough Mudder, and HIGHLANDER.
A New York Times bestselling author, De Sena’s latest book, 10 Rules for Resilience: Mental Toughness for Families, hit bookstores last October.
A brilliant episode – Enjoy!
Lots of Love,
Dave & Steve x
Available now from all good podcast providers:
To learn more about Clint and Grounding check out: https://www.earthing.com/
This episode is sponsored by our friends from HEALF.com the amazing online platform for all yoru health needs!
Get an exclusive 20% off HEALF.com when you enter the promo code HEATHYPEAR
Healf is where you will find only the best of the best health brands all vetted by their community and validated by experts. We love this platform, you can’t go wrong and it has all our favourite stuff covering the 4 pillars of heath: Eat Move Mind Sleep
Produced by Sean Cahill and Sara Fawsitt
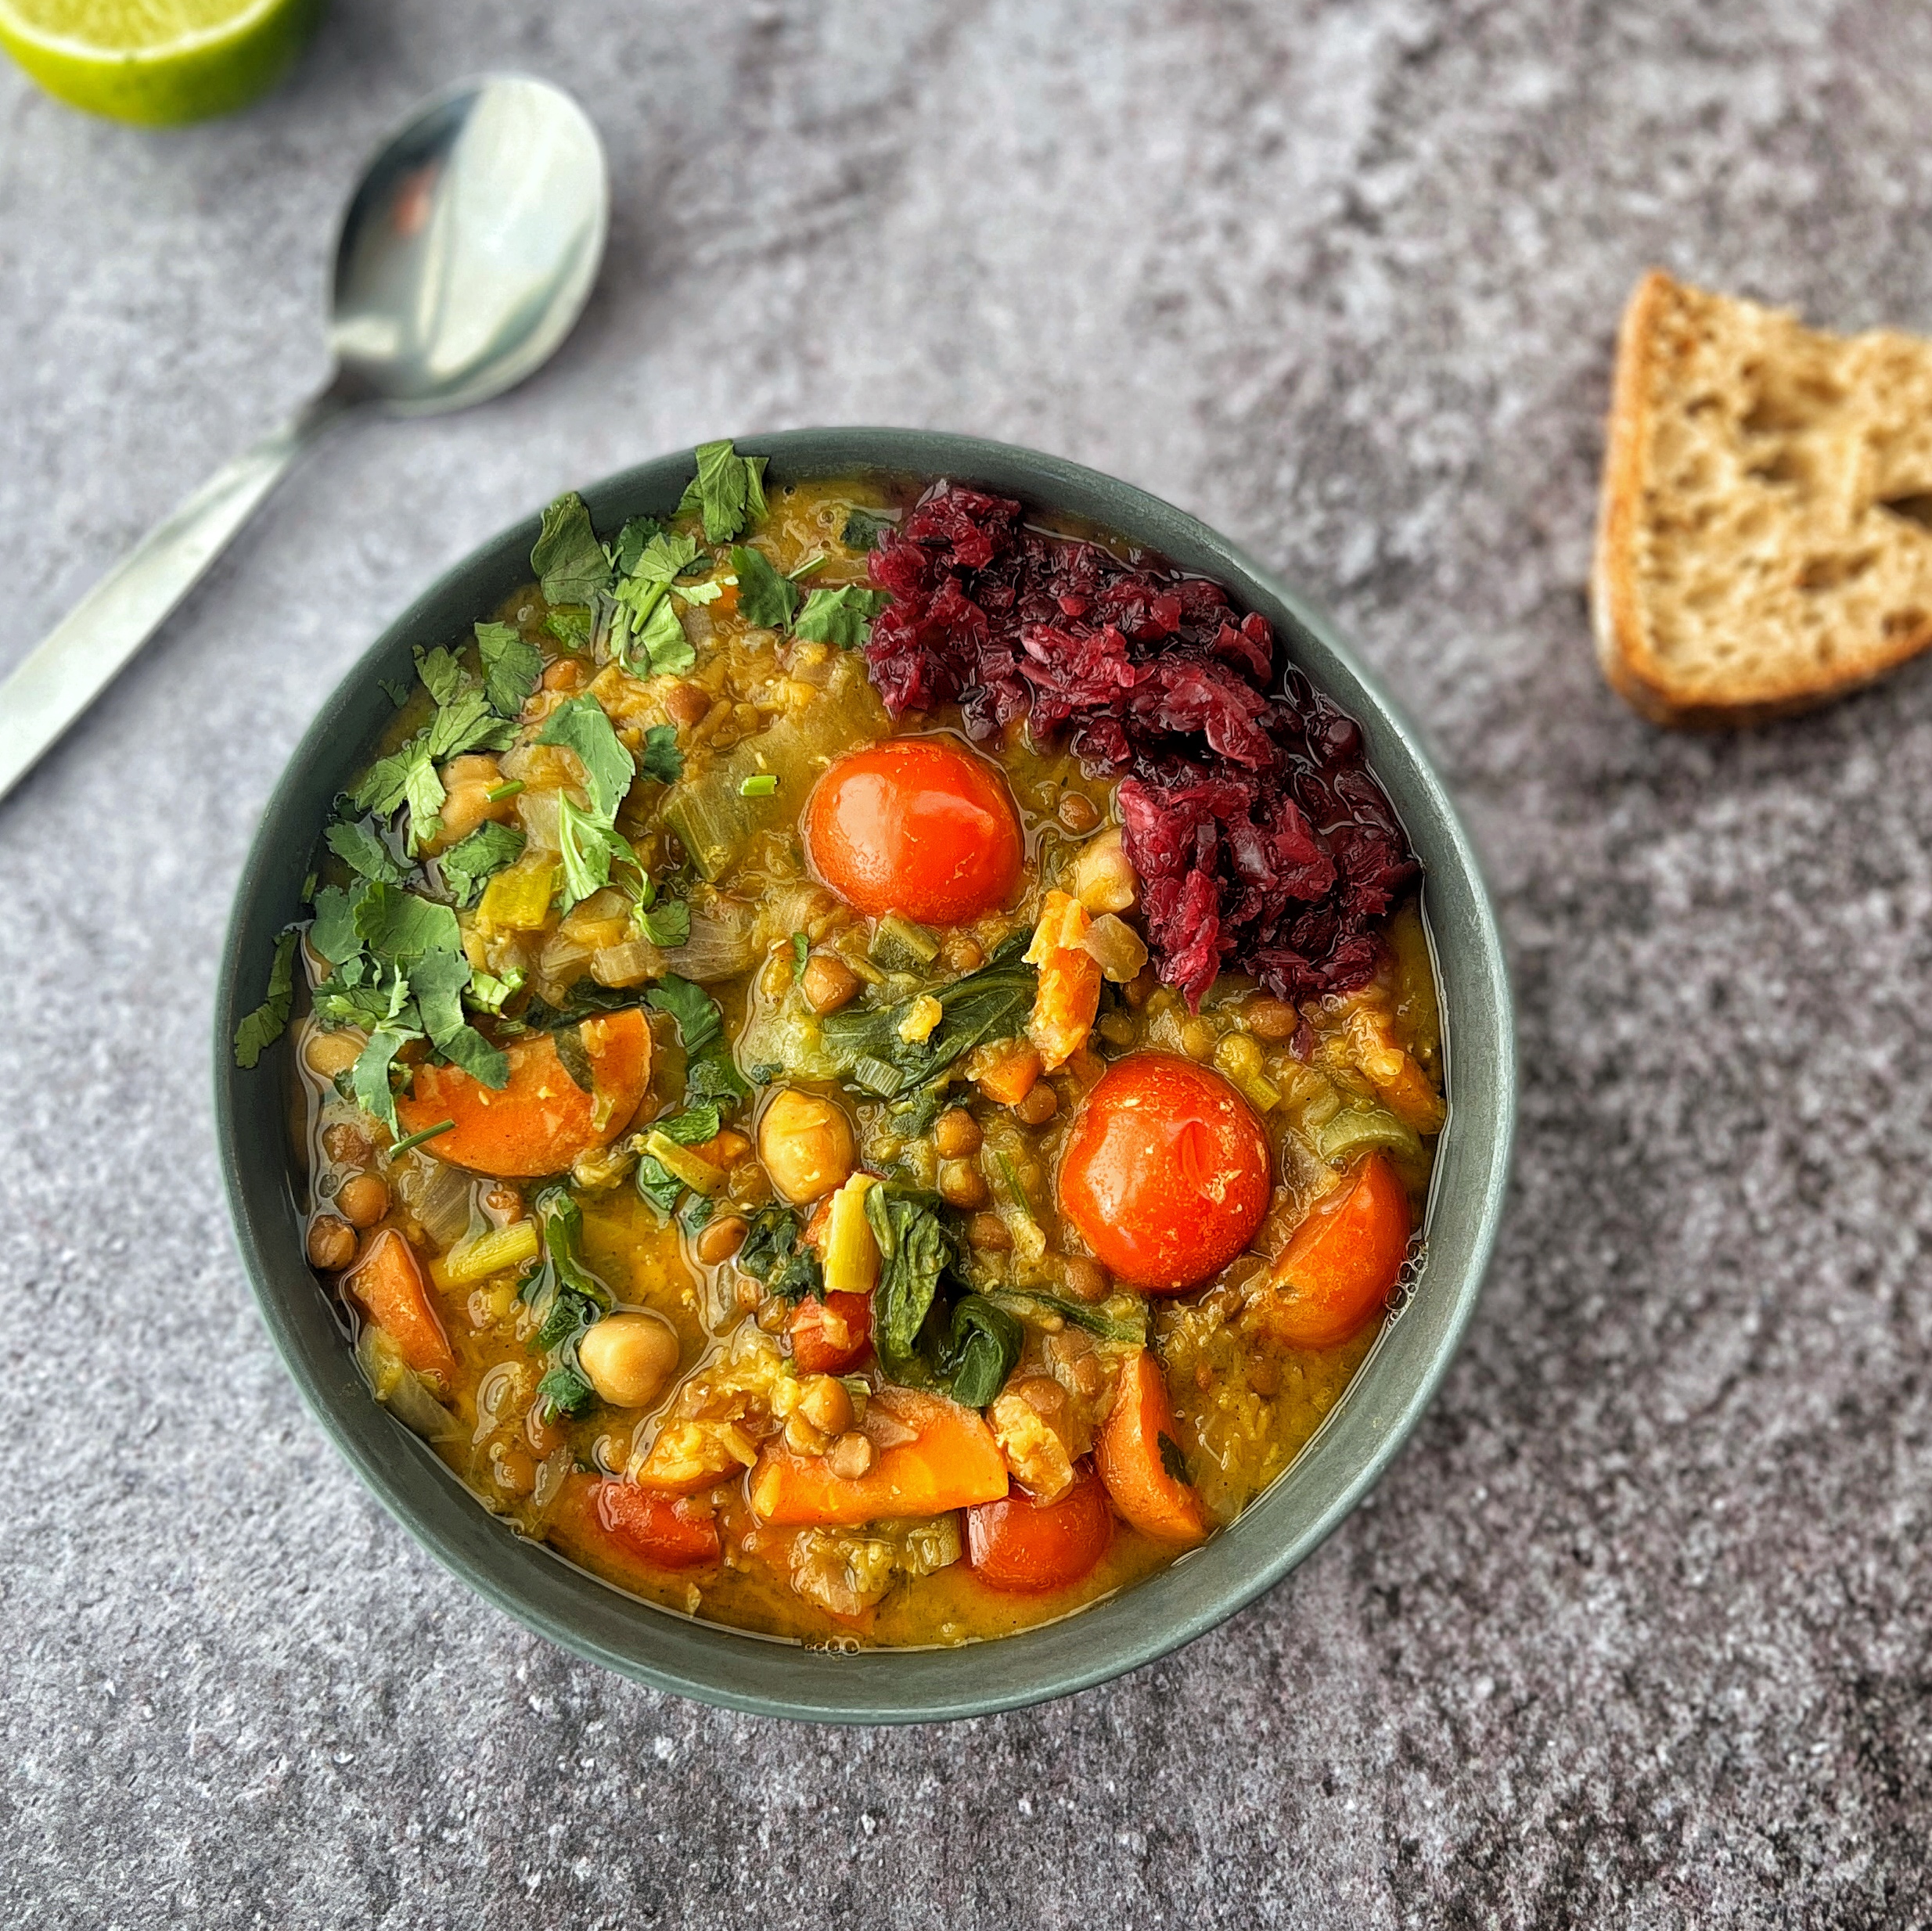
Hearty Lentil Stew
Takes 25 minutes
Serves 4
Ingredients
- 3 onions
- 4 cloves of garlic
- 4 carrots
- 1 leek
- 10 cherry tomatoes
- 500 g red lentils
- 2 pak choi
- 15 g coriander
- 1 litre veg stock
- 100 ml water
- 400 g chickpeas
- 400 g cooked lentils
- 3 tbsp tamari
- 2 tbsp curry powder
- 1 tsp salt
- 1 tsp black pepper
- 1 lime
Instructions
- Peel and finely chop the onions and garlic. Finely dice the carrots. Slice the leek lengthwise, rinse thoroughly to remove any sediment, then slice it into 2-cm rounds. Drain and rinse the chickpeas and lentils.
- Heat a 5-litre non-stick pot on high heat. Once hot, add the diced onions and cook until they start to brown around the edges, stirring occasionally.
- Add the garlic and diced carrots, along with a pinch of salt. Cook for 2-3 minutes, stirring occasionally.
- Add the chopped leek and 4 tbsp of water. Stir, cover with a lid, and let it sweat for 5 minutes. This will speed up the cooking process and help release the vegetables' sweetness.
- Remove the lid and add the split red lentils, vegetable stock, and 1 litre of water. Stir, cover, and cook for 20 minutes, stirring occasionally.
- While the lentils cook, halve the cherry tomatoes, finely slice the pak choi, and chop the fresh coriander or herb of choice.
- After 20 minutes, remove the lid and add the cooked chickpeas, lentils, tamari, curry powder, cherry tomatoes, pak choi, and fresh herbs. Squeeze the juice of half a lime into the pot and stir.
- Taste the stew and adjust the seasoning with more salt, pepper, or lime juice as needed.
- Bring the stew to a boil over high heat. Once done, remove from heat.
- Serve hot with your favourite grain or sourdough bread. The stew will keep for 2 days in the fridge and freezes well.
Nutrition
Video

Easy Indian Curry for Weight Loss
Takes 20 minutes
Serves
Ingredients
- 1 onion
- 2 cloves garlic
- 1- inch cube fresh ginger
- 400 ml veg stock
- 1 x 400ml tin chopped tomatoes
- 100 g baby spinach
- 2 x 400g tins chickpeas
- 1 cinnamon stick
- 1 tbsp cumin seeds
- 1 tbsp garam masala
- 1 tsp turmeric
- 1 tbsp tamari or soy sauce
- ½ tsp ground black pepper
- Juice of ½ lemon
- 1 red pepper
- 1 red chilli finely sliced for garnish (optional for extra heat)
- 2 tbsp gram flour or flour of choice
Instructions
- Peel and finely dice the onion, garlic, and ginger. Drain the tins of chickpeas and slice the red pepper, removing the seeds.
- Heat a wide-bottomed non-stick pan on high heat. Once hot, reduce to medium heat.
- Add the diced onion and ginger to the pan and fry for 2-3 minutes until they begin to brown. If they start to stick, add a couple of tablespoons of water to deglaze the pan.
- Add the cumin seeds, garlic, red pepper, and 1 tsp salt. Fry for another 2 minutes until the pepper softens.
- Add the turmeric, garam masala, cinnamon stick, and black pepper. Cook for 1 minute to toast the spices.
- Add the veg stock, tamari, and chopped tomatoes. Bring to a boil, then add the baby spinach, chickpeas and stir well.
- Sift in the gram flour and mix through.
- Garnish with finely sliced chilli and a squeeze of lemon juice.
- Serve with toasted pitta bread or your favourite grain.
Notes
menopause and perimenopause – Approximately 80% of what doctors and health professionals see in their clinics is related to lifestyle. When it comes to reducing the discomforts of menopause, there are changes you can make TODAY to make a difference. We’ve created a new course, HAPPY MENOPAUSE with the amazing Dr. Nitu Bajekal, Consultant Gynacologist who is full of amazing advice for women who are entering perimenopause or menopause. The course is also supported by Rohini Bajekal, Nutritionist who shares the information about what women should consume and what they should try and avoid, to reduce negative symptoms such as brain fog, hot flushes, sleep problems etc.
THE IMPORTANCE OF DIET…
A whole-food, plant-based diet means enjoying an abundance of colourful fruits and vegetables, legumes, whole grains, nuts, seeds, herbs and spices. These vibrant plant foods are full of hormone-regulating fibre, health promoting micronutrients, and antioxidants.
Centering your meals on plant foods offers both mental and physical benefits. When you focus on the healthy plant foods you’re adding to your plant, you don’t have to feel deprived. Focus on adding an abundance of colour to your plate and eat mindfully without the guilt.
Many experts believe that protein needs are higher as we age. Unfortunately, there’s a misconception that you cannot get enough protein without animal products. We’re here to dispel that myth. When eating a wide variety of protein-rich plant foods, such as legumes, you can meet all your protein requirements. This High Protein Bowl is a favourite of ours!
Replacing some grains in your diet with beans is one way to increase protein intake without increasing calories. Focusing on two to four servings of soy foods per day can be a great way to achieve higher protein intake during menopause. Plus, minimally processed soy products can be helpful in reducing the frequency and intensity of hot flushes. Win-win!

Things you should avoid…
- Ultra-processed foods
Avoiding or minimising foods without fibre can be helpful in improving menopause symptoms. These ultra-processed foods contain excess refined oils and animal foods filled with saturated fats, which can actually make hot flushes worse!
- Alcohol
Make water your drink of choice whenever possible. The chemical changes in your brain from alcohol can result in a loss of inhibition and may result in risk-taking behaviour or over indulgence. This can result in excess weight gain and worsening menopausal symptoms. Additionally, consumption of alcohol, especially beer, appears to be associated with an increased risk of developing fibroids.
- Cigarettes
Both alcohol and cigarette smoking are Class 1 carcinogens, which means they are known to cause cancer. In addition, there are a number of negative health outcomes, which only make existing menopausal symptoms worse. Cigarettes can impact your mood and sleep. Avoiding cigarette smoking can not only help alleviate menopausal symptoms, but it can also help in reducing your risk of cancer and heart disease.
- Caffeine
Not a surprise, but caffeine can greatly disrupt our sleep. As we’ve learned, sleep is vital for our health through menopause and beyond. Additionally, caffeine can irritate your bladder and make hot flushes worse. While we’re all for a brilliant cup of coffee, it’s important to reduce our intake if we notice symptoms worsening. A cup of decaffeinated tea or sparkling water with fresh berries and mint is the perfect, refreshing swap..
While big changes don’t always come easily, it’s important to recognise your progress and set smart and measurable goals rather than get overwhelmed. Incorporate more healthy choices into your life and make smart swaps to gain momentum and move yourself forward.

EASY VEGAN TACOS
Super tasty low fat, so perfect for those going through perimenopause and menopause. These are super easy vegan tacos that take 10 mins to make – packed with flavour… real crowd pleaser!
Total Time Needed: 10 Mins
Difficulty: Easy
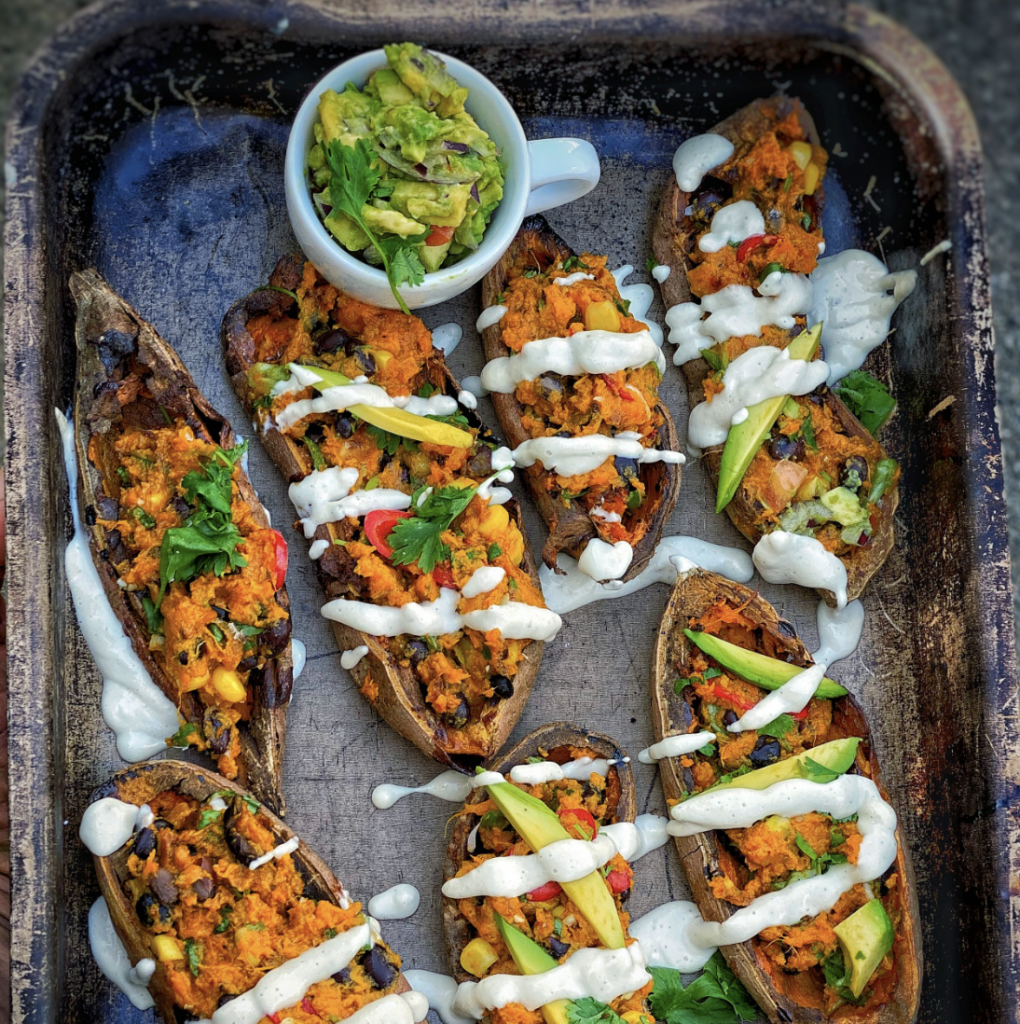
MEXICAN STUFFED SWEET POTATO SKINS
These are high in nutrition while being low in calories and super tasty. We have added a cashew cream to make them even more indulgent!
Total Time Needed: 40 Mins
Difficulty: Easy
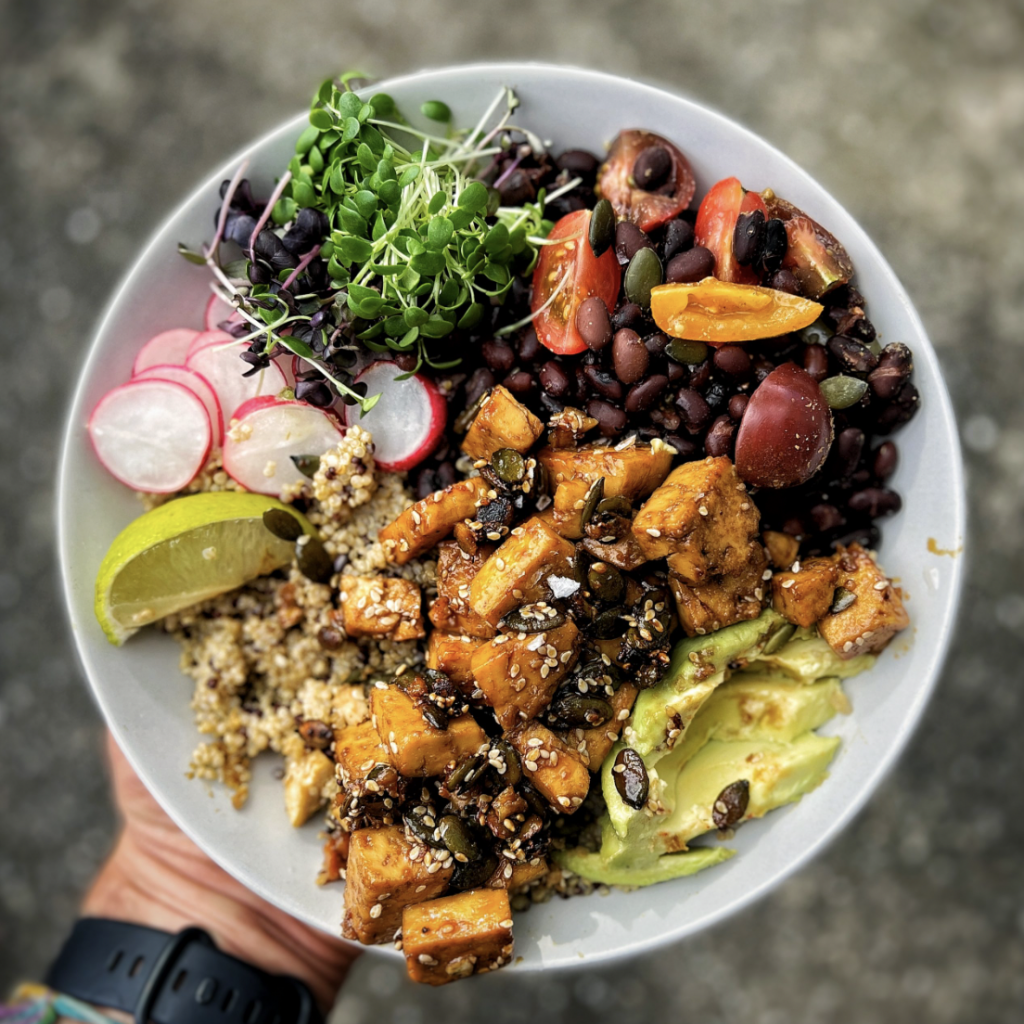
HIGH PROTEIN BOWL
A super tasty meal that is really quick to whip up with lots of fresh flavours, that also happens to be low in fat and high in protein. This meal is oil free so lower in calories and ideal for weight loss.
Total Time Needed: 5-10 Mins
Difficulty: Easy
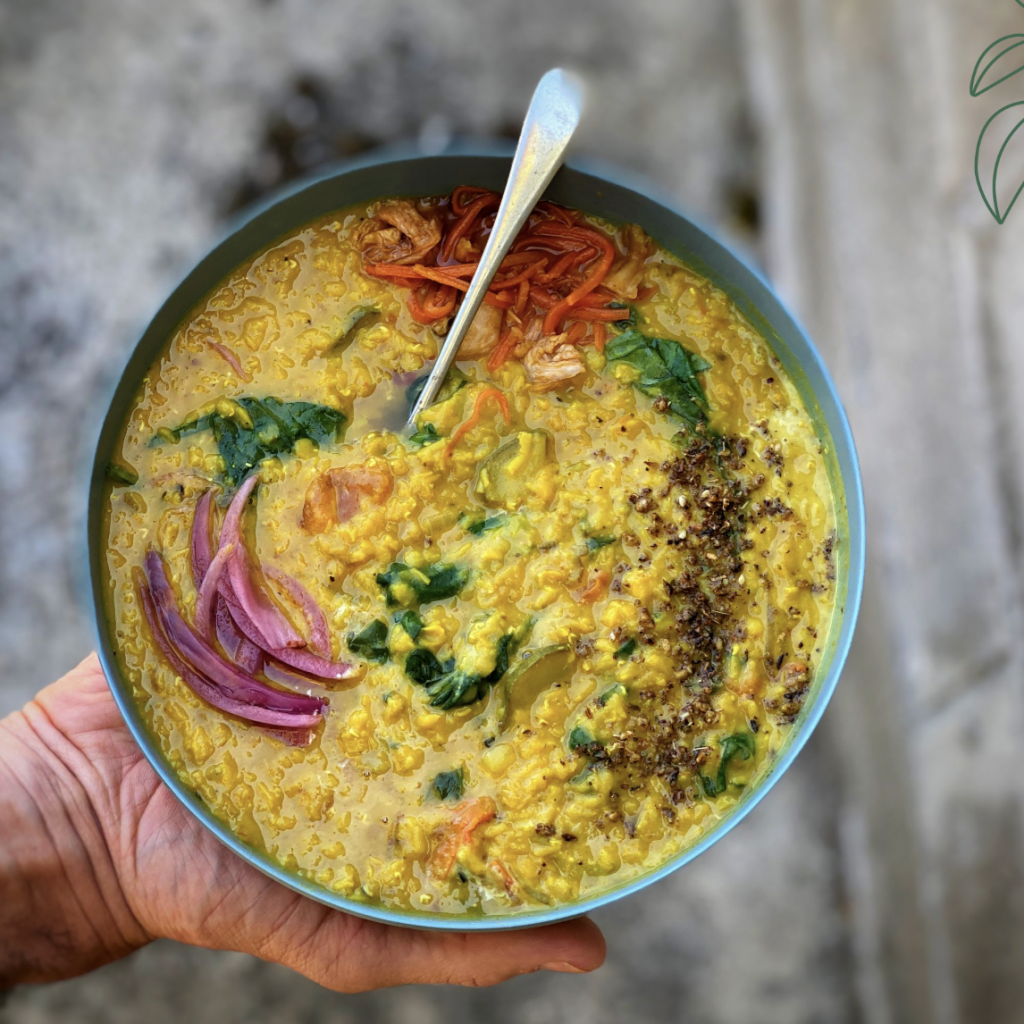
RED LENTIL DAHL
We love Dahl and have been cooking it at home and in our cafe for years! This red lentil Dahl is of our oldest and favourite recipes. Vegan, gluten free and made with no oil, so perfect for those who are experiencing menopause or even perimenopause. It’s so tasty and comforting. A great recipe for batch cooking too!
Total Time Needed: 40 Mins
Difficulty: Easy

EASY CHEESY ENCHILADAS
The root of the word enchiladas comes from the word enchilar which means to add chilli, here tortillas are filled with a delicious tomato and bean sauce, and baked in the oven and served with a rocking cashew cream – this is a family favourite in our house!
Total Time Needed: 15 Mins
Difficulty: Easy
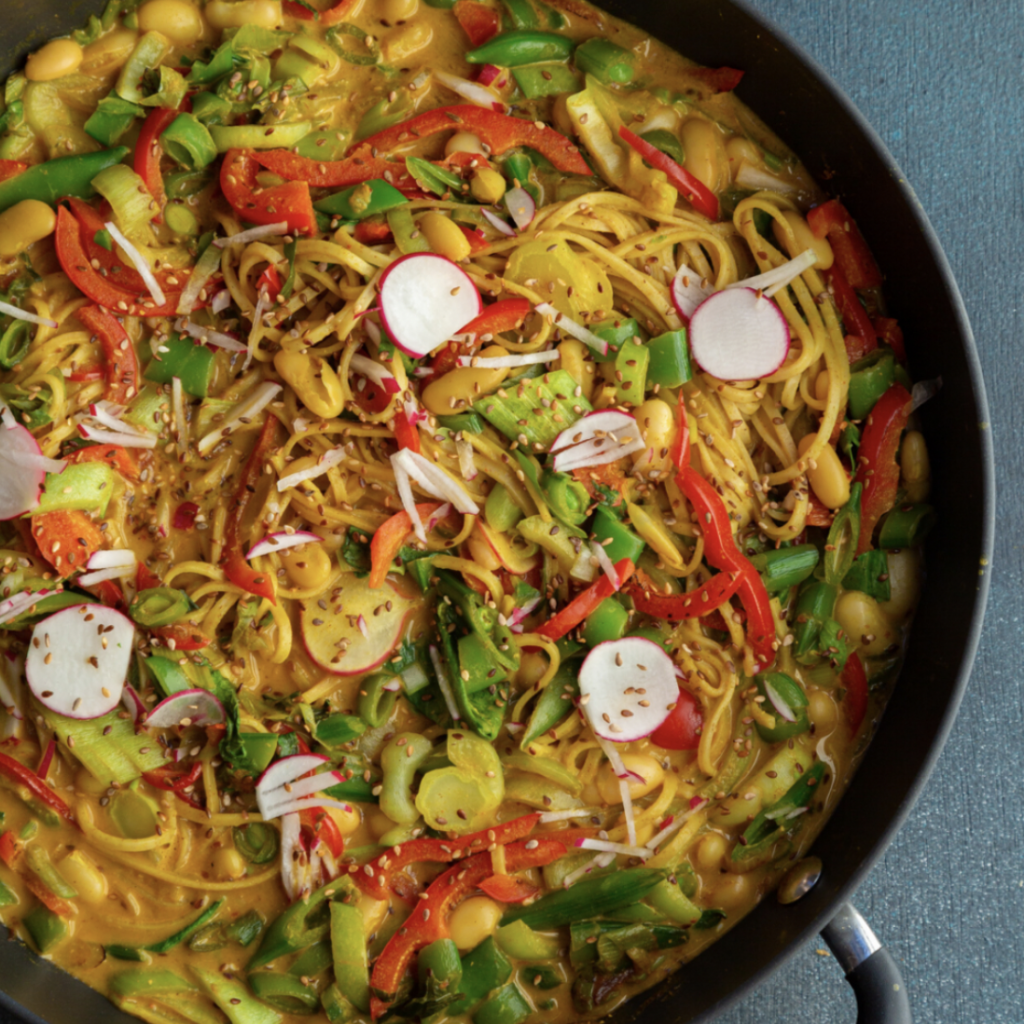
OIL FREE THAI YELLOW CURRY
Give this simple, easy Thai curry recipe a go. Being oil free it’s great for anyone going through menopause or perimenopause!
Total Time Needed: 15 Mins
Difficulty: Easy
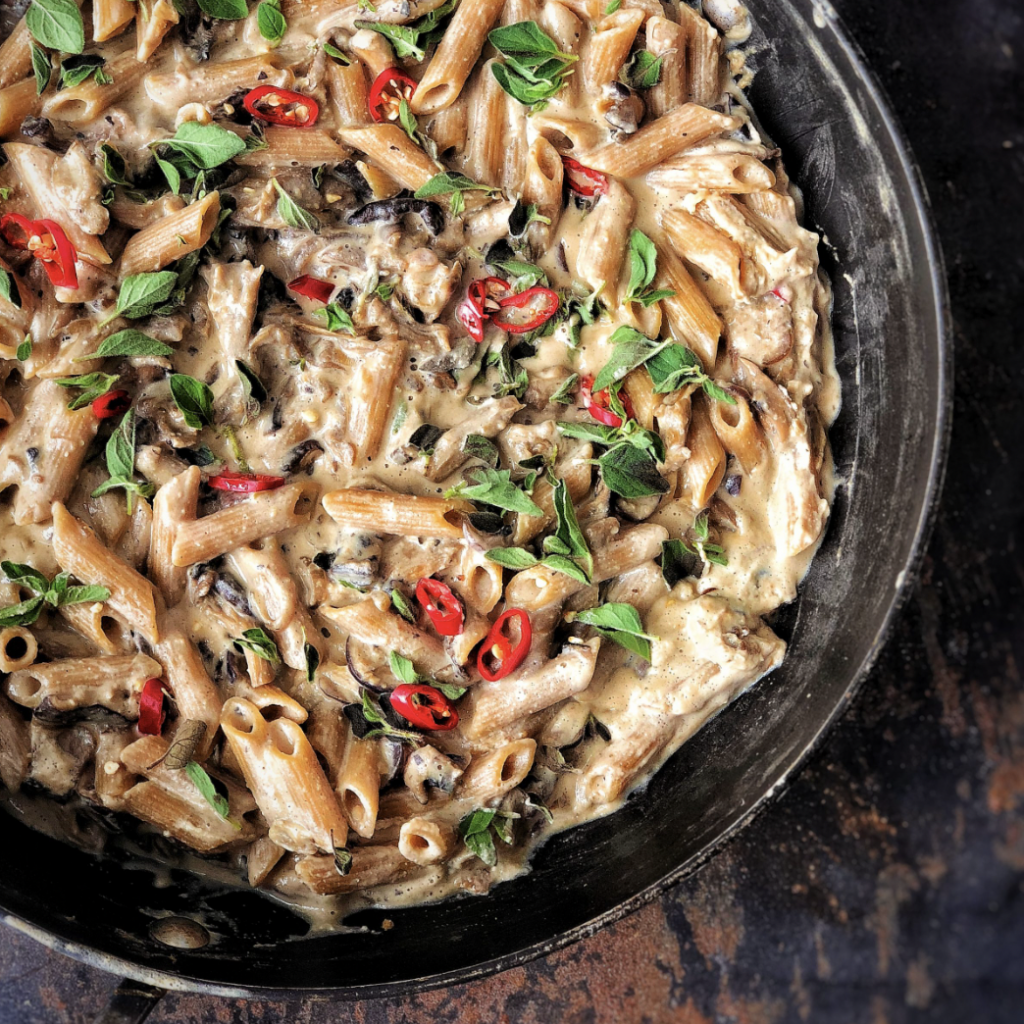
OIL-FREE CREAMY MUSHROOM PASTA
Easy to make, really simple and super tasty, this creamy, fried mushrooms pasta is well worth making…AND it has no oil! Huge win!
Total Time Needed: 15 Mins
Difficulty: Easy
The Bottom Line
It is never too early and never too late to bring in dietary and lifestyle changes that will help you manage menopause symptoms.
A fibre rich plant-based diet combined with exercise, good sleep hygiene, mindfulness and stress management can go a long way in combating menopausal symptoms.
For more expert advice in easing menopause symptoms, be sure to check out our course, Happy Menopause! Access the course via our membership platform on the app. Start your seven-day free trial TODAY!
Menopause is turning the page to a new chapter – a chapter to grow in wisdom, experience, and to become a better version of yourself. This is your time to thrive.
The Happy Pear Podcast
How often do your bare feet touch the earth; soil, grass, sand, stones?
Do all your shoes have rubber souls?
Have you ever heard of grounding?

Episode 94 – Clint Ober
For more than 20 years, Clint Over has dedicated his life to improving the health of everyone on earth.
In 1998, after a successful career grounding systems in the cable television industry, Earthing pioneer Clint Ober began investigating the potential to improve human health with grounding.
“I had suffered from chronic pain, unable to sleep for years. After I did this, I went to bed and for the first time since I could remember I woke up the next morning, I had slept through the night and the pain was gone.”
Today, he is the founder of Earth FX Inc., a grounding research and development company based in California through which he helped to develop, and patent, the first indoor Earthing products.
This episode will give you goosebumps and if you are like us you will be rushing off to buy your grounding bedsheets!
Enjoy!
Lots of Love,
Dave & Steve x
Available now from all good podcast providers:
To find out more about Mo and his work please check out: https://www.mogawdat.com/
Produced by Sean Cahill and Sara Fawsitt
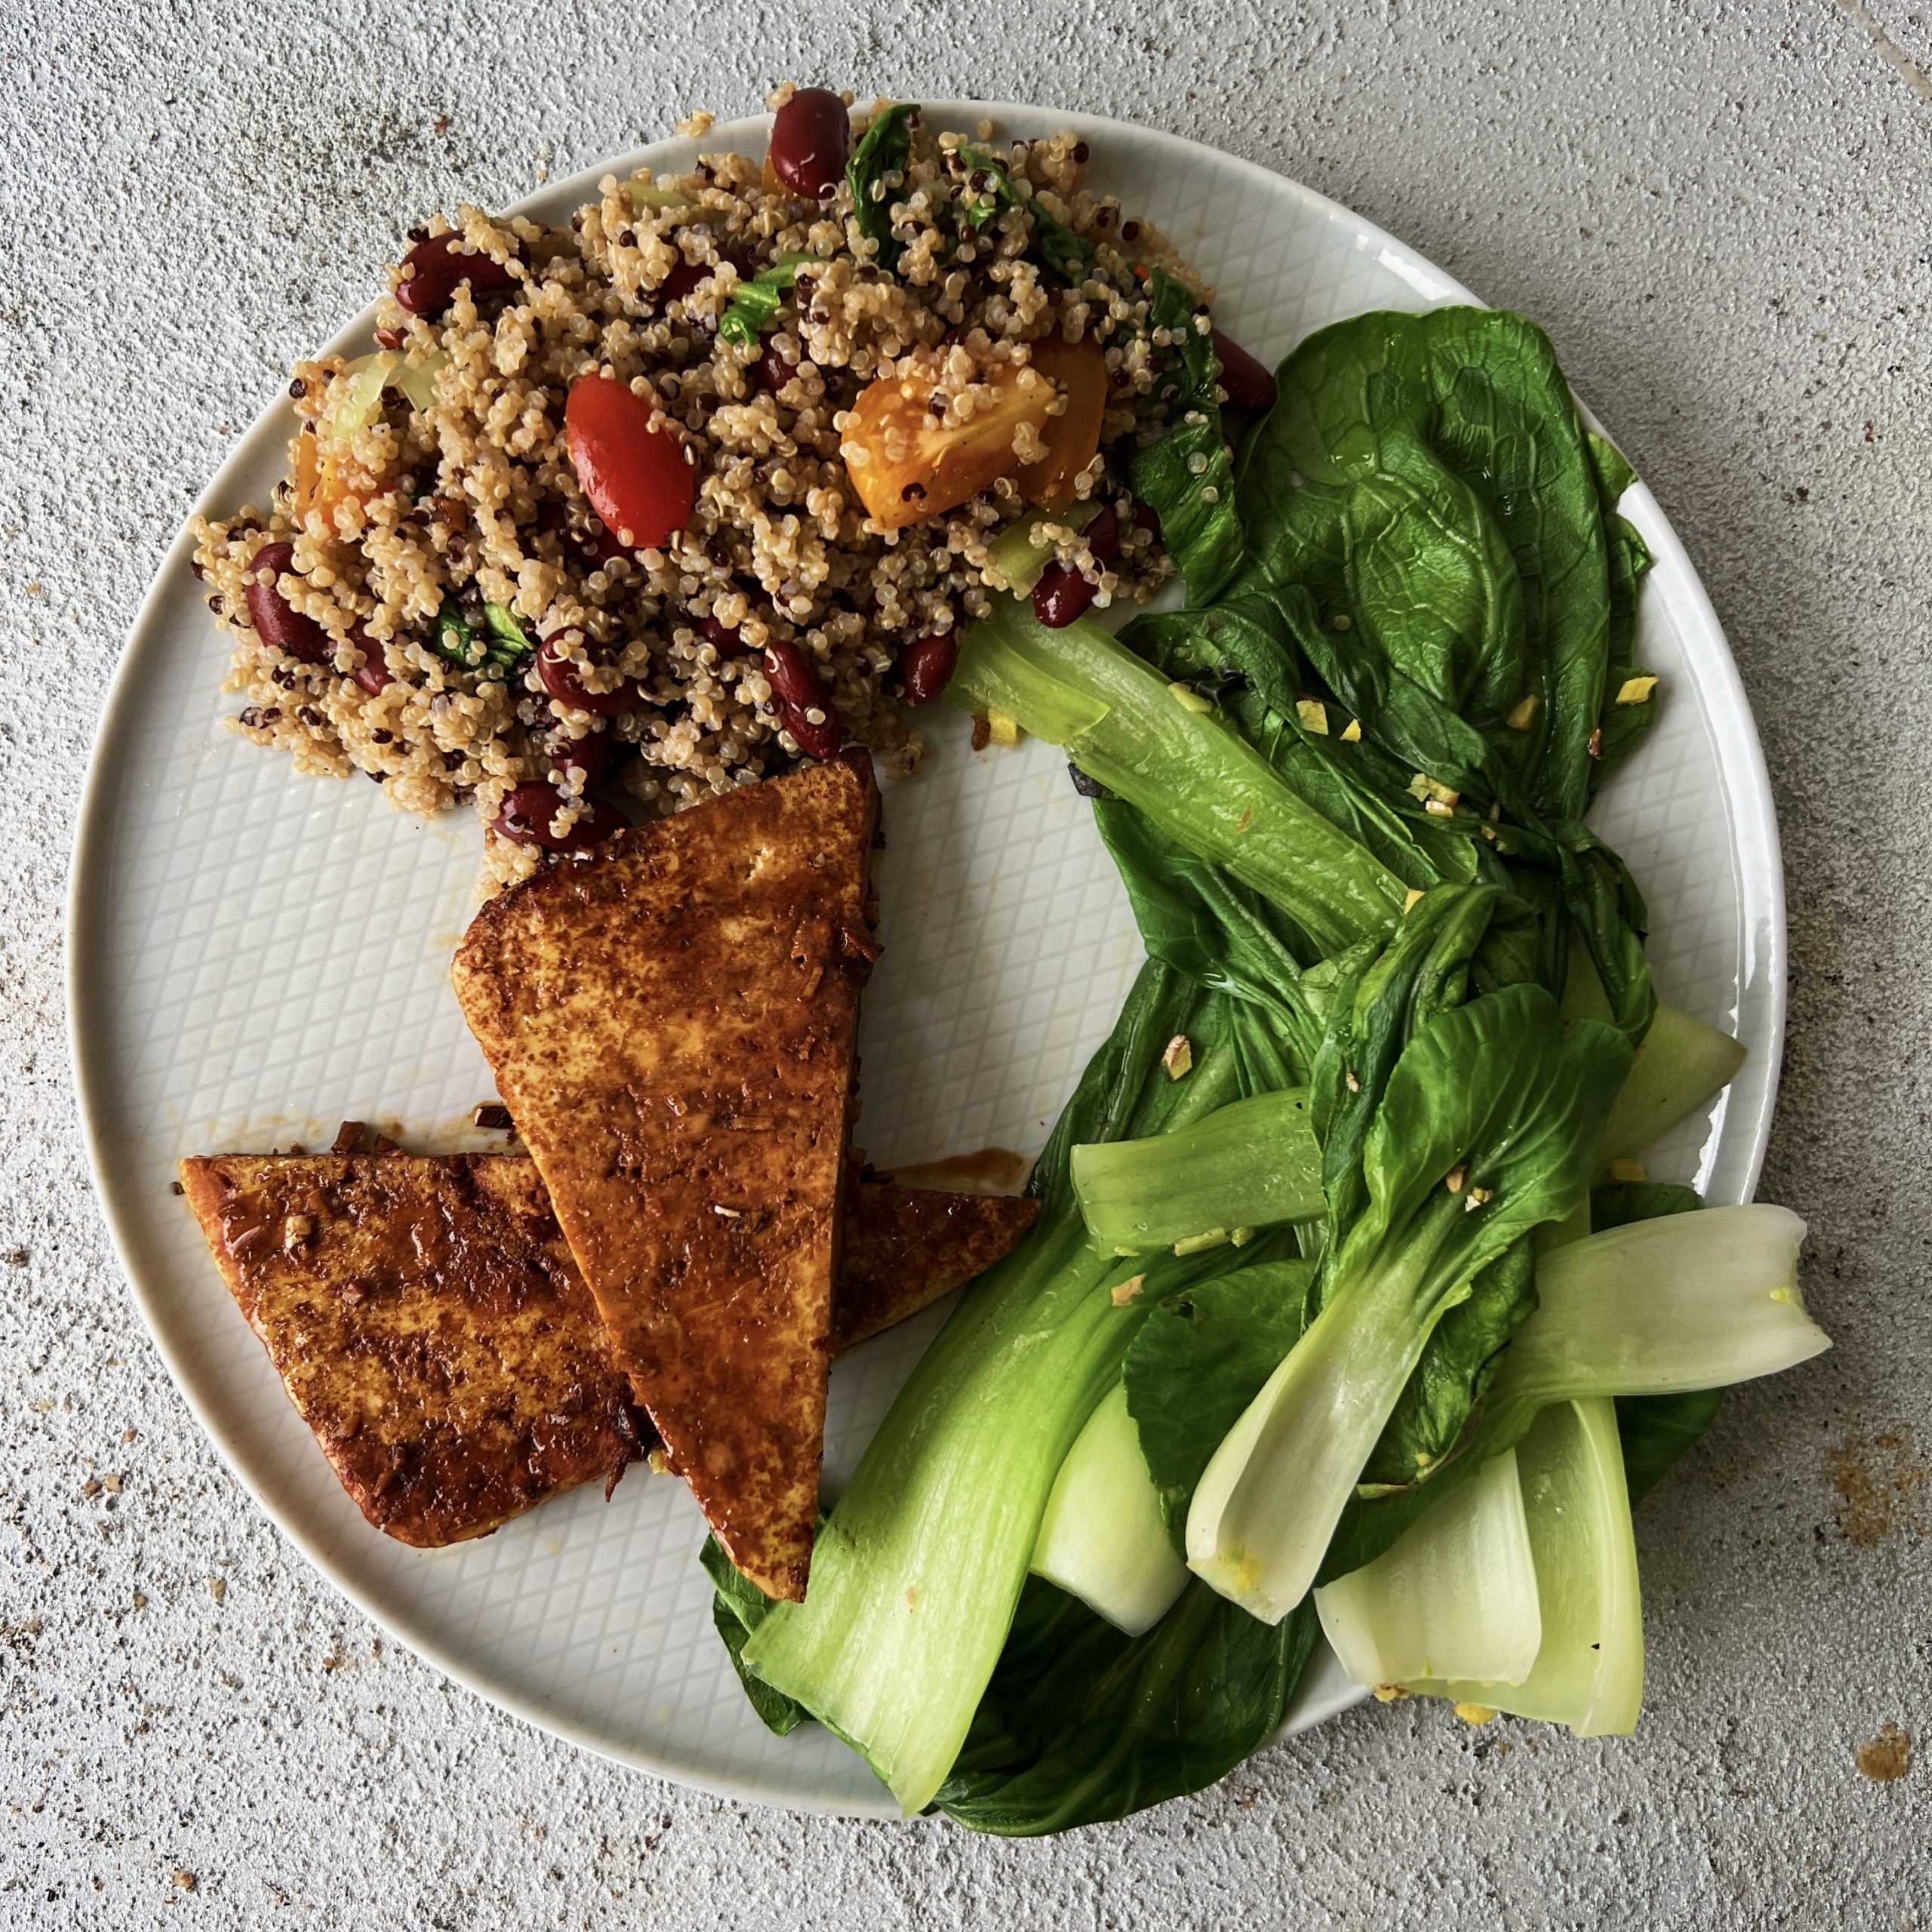
Pan-fried Tofu with Steamed Greens and Quinoa
Takes 15 minutes
Serves 2
Ingredients
- 100 g quinoa
- 225 ml water
- 100 g spinach kale, chard, or York cabbage
- 200 g firm tofu
- A small thumb-sized piece of fresh ginger approx. 15 g
- 1 small red chilli leave it out if you don’t like spice
- 100 g fresh tomatoes
- 1.5 tbsp sesame seeds
- 2 tbsp tamari
- Juice of 1 lime
- Optional: Nutritional yeast for serving
Instructions
- Put the quinoa on to boil with the water and a pinch of salt. Bring to the boil, then reduce the heat to a simmer with the lid slightly ajar.
- Once nearly all the water has evaporated, remove the pot from the heat, cover with a lid, and let it steam for 10 minutes. The quinoa will fluff up.
- Wash the greens, remove the tough centre veins, and roughly chop into bite-sized pieces. Steam for 3 minutes until softened but not overly cooked, turning occasionally for even cooking. Set aside.
- Chop the tofu into ½ cm cubes. Peel and finely chop the ginger, deseed and chop the chilli (or leave the seeds for more spice), and chop the tomatoes into bite-sized pieces.
- Heat a non-stick pan over high heat. Add the ginger and chilli, frying for 1–2 minutes. If it sticks, add 2 tbsp water and scrape up any browning with a wooden spoon.
- Add the tofu and sesame seeds, frying for 4 minutes and stirring regularly until golden on all sides. Add more water if necessary.
- Pour in the tamari, stirring to coat the tofu evenly. Turn off the heat.
- Add the steamed greens, tomatoes, and lime juice to the pan. Stir well and cook for another 3–4 minutes.
- Serve the quinoa in bowls with the tofu, greens, and sesame mix on top. Sprinkle with nutritional yeast if desired.